peter_m7uk
 RHOCaR Member
-
Posts
476 -
Joined
-
Last visited
-
Days Won
2
Content Type
Profiles
Forums
Events
Store
Community Map
Everything posted by peter_m7uk
-
Thanks, Bob. The annoying thing is that, having inspected the cork seal that came off, I'm starting to think it was actually okay! I put that on when I fully rebuilt the engine, so I was able to turn the block upside down, get everything cleaned up and take my time over it to do a good job. Like I said, there were other small leaks above it (dipstick, oil pressure sensor, oil filter), so it was possibly just wet with oil because of those On the exhaust side of the engine, the sump gasket was bone dry.. My reasoning, though, was that "I've got the engine out now, so while I've got this chance, I might as well fit an improved gasket to be doubly sure". (On the Lightweight, there isn't space to take the sump off without taking the engine out!) I will really kick myself once I sort the dipstick etc leaks, if the new gasket decides to blow instead!!
-
Hi, I used a cork gasket on my Pinto sump, but wasn't happy with it as I thought it was a bit leaky. Hard to be certain, though, as I think I had other leaks above it! Anyway, as my engine is out at the moment for a different reason, I thought I'd take the opportunity to buy a "competition" sump gasket from Burton and give that a try instead - https://www.burtonpower.com/sump-gasket-set-heavy-duty-ford-sohc-pinto-ft793kc.html. Apparently, if there is a leak, oil makes the gasket material swell at that point and should stop the leak. Thing is, now I've fitted it, it seems quite thin and I can see a wave along the joint, particularly in one place. I ran a feeler gauge there and there was a small but definite gap in the seal. Has anyone else tried this gasket and how was your experience?? I realise that the sump edge material can bend, also the bolts can distort the material when tightened, both of which can compromise the seal. I had an idea to use a small piece of wood of the correct size, with a rubber mallet, then go right around the sump edge tapping it to try and close all the gaps - Anyone tried something like that? What are the chances that the blue gasket material can swell enough to close a gap? Pete
-
I have heard others say that they left it off and never had a problem (one for 14 years!), so I am very tempted to remove it.. I will keep it, just in case fate teaches me a lesson and I decide that Ford got it right all along!
-

-
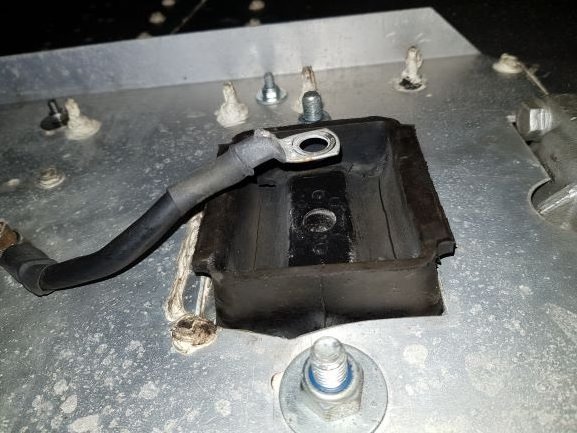
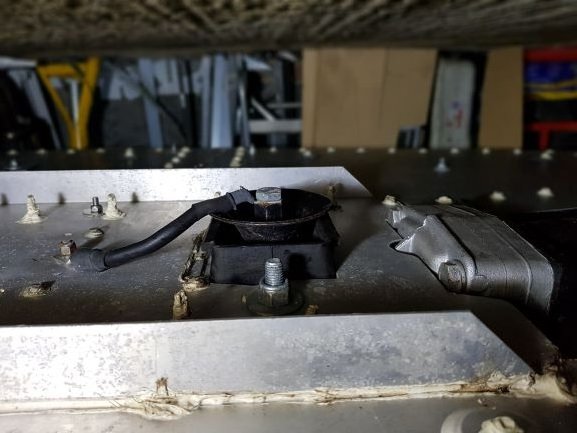
I have my gearbox out at the moment, as I'm going for a rebuild and higher 1st gear. Anyway, it made me think about the rear mounting point, which I know is the lowest point on the car after going over speed bumps! I kept it as on the Sierra, where a bolt with a long hexagonal end goes through a bell-shaped "washer", then the earth strap is screwed to the end of this hexagon. My question is why the need for this bell-shaped washer? Can't you just leave that off and put an ordinary set screw through the earth strap ring terminal and on into the gearbox? This would significantly raise the lowest point on the car, while still mounting the gearbox and creating an earth... Pete
-
Hi Bob, are you saying the E6 is a 6-speed box? Would you mind saying what that cost? And how long you had to wait for it? I'm not looking to spend thousands and wait months, I was hoping to spend under a grand and get it quickly so I can go driving through the Spring
-
Hi all, I'm about to whip my engine out as I think the spigot bearing may have gone. Not 100% about that, it could be gearbox related instead. So I was thinking, while I'm doing a major job, should I change the gearbox as well.. It came out of a 100,000 mile donor Sierra, all I did was clean and paint it, change the oil and output shaft seal. I thought it was okay, but it would be good to have a box that I can trust completely. Anyway, I looked at my options and found this company - https://www.firstmotion.co.uk/ford-type-9-close-ratio-2/ - who will do an exchange or rebuilt gearbox, with options for different ratios. The standard Type 9 has a 3.65:1 first gear and 1.97:1 second gear, which are obviously very different! Have any of you tried the 2.98:1 first gear? That is an option from First Motion. The idea is that you can hold first for longer when you accelerate, as the standard box means you have to go into 2nd quickly and then it's much higher than 1st, so it isn't so smooth through the gears. First Motion do other options, but it gets expensive pretty quickly! Opinions welcomed
-
Hello chaps. Yes, it's straightforward to remove the propshaft on the Lightweight, you just take the tunnel top cover off and access is easy. However, I've measured it up and I think I can get the engine out first without moving the gearbox! It may turn out differently when I come to actually do it, but I think if I take the pump and thermostat housing off the front of the engine to allow it to move forwards, I can get enough movement to release the gearbox input shaft. Then I just lift. We shall see!
-
I am facing up to the fact that, whatever the cause, this is probably an engine-out (or even gearbox) job I've never done that in a complete car, so just wondering about any tips?? It's bloody tight in a Seven, so I'm giving it some thought. Obviously, I disconnect exhaust, fuel lines, electrics. Removing the engine+gearbox together seems extremely difficult in a Lightweight, involving scuttle and battery tray removal, so I definitely want to avoid that. Separating the engine and gearbox also looks tough! I suspect, after removing the propshaft and gearbox rear mounting bolt, I need to jack the box up underneath, support the engine and bellhousing and remove the bellhousing-to-engine bolts. Then try to move the gearbox backwards up the tunnel until the gearbox input shaft separates from the engine. At this point, with engine mounts off, I can freely hoist the engine up? Cheers
-
It's a brand new clutch, Rich, so that's very unlikely and it feels nice and strong, but thanks for the suggestion
-
Thanks, Sparepart, I will try that. The suggestion I'm getting on another forum is the spigot bearing in the end of the crankshaft - A guy said he had the same symptoms when his seized. I suspect, whatever it is, it's not a fun fix
-
To clarify, the noise seems to happen at the point of clutch bite as the pedal is raised, whether in neutral or in gear.
-
My Robin Hood is running a 2.0i Pinto with Type 9 box. I'm finding that everything is fine and smooth when cold and warming up, but once hot, the gearchange can become notchy and releasing the clutch makes a worrying clunk! When I'm changing gear after about 20-25 mins of driving (nice and hot), it decides to clunk, particularly from 1st-to-2nd and 2nd-to-3rd. If I stop the car, put it in neutral with engine running and move the clutch pedal in and out, there's a clunk when I release the pedal. With the engine off, no clunk. It seems strange that the problem takes so long to appear, so it seems heat-related. I shielded the clutch cable so it can't get hot and expand. I adjusted the clutch so it's definitely disengaging gears when hot if I press the pedal halfway and beyond. The Type 9 had done 100,000 miles when I took it out of the donor with no gearbox problems. All I did was change the oil, change the output shaft oil seal and fit a new clutch release bearing. Any ideas, folks?
-
Thanks, Richyb, appreciated
-
Just an update after I called the DVLA. The answers were As the donor is 1989 and I'm looking to retain the original reg plate, I was advised to leave V55/5 "Date of registration" blank and put an explanatory note in with the forms to the DVLA For the V672/1, I was advised again to leave Current Registration Number blank and include an explanatory note Apparently, it's only in Northern Ireland where insurance or cover note is required before paying the tax. Sparepart, I used a magnificent invention called "a trailer" that you may have heard of...?
-
Thanks! But I don't agree about the old posts. They definitely don't belong in the section dedicated to the Lightweight chassis problems. Would we keep posts on wiring in the mechanical section of the forum, for example? Yes, maybe no one spotted this error for a while, but it's not helpful to have a disorganised forum IMO
-
Thanks all! Yes, I am one stubborn sod Obviously, I had time to do a lot of checking before the IVA
-
After passing IVA yesterday I've been filling in the registration forms, but I'm not clear on a few things, if anyone could help, please! My kit car is based on Sierra running gear from a complete donor, for which I still have the V5 with 1989 registration date. I hope to get an old F reg age-related plate, definitely want to avoid a Q (I have receipts/photos etc). When I filled in the V55/5 registration application form, I needed to give "Date of original registration" and "Date of registration in the UK". I found something online saying I should use the IVA test date for both. But then I realised that might be for a build with all-new components! So do I use the donor date in my case?? On the V627/1 built up vehicle report form, I filled in make/model/colour etc for the kit car not the donor, is that right? There's a box for Current Registration Number. Do I fill in the donor reg, or leave that blank? (I added all the serial numbers etc for components) Can anyone confirm if I need to be insured before I can pay for tax? They appear to want a certificate or cover note for this. This seems a bit chicken-and-egg, as I don't have my new reg number so can't give that yet, nor do I know how long registration will take so what would the insurance start date be?! Cheers in advance
-
I realise the Lightweight created some controversy in the past over the use of an aluminium monocoque, but I'm delighted to say mine passed the IVA at Gillingham yesterday My mods consisted of Steel plates at the lower seat belt mounting points The same steel plate inside the propshaft tunnel is used to mount the diff at the front A right angle bracket at rear of diff used to bolt the rear diff mounting point to top of the enclosed ali box Steel plates and sheet under all roll bar mounting points for load spreading into chassis Ali right angles added wherever ali square box sections (wishbone mounting) meet the chassis Pedal box mounting strengthened using steel right angle sections Extra ali at gearbox rear mounting point to chassis I think that's everything (might remember something later)! That basically covers the areas of concern, where the drive train torque and suspension transmit load to the chassis, where the seat belts are mounted, plus the pedal box. Cheers
-
Gents, I'm delighted to say that, after over FIFTEEN years, I finally passed the IVA yesterday at the first attempt! In that time, the test was renamed from SVA to IVA, I've had an operation on my heart to close a hole, I've made a bunch of mods and redesigned many parts of the car. But I've done it, wahey!! Now I can go drive and get on with the rest of my life! Thanks for all the advice over the years, Rhocar has been great Pete
-
For those suggesting an MOT, thanks for the advice, but if I can build an entire car I insist that I can set a pair of headlamps by myself too !! I'm going to take the adjustable spanner I use for the headlamps to the IVA, but my understanding is that strictly speaking I won't be able to use it due to Covid rules....
-
Thanks for the info, Ian! I've been reading around this more and I finally understand the percentages - They are a gradient. So the 1% line depends how far you are from the wall. For example, at 1m from the wall, the top of the beam must 1cm below the zero. At 7.62m from the wall, the top of the beam must be 7.62cm below the zero line. And so on. Now I understand the rules, I can work it all out on a wall regardless of distance, but I'll try to keep to the 25 feet mark if that's what they use at the IVA test
-
Hello chaps, thanks for the answers. The thing is, if I do it outside my garage, I save all the hassle of trailering a car to an MOT (I'm not going to drive it there!), plus the usual £40-50 fee! Surely someone understands the regulations out there? If my description is right, I'm happy to do it that way
-
Hi all, I've seen the IVA regs for headlamp aim, with the diagrams showing vertical and horizontal percentage tolerance bands. I understand that this can't be adjusted in the IVA test at the moment, due to Covid restrictions, so I have to get it right first time! First of all, I'm not sure I understand the definition of the tolerance bands, can anyone help? My educated guess is that the zero-zero point is measured at the centre point of the circular headlamps and halfway between the two? So if my headlamp centres are 680mm off the ground and 800mm apart, then the test equipment will set the zero point on a blank wall at a height of 680mm halfway between the headlamp centres? My headlamps are less than 850mm from the ground, so the top of the beam must be between the 0.5% and 2% lines. 1% of 680mm is 6.8mm, so I think that means top of beam must be 3.4mm to 13.6mm below the 680mm mark. Am I right? The beam breakpoint must be between 0% and 2% lines to the left. So if my headlamps are 800mm apart, the breakpoint must be between 0mm and 16mm to the left of the centre line? If I put those marks on a wall opposite my garage and turn the headlamps on, should that be a decent approximation to the IVA test? How far away should the front of my car be from the wall? Thanks! Pete
-
So not necessary to pass? Thanks for the tip, gents