AndyW
 RHOCaR Member
-
Posts
373 -
Joined
-
Last visited
-
Days Won
5
Content Type
Profiles
Forums
Events
Store
Community Map
Everything posted by AndyW
-
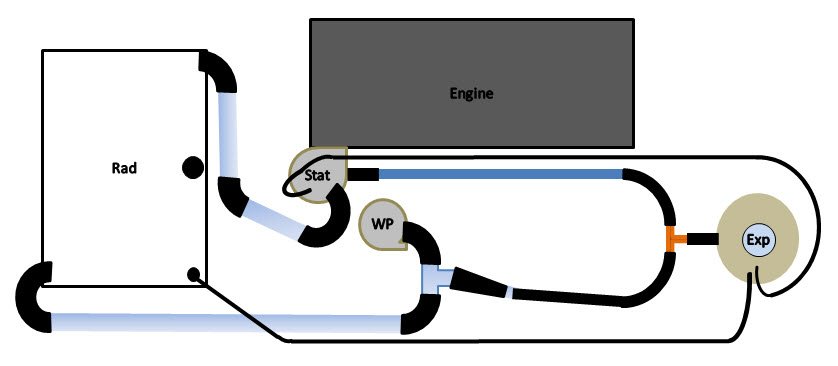
Looking at the photo of your engine bay, is that the clutch cable in a silver sleeve going across the top of the engine? If so, it's too short and will make the entry points to the pedal box and the engine plate ahead of the clutch lever, very sharp. That can't be helping your heavy clutch. You need to make the cable run into the entry and exit points as straight as possible, which means looping it around the front of the engine. And as Al says, make sure you have a linkage that allows a straight run onto the clutch pedal as that's where they normally fray and snap. Also I see you have the original RH coolant plumbing with the small loop return pipe (or heater loop if you have one) going across the top of the engine into the centre of the radiator. We found this leads to slow engine warmup so I did a redesign as per the attached diagram which is more like the original Rover system. I now get a 7-10 minute warm up and no problems with overheating.

-
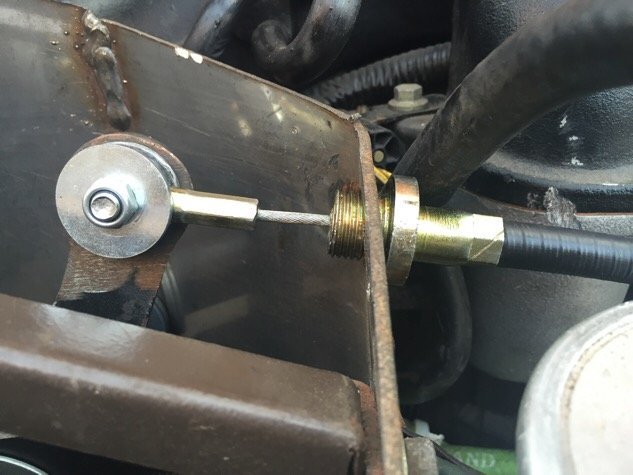
Yes, it’s a Quinton Hazel no. QCC1303 for a Fiat Ducato diesel 1982-86. Think it’s about 1700mm long with eye for pedal end and threaded rod for clutch lever. I lubricated mine with ptfe spray before fitting to try to ease the heavy clutch.
-
Ford Sierra. Usually 7 inch with tripod pushin shafts and drum brakes. Superspecs seem to have different final drive ratios.
-
-
Filling and bleeding these systems is always difficult as there are several high points that trap air, particularly the top hose. On mine I separate a join in the hoses and alloy pipes between thermostat and top radiator, and use a funnel to slowly fill the system there. Then run the engine with the cap off the expansion bottle to burp any air out. The mod we’ve found for quicker warm up and better operation of the thermostat, is to remove the 20mm hose into the top centre of the rad, and route the hose from bottom of the coolant bottle into the bottom hose before the water pump. One other thing that looks odd in your diagram is that the turbo has a 20mm hose in from the thermostat but only a 6mm air bleed hose out back to the coolant bottle. I can’t see how that would circulate enough water through the turbo for cooling, so might be adding to your under bonnet temps. I’m away at the moment, but when back at the weekend I’ll look at my manuals and see how Rover plumbed the turbo. Andy
-
Hi Dean, where did your cable break? When mine went a couple of years ago it was where the inner cable enters the pedal box, as it’s at an angle to the outer cable where it exits the box and frays. I made an approx 30 deg angled spacer to hold the ferrule of the outer cable at the right angle to the pedal box wall. The clutch cable now goes downward toward the steering column rather than straight out. Sorry I haven’t got a picture of the spacer itself but this photo shows the straight line path it makes the cable go. I lubricated the inner cable with bike chain ptfe spray when I reassembled it, and also put some exhaust wrap around the cable where it goes under the exhaust headers to prevent it overheating and drying out. I’ve not had any problems with the clutch cable since then. But like yours my clutch is still very heavy. I’ve not found a solution to that although I’m told a longer clutch fork can help. Cheers Andy
-
On my Superspec I reinforced the seat mounting bolts through the floor pan with 40x40 4mm square steel washers from B&Q.
-
My Superspec wiring nest was like that. I bit the bullet last year, removed the dash and scuttle and rewired the whole lot. A week or two’s work but I now understand the wiring and everything is on separate circuits with fuses and relays.
-
Glad it made an improvement to your car as well.
-
Yes please Peter. One for me.
-
It can go anywhere between the radiator and the water pump, although the closer to the pump the better to minimise the amount of water in the warm-up loop. My car had a U hose from the water pump to a long alloy pipe coming from the bottom front of the radiator. The U hose had a wear mark from rubbing on the exhaust manifold, so I replaced it with two 90 bends and put the Tee piece between them.
-
Afraid I can’t make this weekend. Maybe next time.
-
I think I used 17mm ID hose for the pipe work as that fitted nicely onto the metal water rail, and also goes nicely over a 15mm copper plumbing tee for the joint under the bottle. I also replaced all my previous mish-mash of different sized hoses to the top and bottom of the rad with 32mm silicon hoses and alloy pipes. Avoids having to use reducers to match everything up.
-
Hi Dean, It looks like we've all done it in a similar way. I couldn't find a T piece with the right size of spout, so I used a 32/32/25 mm alloy tee (from ASH). I inserted this in the bottom hose before the waterpump. On the 25mm outlet I put a 25>19 mm silicon hose reducer, which connects to some 17mm heater hose with a plastic joiner. This goes to a T piece under the expansion bottle with a short length up to the bottle, and another length round to the end of the water rail by the distributor. As my water rail was in good condition I left it on, as it also holds the dipstick tube. Andy
-
Hi Peter, many thanks for the offer, but I'll defer that one for now. Since I cleaned up the front calipers and sliders, and replaced the seized rear drum cylinders, the overall braking balance is vastly improved, and I'm not seeing the front lockup now. So maybe I've fixed it. I'll drive it for a bit and see how it feels before I get into checking disc runout.
-
Solved the issue with the lack of wear on the rear brake shoes. 3 of the 4 pistons were seized in the cylinders so I had no rear braking effort at all! Surprised to find that my local motor factor had some Sierra drum brake cylinders on the shelf, so a quick replacement and that’s fixed. Now to get back to investigating the front disc lockup.
-
Have to admit that I found the shoe adjuster on that wheel looked to have jammed. The ratchet teeth on the cam were filled with something like paint (not rust) which was stopping it moving. Cleaned it up and it now moves ok, so maybe I’ve rectified that issue. All four wheels have their own brake pipe from the master cylinder, so the locking wheel isn’t shared. Is there an easy way to check disc run out as I don’t have a gauge? I can check the thickness at various places round the rim, although the discs and pads have only done 6k miles so shouldn’t really be worn.
-
I’ve now fully stripped and checked over my brakes - removed and cleaned the front callipers and pads, removed rear drums and shoes, cleaned and reset the adjuster mechanisms, put copper grease on all contact points, and changed the brake fluid and bled the system. The discs and drums were not rusty or scored, the pads and shoes were all in good condition with plenty of material left, and all the brake cylinder seals looked good with no leaks, although I didn’t check that the cylinders were free to move. All the brake pipes, unions and rubber hoses also looked good. A test drive afterwards showed there was little or no improvement to my original issue. The left front brake still locks under medium-heavy braking. Oddly the brake shoes on the right rear had hardly any wear at all as they still had sanding marks on the surfaces presumably from when the last owner fitted them. So it looks as if the right rear brake has not been working much (or at all?). Would this have any affect on the diagonally opposite front brake? Any other ideas I can check?.
-
Hi Ivan, Al will correct me if I'm wrong but I think he's still running the standard RH cooling system with the heater return pipe over the engine to the top centre radiator connection. He hasn't yet got round to changing to my redesign.
-
You need to have a feed from the bottom of the expansion bottle back into the cooling system. That allows the system to refill when it cools. The small diameter pipes off the side of the bottle are really only there to bleed air out the system.
-
Sounds about right Dean. I've got an 88 degree water thermostat and the engine generally runs around 82 - 92 when warmed up. I've got my fan thermostat set to kick in at about 92, which it only does when stationary or in slow traffic.
-
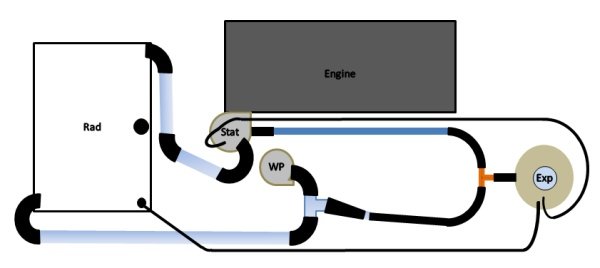
This is how I re-plumbed my coolant system.
-
You are correct that the 3 pipes off the thermostat housing are for top hose to rad, metal rail over exhaust to feed the heater and expansion bottle (your 3rd photo), and the small hose is for expansion and air bleed back to the expansion bottle (your 1st photo). In the original plumbing for my Superspec, the heater return pipe was tee'd from the bottom of the expansion bottle, and went back across the top of the engine to the top of the radiator. I did away with this pipe and instead plumbed the return into the bottom hose near the waterpump. This means you are not circulating the whole of the cold radiator during engine warmup. My car now warms up in less than half the time. You need to have 2 circuits in the cooling system, which are switched by the thermostat: - main loop, large capacity, large bore hoses, from top of engine and thermostat through the radiator and back into the water pump. This is for main engine cooling. - secondary loop, small capacity, small bore hoses, also from top of engine and thermostat and returning back into the water pump. This is for quick engine warmup when the thermostat is closed, and also feeds the heater. If you don't have a heater (I don't) you should connect the heater feed and return hoses to make a small loop back into the bottom hose to bypass the radiator and give you quicker engine warmup. In the photo of the blue Rover engine it looks like they have changed the radiator and also done away with the expansion bottle. The top tank on the radiator allows for expansion, and the rad cap looks to have an overflow hose either to a catch bottle or venting to the ground. I guess that's another way of doing it, but I'd still prefer to have a proper expansion bottle for the pressurised coolant system. Also they seem to have plumbed the heater return into the air bleed on top of the thermostat housing. That doesn't look right to me - it should feed back into the waterpump intake.
-

HELP!! Building a Super Spec From Rolling State
AndyW replied to oldskoolford's topic in Fitting & bodywork
When I rewired my Superspec last year I built a fuse and relay board from an ABS sheet - actually the base cut from a large rectangular paint bucket! I looked at mounting it on the inside of the passenger footwell either on the back of the firewall or on the side of the scuttle, but decided access would be too difficult. In the end I put it under the bonnet lengthways next to the coolant bottle and battery on the nearside of the engine bay, and fixed to the firewall and battery tray. No cover on mine but the two led fuse holders have clip on clear covers for protection. -
HELP!! Building a Super Spec From Rolling State
AndyW replied to oldskoolford's topic in Fitting & bodywork
I've got 2 RH brochures that indicate the first batch of Superspec kits (2003-2004) were sold as rolling chassis with Rover engine, gearbox, diff, floor pan, suspension, steering and wheels all fitted. Later they were also offered as separate unbuilt chassis and with a choice of engines. If you look at your engine number on the block under the rear exhaust port, you can work out it's approximate age and which Rover car the engine would have been made for. See post... https://www.rhocar.org/index.php?/forums/topic/24891-rover-engine-codes/&do=findComment&comment=377578