James Agg
 RHOCaR Member
-
Posts
26 -
Joined
-
Last visited
Content Type
Profiles
Forums
Events
Store
Community Map
Everything posted by James Agg
-
Ooo that looks like it may be correct, and your breather nozzle is placed in a more sensible place than mine. My breather nozzle is right next to the filler hole which makes the possibility of installing a sleeve there somewhat difficult… my next step is to drain my tank, drop it out and measure/compare to your picture. I will let you know - I may well be interested in taking this off your hands
-
From what I’ve been able to see of my tank in situ, I do believe that the tank you’ve pictured is one and the same as my tank although looking more closely, it looks like the holes in the top on mine are more towards the back of the tank than the front. Interesting… I’ll have to see what can be made I think
-
Update - I’ve spoken to Kitspares and they can confirm that the 2B tank doesn’t fit. They did however say that if I drop the tank out and measure up its dimensions and take some pictures, they might be able to fabricate one along the lines of the original tank. That’s worth knowing!
-
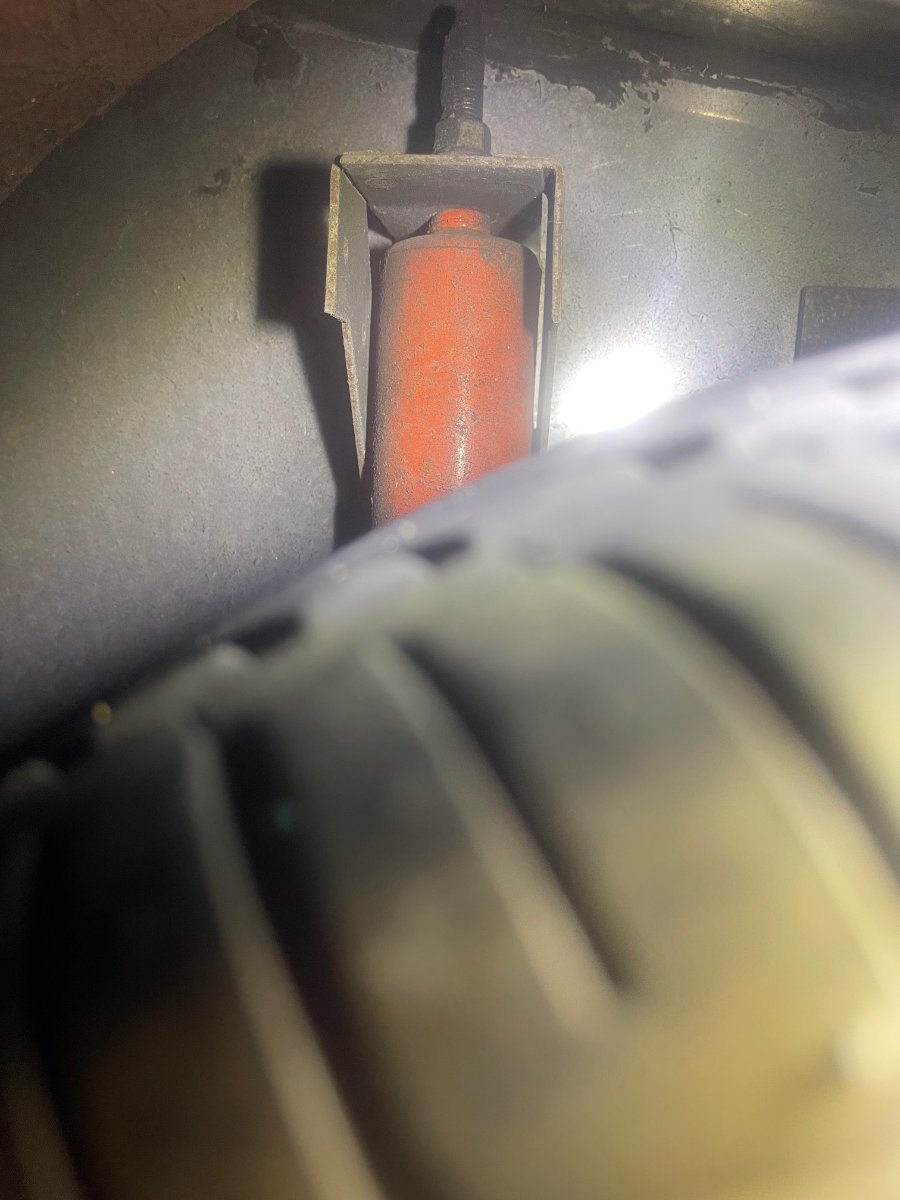
Hello to all you hoodies! I’m not sure if I’ve chosen correctly by posting this in fitting and bodywork, but this is the closest match I can think of… I previously posted about the potential that my fuel filler neck arrangement is allowing a slight leak causing a strong smell of petrol. Well… I just stopped off to fill up with fuel (annoyingly on my way to my MOT) only to come back out after paying to find that quite a lot of petrol was pissing out underneath the car. It slowed and then stopped doing so after a short amount of time which suggests that the leak was high up. I checked in my boot area and there was a little wetness, but not as much as I would expect considering the amount I saw coming from underneath the car. In addition, my fuel gauge would normally read bang on full after filling up to the neck, but it was almost an 8th of the tank down from full, which leads me to believe that I might have a leak further down. Rather than messing around trying to make the existing tank work with a better filler neck arrangement, I’m beginning to think that a new tank would be for the best given that there’s every chance that it’s got a problem further down too. Kitspares have a 2B tank for sale. My kit is a MK2 Sierra kit with stainless monocoque chassis. My question here is does anyone know if the 2B tank for sale on kit spares fits the MK2 stainless monocoque?
-
All superb info chaps. Thanks. I will start to formulate a plan, do a proper wrecky of the job and then see how I get on. Will keep you all posted on how I go
-
That is all amazing! Thanks! Much easier to find parts referenced for a KA. I think my sender grommet is the same in that the sender rests on the top of the grommet inserted into the tank hole, and then it’s bolted down to form a tight seal. The grommet was not looking all that great when I changed the sender, so I could use one of these for the sender in any case, just to be belt and braces. Re your filler neck fabrication, I’ve found a pre-made one… https://www.carbuilder.com/uk/fuel-filler-neck I might try what you’ve done with this, or possibly take it to a welder given that I have the complication of needing to avoid or even move the breather nozzle. Do you happen to know if the standard RH tank dating back to the old monocoques is aluminium? Or is it stainless? It looks a bit too shiny to be aluminium, but then again, it might just be highly polished
-
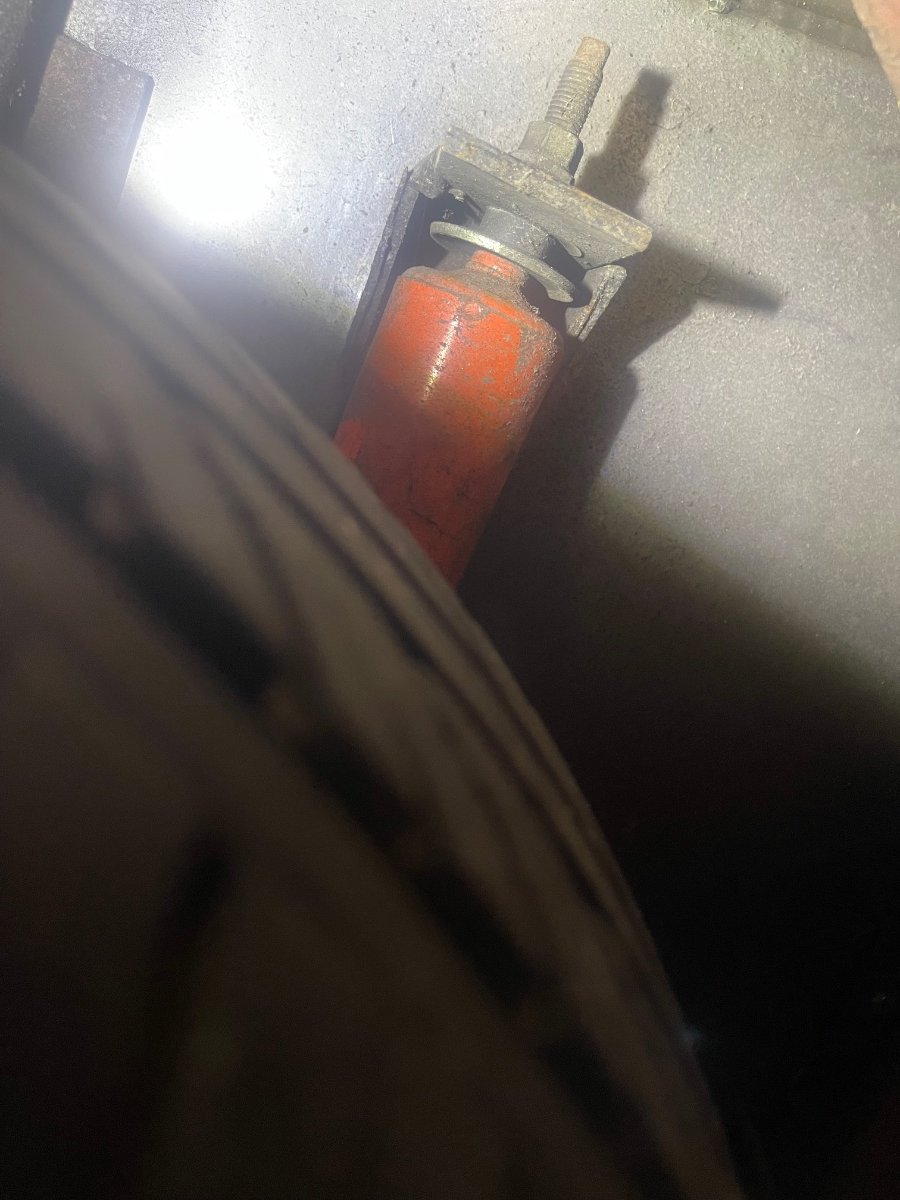
Nice work Sparepart. I very much like your solution. I would do the same except I have three problems. 1) I do not possess a welder 2) I’m no great shakes at welding - I’ve only done it once in my life a very long time ago 3) My tank seems to have something yours doesn’t which is the flared metal nozzle for the breather pipe bolted into the tank right next to the hole containing the filler neck and the grommet, meaning that I wouldn’t have the space around the hole to do this. I imagine with your setup you could use a completely fresh filler neck hose and fresh cap and orifice solution rather than sticking with a butchered Sierra one, although your solution is pretty neat for using the original bits there. If I found a way around the problem of the metal breather nozzle at the tank end that enabled a bolting of a metal shoulder like you’ve done, I would consider changing the cap/orifice setup just so that I could have the breather nozzles matching in diameter at both ends as that would mean ditching the Sierra breather pipe that has different sizes at each end. Not a straight forward solution… I imagine you had to drill into the tank for your screw holes/rivnuts (or whatever you used.) That’s pretty nerve racking with the whole fuel vapour risk and of course ensuring that the tank goes back together swarf free.
-
Good thought! That might work. I saw a picture of how the mounting is done on the 2B the other day and I think with the reinforcement plate on my bathtub, it’s much the same principle. I will investigate…
-
Yeah I think this could be much of what’s going on with mine too. My breather goes from the neck to a flared union on the tank right next to where the filler neck passes the grommet into the tank and it looks to be too short and so perhaps not creating a good seal around the flared end. Not an easy part to source as the Sierra ones will all likely be too short also as I don’t believe mine was cut down, and to make matters worse, the breather pipe has different inner diameters at each end and so it may be that I have to find somewhere that does custom made fluoro lined silicone pipe work. Where the neck/fuel filler orifice screws onto the back panel of the car, it all looks a bit bodged currently. Now to figure out all that I need and where to get it. I have found a replacement grommet but it’s billed as for an RS Cosworth (same part number) and of course £45 for a relatively simple ring of rubber. I guess I’ll have to dig into my pocket for that…
-
The nut on the underside of where the Sierra rear subframe mounts to the underside of the bathtub right behind where driver sits and same on passenger side. I think I’ve fixed it. Ride height was too low at the front, but I reckon I will still find the odd speed hump with that nut even with the front ride height lifted
-
Hi everyone. Another post from me as I’m very much in kit car mode right now. Ever since I got my RH S7 Mk 2 it always had quite a strong smell of fuel coming from the boot. There isn’t really any boot liner to write home about covering things like the sender, the neck and the breather, presumably because this car was built pre SVA. The problem I’m finding also is that the smell of fuel gets really quite strong when I go around corners and takes a very long time to clear and the problem seems to get less intense as my tank gets used. I have multiple suspicions of the cause based on this. I initially suspected my sender as I found that the send and return union welds had broken and I imagined that some fuel might have been seeping from these broken welds. I replaced the sender as my gauge wasn’t working and this fixed the gauge, but I was hoping I’d kill two birds with one stone, but alas, the fuel smell is still potent, particularly after fill up. The carb air filter gives off a slight fuel smell, but nothing on what is in the boot… I’m chasing multiple possible issues that may be causing this and I’m thinking that given the age of the kit, I’m considering all new lines, electric pump to replace mechanical (mech pump possibly leaking slightly), new pressure regulator, an overhaul of all things carb and seals if not an upgrade someday. I am however having a head scratcher with the fuel filler and breather setup that I suspect to be the main culprit. I feel fairly certain that this is where the majority of the boot smell is coming from given that the problem is worse on a fuller tank and going around corners - perhaps the breather and/or the neck and accompanying seal have a leak? The problem is, these are standard Sierra, and given the age of my fuel tank, it only has a hole for the filler neck grommet to go into, which then receives the standard Sierra plastic neck. As for the breather, it doesn’t appear long enough to route fully home onto the tank union which may well be the biggest issue. Does anyone know where one might get neck, breather and grommet replaced or fabricated without paying RS Cosworth tax? Alternatively something that works instead of? I notice that newer tanks have a shoulder for a generic neck to slide and jubilee clip onto. I would have one of these welded on if it weren’t so dangerous to weld a fuel tank… Reluctant to go down the route of a different tank if I don’t have to given that I don’t really know what would fit and of course the cost if it’s not a necessary one. Anyone had the same issue with a MK2 tank setup? Keen to get to the bottom of it all as my wife and I are tired of being high on fumes
-
Thanks Ian, good thoughts. The Ply sounds a bit ominous but I can see how that would help. I am also slightly puzzled by the spacer hat on the top of one shock but not on the other. It explains why one wheel arch has less clearance than the other given that the hat side is the one with more clearance. Makes me want to go to coilovers even more… The spring assisters look interesting - I knew not of the existence of such a thing. It is possible that the springs on there are knocking on and have compacted somewhat too. Today I raised the ride height at the front and re-tracked accordingly and not only is the steering feeling generally better, it would also appear on an initial test drive that the car isn’t scraping now in places on my test route where I’d normally expect it to. That’s not to say that it won’t ever scrape again on a particularly big pit in the road or errant speed hump as that trailing arm mount is a real nuisance of an appendage and is bound to find something again at some point. I ought really to replace the bolts/nuts given the amount of road grinding they’ve done
-
Ok, a couple of interesting finds having gone out to snap these pics… 1) Driver’s side wheel arch clearance is about a finger width’s worth tighter… Having examined my photos, I just noticed that the shock on the driver’s side doesn’t have some sort of spacer at the mounting point that the passenger side does have… odd! That may have something to do with it all… 2) I’ve noticed having looked around the car properly at ground level, it is looking a touch nose down at the moment. I did the front coilovers about 3 years ago now and I wonder if they’ve generally compacted slightly and need a slight lift to get the car back to a more level position. Will play with this tomorrow… I’m still interested in a coilover conversion for the rear though!

-
Hello everyone. Apologies, I’m sure this subject has been posted about hundreds of times before, but I can’t seem to find a thread and so I’m asking the question again… My RH S7 Mk2 is running the standard Sierra rear subframe/suspension where the springs are sandwiched between the lower wishbones and the underside of the stainless tub. The shocks are then independent of the springs and mount to the sidewalls of the tub. The issue I’m getting is constant scraping of the bolts that mount the trailing arm of the subframe to the tub right behind/underneath where driver and passenger sit on each side. Me being heavier than my wife it’s my side that seems to catch the most. On the front I have protech inboard coilovers at 120lbs and am thinking that it might be a plan to try lifting the front end to get around this scraping problem - it might help a little in the short term, but in the long term, I’m very much wanting to go down the route of converting to adjustable coilovers on the rear in place of where the current shocks are and ditching the roped springs that are there currently. Does anyone have some detailed photos of how they reinforced the top mounting points on the bathtub? Mine are only just good enough in my view for the shocks alone (although I can see where the tub has slightly distorted on one side presumably because the mounting point isn’t strong enough…) With coilovers it will definitely need reinforcement. Also, what were the dimensions of any reinforcement plates/angle irons used? I will see if I can post a picture of what my mounting points are like currently. Also, poundage and dimensions of coilovers on the Mk2? I have a feeling I’ve seen 180lbs for the rear suggested somewhere? Or maybe I’m misremembering that as what the front used to be? Is Dave at Dampertech likely to go back as far as the Mk2 in his knowledge?
-
rthomas69, I know that this thread was over a year ago now, but I’m still suffering with the occasional starting issue. I’ve messed about with the timing etc, and it doesn’t seem to sort the issue. Interestingly, when the car hits this point of being very hard to turn over, a booster pack on the battery terminals gets it to start up straight away so I think a new battery would be a good way to go. Equally though, I’m exploring other factors that seem to make it reluctant to start, and I think your upgrade to a high torque starter motor in conjunction with a better battery is a logical thing to try given the issues I’m experiencing. Are you running a 2.0 pinto SOHC too? What was the make/model number of the high torque starter motor you got? I found this one https://www.ebay.co.uk/itm/NEW-HIGH-TORQUE-Starter-Motor-Ford-1-8-2-0-CVH-Zetec-mated-to-MT75-Pinto-Type9-/131186336380?mkcid=16&mkevt=1&_trksid=p2349624.m46890.l6249&mkrid=710-127635-2958-0 but not sure if it’s going to be a fit… It says it’s for the MTX75 which I’ve always understood to be a gearbox married up to zetec or duratec engines. As said in an earlier comment, my pinto is off an ‘83 Sierra so if anyone knows what is correct here in the way of starter motors, some guidance would be much appreciated.
-
Thanks Richyb66, that’s great, and yes, house number 29 is the one
-
Hello everyone. About 6 months ago I moved house and changed my address on my RHOcar account, but alas, the kits and bits booklet still got sent through to my old address. Luckily the person who bought my old address off me forwards any straggling mail. I assumed that it may have just been that it would take time for the address update to filter through to whoever is responsible for sending out the booklet. Unfortunately, I’ve just received my latest issue of kits and bits after it went to my old address again. Does anyone know who I need to talk to about this? Or is there something I’m missing on the address change side of things that I’m still yet to do? I can assure you that my account definitely says the new address, so I’m not sure what else to do…
-
Thanks IanS, that’s really useful. That sounds like it could well be the explanation for the little splutter when the throttle is suddenly opened. I did slightly retard the ignition timing tonight, and whilst it’s difficult to say whether this will have helped the starting issue, it didn’t help the splutter, so I shall look into this next.
-
Thanks RedTrev. That does sound like it could feasibly be my issue. The ignition timing being off may also explain the cough under harder acceleration. On a separate but potentially related note, I have a vacuum gauge on the dash that allegedly tells me how good or poor my vacuum system is and whether I’m driving/decelerating. If I’m holding throttle steady, it stays in the drive region of the gauge, but again, if I give it some beans, it registers as being poor vacuum pressure. Could this potentially have any bearing on any of the problems I’ve been having too?
-
Hello everyone. I just wanted to run past you all an issue I’m having with starting my Robin Hood Mark 2 running a 2.0l Pinto engine from an ‘83 Sierra. Basically, since I’ve owned the car (coming up on 2 years now), it has often been sluggish to start. I think that on the whole, it prefers starting when the engine is warm, which I would expect, but this isn’t necessarily always the case - it’s a bit random. When it’s driving, I notice that if you put your foot down, there’s a little cough before it then decides to open up relatively cleanly through the Rev range, so I’m thinking distribution or carb balance need checking. It’s running a Weber 32/36 (presumably what came off the donor car) and I suspect that no re-balancing took place on this with a kit of this age when it was given the different exhaust system etc etc as this Robin Hood is pre SVA I believe. In addition to this, I’ve been noticing lately that after a run, I’m sometimes noticing that when I go to restart the car again shortly after, there is insufficient oomph from the battery to turn over the starter motor. What’s strange about this is that if I then leave it for a bit after this problem, enough current has returned to the battery, and if the fuelling or distribution is having a good moment, it then fires right up no problem. Of course I’m questioning the condition of the alternator as that is a likely candidate for the battery not getting sufficient charge when the car is driving. In addition, there has been part of me that has contemplated the possibility that the flywheel might be sticking as I’ve known a few cars over the years that have displayed similar starting issues when the flywheel sticks, but it’s very hard to say; as always, so many factors at play. All of these issues are very intermittent. I also noticed that if I give the battery an overnight trickle charge, starting is generally instant on a warmer day. As the car is using the same battery as when I bought it, I am considering replacing the battery to see if this helps matters as it is possible that the existing battery may have a dead cell following on from the loads placed upon it with the starting issues it’s been having. Equally though, I don’t especially want to buy a new battery for it only to cook that one too if there is an ongoing underlying starting issue that the new battery then has to contend with. Has anyone with the same sort of setup experienced this before? Any insight would be greatly appreciated!
-
Hey all, for some reason I didn’t get a notification about comments on this thread. Yes I’ve tried lighting in all positions and yet my meter still displays squat at the light cluster terminals themselves. There’s definitely a problem going to the lights themselves. I found an old build manual that has a much more straightforward wiring diagram and so I will prod around with the meter and keep checking. The problem I have is that when I manage to identify any wires, they then disappear off into the black sheathed loom and without taking all of it apart, it’s hard to know where everything goes. If there is a relay for the fogs, I haven’t the foggiest idea (excuse the intended pun) of where it would be located, unless it’s behind the dash along with the indicator flash relay etc, assuming that my car even has a relay for the fogs...
-
All good to know! You don’t happen to remember what size of box section you used to fabricate that do you? Also, do you remember the bolt sizes for the rose joint eye? And what bolt sizes did you use to mount the box section to the chassis? Angle iron is easy enough size up as it presumably only needs to be big enough to receive the bolts and bolt down to whatever is on the other side (I need to have a look at what’s going on internally), and of course it needs to have enough depth to be of sufficient Reinforcement. I like this tie bar conversion as it effectively converts the track control arm into a lower wishbone.
-
Ah! Brilliant. This is what I need. Thanks! The current setup of the original anti roll bar is horrendous; this is bound to be an improvement! I like the fact that you were able to salvage the original bar for the tie bar conversion.
-
Thank you both. What you say corresponds with my findings about measurements. I will give Dave at dampertech a shout. Dandan62, did you create a thread on your tie bar conversion? And do you have links to the required parts? It would be great to do this while I’m at it if I can!
-
I accidentally posted the same post twice re my suspension, and as I couldn’t figure out how to delete posts, I simply edited it and put in another one... I’m getting nothing from my rear fog lights at all. I’ve done all the obvious things like checking bulbs/fuses etc to no avail. I ran a multimeter across the terminals of both fog clusters, and absolutely squat is going through there. I tested at the fog light switch end and I appear to have voltage registering at least up to the switch. I haven’t tried bypassing the switch to rule that out as I am not 100% certain on which wire bridges to which over the switch, particularly as whenever I had voltage passing through, the fog lights still did not illuminate when the circuit was completed by the multimeter. I’m assuming that if not a faulty switch, the problem is further down the wiring towards the lights themselves. Does anyone know of any common places for the loom to fail between the switch and the lights. My knowledge of car wiring is somewhat limited by comparison to my mechanical knowledge, particularly when the typical wiring diagrams I find in the Sierra Haynes manual make my head hurt!