Longboarder
 RHOCaR Member
-
Posts
8,200 -
Joined
-
Last visited
-
Days Won
70
Content Type
Profiles
Forums
Events
Store
Community Map
Everything posted by Longboarder
-
Beautiful things but a fierce price. Half that gets you a set of DCOE style jenvey throttlebodies which are very close in performance if not looks. Ebay can be even better value if you can be patient.
-
Can I ask how the booster charges itself? Do you have to take it to a 240v socket to charge it or does it plug in to the cigarette lighter socket and maintain itself at optimal charge?
-
Alan, does that device know the speed limit where ever it is on the road or do you have to set a speed limit and it just beeps or flashes when you exceed the speed you set?
-
Valve stem seals can certainly cause oil smoke from the exhaust but are very unlikely to pressurise the crankcase so I would be more inclined to think its bore/ring wear and a rebore/bottom end rebuild is a long term option/fix if the problem persists. You could try a quick 'cheap and cheerful' new set of piston rings and see if that helps but if you were to strip the engine down far enough to fit new rings, another half dozen bolts and the block is ready to be taken for a rebore.
-
Some people have had crankcase pressurising in the past because the Ford produced elbow that fits into the block breather has a one way valve in it. This valve does require slight intake vacuum to open and ford plumbed it into the inlet manifold. This ensured negative pressure to open and evacuate the crankcase and burned the oil fumes by passing them through the engine. All good till kitcar builders put the pipe into a catch can or vented it below the car. Without inlet vacuum to open the valve pressure builds. So remove the valve from the elbow or better still feed it into the inlet manifold. Below is the breather valve. The lower edge has been ground off and the lightly sprung 'penny valve' plate has dropped out.

-
I have had an old mini heater in mine for years and it cooks up a storm. I've had to stop in snowy weather to take clothes off. Mind you my roof and sidescreens are well fitted apart from the almost inevitable cold right elbow syndrome. So a healthy mini heater matrix and fan can be very good.
-
Looks like the car was developing an ignition problem. You replaced most of the ignition system. If you didn't move the distributor when you replaced cap and leads there are only a few things you could have mixed up. Prime suspect is you had the engine on TDC for cylinder 4 and set up the plug leads as if it was on TDC for cylinder 1. You can check you have the engine on TDC for 1 by taking out the No.1 spark plug and while turning the engine sticking your thumb over the plug seat. You feel the pressure as the piston rises toward TDC. Bet that's what you done. LT wires on wrong coil terminals is possible. Moved the dizzy so far off its correct position it wont fire is remotely possible. Duff new parts also a possible.
-
A more elegant solution to avoid fatigue failure and significant flexing is to make a simple quadrant based on a grooved circle of the same radius as the height of the adjuster above the pivot of the axle round which the cable runs and is fixed. Basically just what Ford did with the sierra pedal, minus the adjuster.
-
Blocks are strong and stable but check flatness anyway. The cylinder head although cast iron can warp. Mine did. Best to strip the head and get it skimmed flat just as you would with any aluminium head. Then you can use any standard head gasket. Maybe ARP head bolts or new standard.
-
The different front ends are pictured here to help you identify your car. http://nw.rhocar.org/identification.htm
-
Independent rear semi trailing arms. Can be decent. Good shocks. Correct spring rate for a car weighing 300Kg at that end. Perhaps an ARB at the front. They are mounted too low giving weird camber effects and they are very heavy. Never be quite as good as double wishbone rear end. First thing is what have you got? Are the shocks mounted from the centre of the spring pan or the bracket off the rear of the arm? Are the top ends of the shocks securely located and solid? What springs are you running? Separate from the shocks or mounted as coilovers? Do you want to make the best of the sierra setup or get fabricating and make double wishbones and chassis mounts (which is a pretty big job and has not to my knowledge been done by a RH owner before)?
-
Yes. Just see what the switching wire does when the main beam is switched on. It will probably go to earth if the switches have been wired as they were in the sierra. Then it's just a question of using that as the earth for the warning light and supplying the other side of the warning light with an ignition live supply.
-
Ford very helpfully stamped letters on the exhaust manifold face at the back of the engine. 'Made for EFI' heads were all unleaded and had pear shaped inlet ports.
-
So you have confirmed the headlights are wired correctly and the loom is not faulty. There is no link from dip circuit to main beam warning light when the bulbs are removed from the circuit. I can only think that the backfeed is via the bulbs. Presumably you currently take feed to the warning light from the main beam wire after the relay. Are you using later BG87******** column switch and negative switching of relay. Can you rewire the warning light to be switched by the column to relay switching wire, rather than the post relay wire?
-
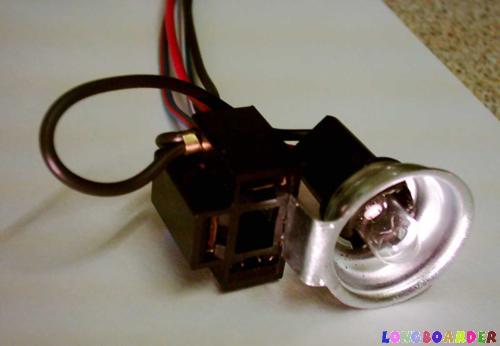
The main and dip circuits should be completely separate at the stalk end. Common problem that links the circuits is incorrect connections at the headlight end to the bulbs. So first step is to pull the connectors off both headlight bulbs and then switch on dip and main and see if you still get a glow from the main beam dash light. No glow? Then the switching is probably OK and the problem is probably the bulb plug wiring. Try connecting one head light and test. No glow. Disconnect that headlight and connect the other side and test. This could tell you which headlight has its wires swapped. Could be both. The main/dip bulb is set up like the pic. Regardless of how you swap the wires round it will seem to work OK (till you drive at night!). However the central connection between the filaments is the earth and connects to the shell of the bulb base. The dip and main wires then each connect to their proper bulb centre contacts, which will then work independently, one filament at a time and not feed back to the warning light.
-
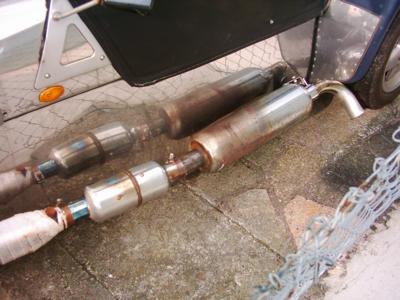
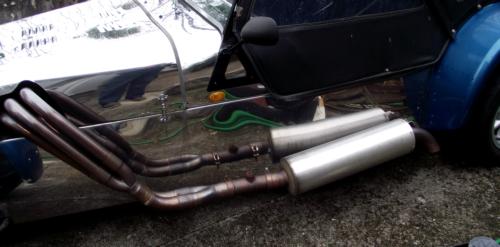
Putting in a small expansion box had a huge effect on mine many years ago. The one shown was an old silencer, gutted and shortened to about 10" long to fit. Have since fitted a 21" x 6" which is OK but not as quiet as the expansion box + small silencer and looks huge and ugly.
-
For a quicker temporary measure you could pick up a used blacktop from your local scrappy. Quick engine swap and you're back on the road by sunday evening.
-
So the valve seat is disappearing faster than the valve train wears. You have a slightly worn 2.56 shim. Add a flat block and a few sheets of emery paper and you can make your own 2.52 shim if you have a vernier or digital callipers to measure with.
-
Side/outline/running/marker lamps have been obligatory since the start of SVA/IVA. I'm surprised the car passed IVA without and surprised it's only an advisory and not a fail. Put some on. You can get headlamp plugs that have a side light holder built in. Most headlamp reflectors have a hole in the silvering for them to shine through.
-
Due to lack of response I will suggest possible scenario is duff engine temperature sender. Next would be mass airflow sender if it has one. Finaly air temperature sender. In that order. If any of them are reporting odd figures to the ECU they would alter fueling. Useful if you could see what they are reporting to the ECU.(On my ECU which is omex the air temp sender has very little effect on fueling but I don't know how much yours does with MEMS.)
-
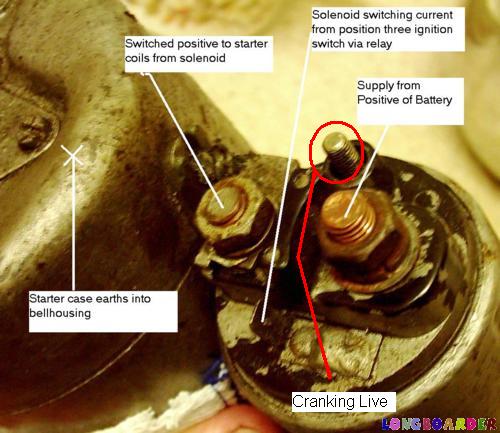
Hmm. Killed two sets of points. Might be coil is wrong for points? Points heel wear? Wrong dwell angle/gap? Not sure why they should have failed so rapidly in use. What did the points contact faces look like after they had failed? Failing coil will sometimes run from cold for a few miles till it heats up and fails. Leave it to cool down and it may run again for a few more. 'There's no ECU or AMP ................ Maybe that's the problem?' Won't be the problem. Points used in the classic way don't need one. Some of the earlier 'electronic' ignitions such as capacitative discharge used points just to give the timing signal but that wasn't what you're doing. The aldon generates its own signal and is entirely self contained. Just needs a 12v power supply and a 12v 3ohm coil. Simple as. New plugs, HT Leads, Distributor Cap, Rotor Arm, and coil are nice but probably unnecessary although a new coil won't go amiss just as a check in case the old one was failing. You were pretty sure there was no ballast resistor knocking coil supply voltage down to 9v and have checked the coil supply is indeed 12v? Odd that your starter solenoid has extra LT wiring which would usually be associated with a ballasted coil supply/9v coil and giving a cranking supply to the coil of 12v. Pic below. What to suggest? Always a problem when you're not confident you have identified the fault. Check the coil and powerspark supplies are good clean ignition live supplies giving 12v. You have the new coil in place. You have fitted a complete set of new ignition components so be confident in them. I can't see there is much else you can do with the ignition. Tacho wire from the coil? I would leave unconnected for the time being and put some miles on the car. (Still can't really see how the tacho itself can be the problem. But the tacho wiring, yes.). Electronic components can just reach end of life and fail. Maybe that's what happened to the aldon ignitor. Blowing out points with the wrong coil could explain why that 'fix' didn't work for long. Dunno. ps. when you do put the tacho back in circuit I would run a new wire from coil neg to it!
-
I also run an ST170 and find acceleration pretty brisk. What size wheels are you running? I wonder if smaller wheels might not be an easier and cheaper way to go?
-
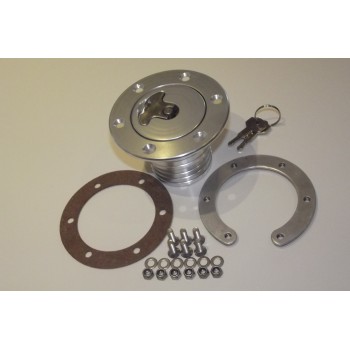
I would put an aero style filler funnel and cap in the hole. like the one below.
-
Sorry. What I wrote was the current IVA rules. Thought you were still building. Your car thus has approval already. If you don't go too wild with the clamshells no one will ever know. Should you ever get checked they were legal back then so historically still legal for your car. Just like semaphore indicators, authentic on your 1945 Anglia or Austin 7. Can't put them on a Mondeo but they will always be OK for vehicles of their time.
-
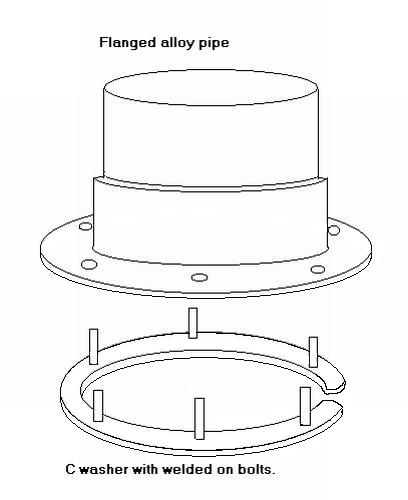
To seal the tank well I made up a C ring (pic below) in 4mm steel plate with bolts welded through it to match the sender/tank holes. This can be inserted inside the tank and will pull up to sandwich the thin tank top and gasket between itself and the sender. Getting the cut-out in the C big enough to allow it to be fiddled into the tank but small enough to not loose sealing was the only difficult part. Pic below is rough idea that I used with the filler. Same style for the sender.