Amateur
-
Posts
18 -
Joined
-
Last visited
Amateur's Achievements
")
Builder (2/6)
0
Reputation
-
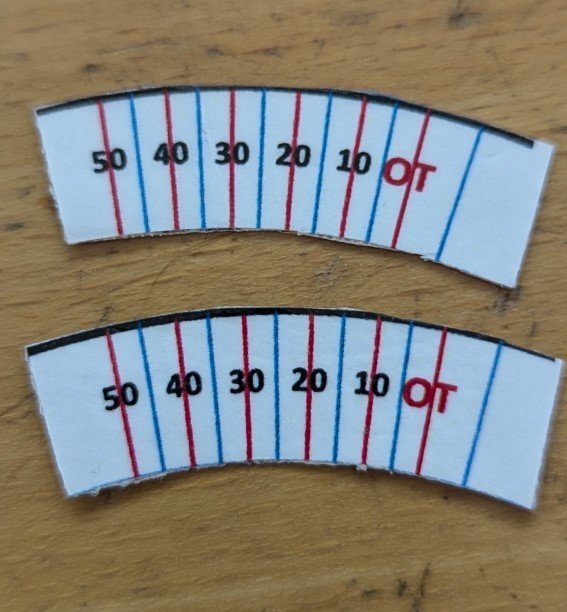
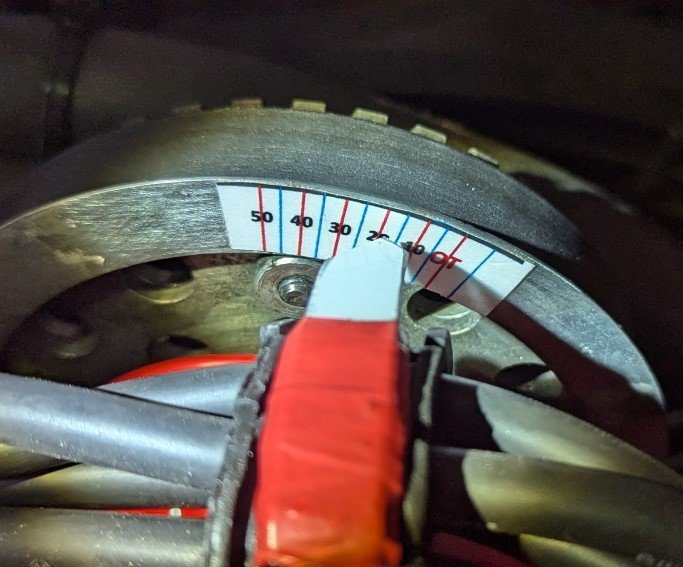
Yesterday I had some time and implemented the above mentioned idea to measure the timing at the camshaft instead of at the crankshaft as usual. As already mentioned above, the crankshaft and camshaft turn 2:1. So you have to attach two scales at the camshaft, 180 degrees apart and the scale is only half as large / precise since two degrees turn at the crankshaft mean only one degree turn at the camshaft. So I created myself a scale with powerpoint. There you can draw a line and then have it turned by a defined number of degrees. I then set the crankshaft to TDC twice and attached the two scales at the respective camshaft positions. A test showed that it works great. See pictures

-
Thanks for the explanation. I attached the VA to see how the engine reacts after verifying my static timing to be at 10 degrees. And yes, the engine does run better, although it does not decrease my rich mixture issue. The vacuum advance causes the timing to forward to something around 20 degrees at idle. Is that an acceptable value? Above 12 degrees OT I can only guess the values as my crankshaft belt wheel only has 3 notches of 4 degrees each. And there is pactically no space between the front of the engine and the radiator fan which makes it impossible to add notches or get in there with a marker. In the web I found a picture with a scale at the camshaft wheel. At least, that is a lot easier to access. But since the camshaft turns at only half the speed of the crankshaft, it takes 2 scales (180 degrees apart) and a 2 degrees change on the crankshaft means only one degree on the camshaft wheel. I plan to try that option and see if it works.
-
I just got my new timing gun today and over the weekend I will need to verify that the timing is really where it should be. But assuming that I already got a decently good spot (the engine sounds healthier already), I drove a little more last sunday and found my first impression to be true. The mixture jumps alittle more up and down at speeding up or slowing down and subjectively the car runs a little richer overall. But the particularly rich mixture issue at low rpm is a good share better than it was before. But the word "vacuum advance" rings another bell: as of now, I do not have a vacuum pipe attached to my ignition. I have an ignition working with gravity to set the advance at rising rpm and I can clearly see the ignition timing going to advance when I hit the accelerator while I use my timing gun. When I bought the car, no vacuum pipe was attached and I never bothered to attach one since. What does the vacuum do? The net says, the engine runs leaner at low rpm or at idle and for that timing advance it advantageous. But I have the opposite issue. I have my idle set to AFR 13 and I also still run rich on low rpm. Vacuum increases when I take the foot off the pedal and the throttle closes. Isn't that contra productive in my case? I just set the timing to later to fix my issue. Should I attach a vacuum pipe anyway?
-
Upate: I tried to change the float level, first decreasing the floater to 34mm (= 5mm more fuel than standard), than by going to 40mm (=1mm less than standard). The effect was nothing, at least not what I intended to get. I then got the idea to check the timing. It was off (early) by about 10 degrees. :-( So much for trusting my garage that they checked everything... I tried to set it back to the 10 degrees before OT that I found in my book. But my timining gun broke before I could finish, so I could not verify my final adjustment. I took a very short turn around the block and found that the mixture chances with timing. From the few miles I drove, I believe it gets more variable, but my low rpm issue seems less. I ordered a new gun and will check the timing before I drive again. But it seems I could have found the leverage which fixes my issue.
-
The measurement I quoted was the closed position. I set that position to 38mm out of memory. Your table above says 39mm for DGV. So I was only 1mm off. The stroke is just the limiter to prevent that the valve cylinder falls out. We seem to agree that the level (height) of the fuel is important. I just checked the level again: after my Hardy pump reached its max pressure and stopped, I opened the carb and used the folding rule. There was 22mm of fuel in the revervoir, its total height is 45mm. That makes it almost exactly 50% full which seems odd to me. In lack of any better idea what else could fix my low rpm issue, I think about adjusting the closed position to something like 34mm. That gives me 5mm more fuel level. Maybe that changes something. If not, I can still switch back.
-
Many thanks for your suggestions. But the air corrector jets are in theory responsible for the mixture of the higher rpm (3,500-4000 until rpm limit). My issue is on the exact reverse end. But the float level might actually be a valid factor. I set up the floater to what it is supposed to be (36-38mm in closed position). But when opening the lid, I reallize that there is not more than 15-20mm of fluel in the float chamber. That is less than half full. This seems quite low to my opinion. I might actually set the float level a little higher and then recalibrate the values to that level. Maybe that fixes something. Assume I have a level of 15mm when full. When the engine is running and consumes fuel, the level drops by 2mm. That changes the float level (which influences the mixture) by 2/15 or 13.3%. When I increase the full level by 10mm to 25mm (which is probably about the float chamber being half full), that same 2mm drop is 2/25 or 8%. That's a lot more steady. Or do I make a mistake here ?
-
Hi folks. I have an Exmo Seven with the usual 2 ltr Pinto engine. The car came with 48 IDF carbs and - as I had to find out - a racing cam shaft with which no weber carb would run decently. So I downgraded both the cam shaft and the carb to a more standard Weber DGV 32/36 (in DE I need to get any modification from standard approved by German MoT and the 48 IDFs were not in my papers). Since finding somone in Germany that still knows how to tune a carb is really hard, I went at it myself. After 6 months of trial & error using my Lambda dial, I have it reasonably in tune. The mixture now stays within AFR 13 - 15 at 95% of the time, at least above 2,500 rpm. Idle mixture is fine too. When I push down the accelerator, the mixture still takes a dip of about 1-2 AFR values for a few seconds before it recovers back to AFR 14, independent to my rpm. That means the pump value is too large. But I am already at a size 30 and there is no smaller size available. So I live with that. However, when I just cruise along in town or on country roads, I tend to shift up and have the engine run at about 2,000 rpm. And here is my problem: when I get below 2,200 rpm the engine starts to run excessively rich (AFR 11-12). Even when holding speed, the mixture never recovers and stays at AFR 11-12 all the time. I tried a smaller idle valve and I also played with adjusting the idle position of the two throttles (my stage 2 runs a 40 points leaner main valve than stage 1). A smaller main valve would sure fix that issue, but then the engine runs way too lean at 2,500 rpm and above. Does anyone have an idea what adjustment could fix just that the low rpm issue? I am open for any suggestions. Thanks Claus
-
Hi Steve. Many thanks for the suggestion. But the idle jets are sadly not the solution. I actually had to make the idle jet smaller. When I bought the Webers, they were supposedly equipped for a VW Beetle or small Porsche. 36 chokes, 135 main jets, 210 air jets, 55 idle jets. That setup is what I started with, in the hope it would be a feasible start. Not the case. With the 55 idle jets the Pinto runs extremely fat at low rpm. AFR falls below AFR 12 at .5 to.75 turns open, and below 3,000 rpm AFR drops below 11 with the foot off the paddle. So I put 45s in. This way, I can at least open the screw 1.5 turns to set AFR to about 13 and the fat mixture below 3.000 rpm mostly went away. Without load, the engine remains inside the AFR rage 12 - 15. But on the road AFR jumps up to 17 and more the second I touch the accelerator. Acceleration pump is in all the way. When I floor the paddle, that gasoline shot is the only thing that prevents the engine from choking. By the book that means that main jets are too small. I tried 140 and 150 main jets in combination with the 210 air jets. I now even dropped the air jets to 160, only 10 points above the main jet (Weber manual suggests 30-40). That last step actually improved it a little. I now ordered 160 main jets and 170 air jets to go even bigger. But I somewhat doubt such big jets are the right solution. The larger 48IDFs having 40 chokes worked with only 140 main jets, 190 air jets, and 50 idle jets. The only thing I have not yet altered is the fuel level. I set the floater to close at 10mm below the lid. Do you think it would do something to increase that level to 5mm or so?
-
Hi folks. My Robin Hood Exmo has a 105 HP 2 litre Ford OHC engine. Standard, no (known) modification. When I bought the car, it was equipped with a 48IDF carburator. It took me ages to get that carb running decently. But I never managed to get good performance for lower rpm. The carburator is simply too big for that engine. Besides, the old 48s are old, worn and dirty. To get a little better performance in lower rpm, I decided to buy 44 IDF instead. However, I failed to get the carbs running until now. In my garage, reving the engine, I get the 44 IDFs running decently within a range of AFR 12 - 15. But on the road, under load, the engine shoots to lean the second I touch the accelerator. I have to push the accelerator binarily (full throttle or none at all). Even when I try to just hold speed the mixture gets lean as hell (AFR 17+). I tried valve combinations getting fatter and fatter. But until now, nothing helped. My last setup is main = 150, air correction = 165. My feeling says, that's way to fat. But pressing the accelerator still makes the mixture go lean. Does someone have 44 IDFs with the Ford Pinto engine and can tell me what valve combination works decently? That would greatly help me to get my beloved Seven back on the road... Edit: just fixed my typos..
-
Hi Folks. I hope you forgive me to hijack this post and ask my own question. I joined the rhocar forum a few months ago and just found this posting. I honestly pray that you that can help me. I have an Exmo and want to have a hood for it. But I am short of the necessary frame structure. I looked for such a thing for a long time. At least here in Germany, where the Exmo is a truely rare breed, there is no such thing on the market. I asked a convertible specialist to build me a custom one. He wanted somewhere 2,000 Euros for it. No way. But I am rather handy with tools. So I consider building my own. But I need a blue print of how this frame structure looks and works. Where are the hinges and places where the thing folds? Where is the hood structure attached to the car? Questions over questions. Without the roll bar, I would probably find a way by looking at other convertible structures. But I have no idea how do I get over or under the roll bar without making it a lot bigger than the outer edge of the boot when the hood is folded away ... I created an emergency roof myself by attaching a piece of lorry tarp to the front screen with Tenax buttons and then tie it down it with straps onto the boot to stretch it over my head with no further stabilisation to it. This in fact keeps away the rain reasonably well and can be folded into a small package nicely to put it into the boot. But it lacks structure and stability. At 80 km/h it starts blowing up to a scary degree and I am afraid that it will rip off one day at full speed and cover the windshield of the car behind me. Therefore I am looking for someone who has a hood with the necessary frame structure that would be nice enough to send me pictures of that frame detailed enough so I can copy it and build my own. Can someone help me out with that? By the way, I solved the issue of not being able to drill holes into the windshield frame by creating an extra frame made of 2,5 mm U-shaped steel that is put over the windshield frame like a glove and then screwed to the side panels that hold the windshield. It weighs about 2,5 kg and looks slightly bulky when attached, but I can drill as many holes into the frame as I like to attach Tenax buttons or screws and it also withstands reasonable pull forces without ripping the windshield apart.
-
Hi folks. I promised to provide pictures of my door construction once my car ist back from its paint job and completely reassembled. This is now the case. However, the forum site refuses consistently to accept my pics. I therefore have put them into a cloud folder. Hopefully you can see them there. https://c.gmx.net/@324523546229343048/XR33lP2YSb6PDgCrD9KJ0w The door consists of a metal frame (aluminum) with a tent-style soft window in it. I have a metal pin attached to the side of my window frame with a nut on top that also holds the outer frame of my emergency roof in case I need it. The door is screwed onto that upper point and on the low side it attached to 2 Tenax press buttons that are normally used for the rain cover. These 3 points form a vertical line to which the door is attached with hindges. This frame is sturdy enough to hold the door. On the back side, the door is attached to the roll bar with a spring loaded locking bolt. The door keeps the draft almost completely out. That's really cool. The only disadvantage is - as dicussed above - that the doors are to big to store them in my car. So I have to decide at the start of the trip if I want doors or not. If I takem them, there is no option anymore to change my mind and drive open.
-
Thanks for your ideas. I have to admit that these doors are also V3.0 or so. V2 was also a two parted door. But the issue is the length, not really the height. My pre-owners installed a metal boot cover on the back. The 2 sides up to the roll bar entries are bolted to the frame. Only the space between the roll bars (~97 cm) is open and my doors are something like 105-110 cm long. And the passenger side is not an option for me. I take people with me regularly. All I could do is strap the doors on top of the boot like luggage. But that is not really pretty. I currently have emergency doors which are entirely soft. No rigit parts at all. I have a small steel bar that I attach to the top edge of the windshield and the edge of the rollbar where it curves from vertical to horizonal. That bar and the entry next to the seat are equipped with Tenax buttons and I span the emergency door between those two lines. But it takes several minutes before the door is in and I can start driving or vise versa. It works, but it's not really an elegant solution.
-
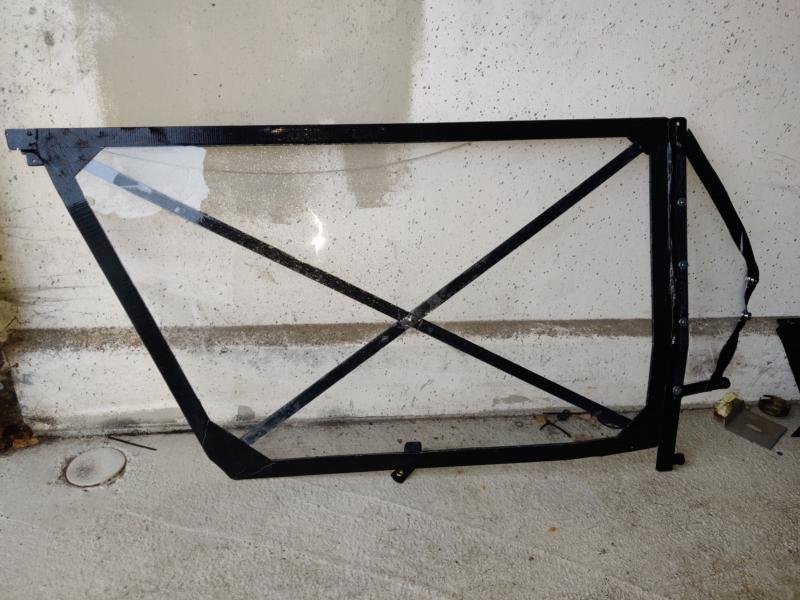
Hi folks. I decided that my Exmo needs doors for when it's cold or wet. And since I could not find any doors that fit my expectations, I decided to build them myself. I created a simple aluminum frame and put 2mm plexi glas on it instead of a soft cover. And while the ready made doors slope forward at the rear end, my doors slope backwards from the lower start of the rear fender, ending just a few inches short of the top edge of the roll bar where my doors get fastened. Maybe a little heavier overall (2.3 kg/door), but they are sturdy enough to not shake when driving and they keep the icy wind out when I drive my seven on sunny days in winter at near freezing temeratures. And in case it rains and I have to put the roof on (that I am also about to fit to the car), the opening is large enough so I still manage to fold into the car (I am not 20 anymore ). But the downside is, that the doors do not fit into that tiny boot of the seven. If I put the doors on to keep wind and slashy water out, I cannot take them off during a trip. So I have to come up with another, more flexible solution for those summer days when I want to enjoy the wind around my head while it's dry but still be prepared in case it rains. Now I wonder if those ready-made doors would fit into the back of the seven. Can anyone tell me? That would be great. You'd probably be interested on how these doors look. But writing this post I reallized that I never made pictures of them and my seven just went away to get a new paint job. So all I can provide today is a picture to the right driver side door leaning against my garage wall. I promise to add better pics of the doors attached to my car once the car is back and put together again.
-
I love that little gap in the GB legislation. It also made my RH 10 years older than it actually is. In Germany, oldtimers are favored by quite low annual taxes and insurance fees - supposedly because oldtimers are hobby vehicles and do low milage. Besides, they are excempted from the restricted emissions areas in cities. For that status the car has to be 30+ years old. Mine is now on paper 33 years old, so cost of ownership is low and I can enter any city I like even without a cat converter.... cool.
-
Hi Sparepart. This is SUPER GREAT !!! Many thanks for your effort to do that and share it with us. Nice puzzle you had there laid out on the ground I'm sure the videos will be useful in one or the other repair attempt. But I could not open the files starting with "XMO*". It seems to be an unusual codec. Had to run them through my format converter app first. The sound quality is a little bad, but the video resolution is good enough for the purpose. We are all spoiled with HD resolution nowadays...