itllbedonesoon
-
Posts
67 -
Joined
-
Last visited
Content Type
Profiles
Forums
Events
Store
Community Map
Everything posted by itllbedonesoon
-
true, i am still waiting for my first panel that fits without requireing modification... and i have only got the rear wings and boot left to do.
-
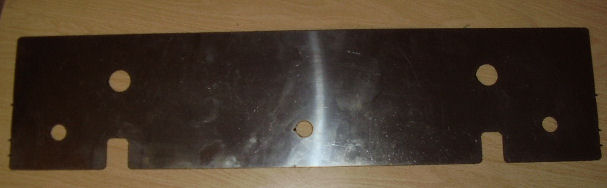
Not sure about that, the cuts and or the holes are out of alignment to fit over the top seatbelt mounts and what are the rest of the holes in the panel for? they are definatley cut in pattern for some specific use????
-
Mornin' i have got this pannel in my kit and i dont recall seeing it in the video and i cant guess what it is for. any ideas??? see attachment..

-
ahh, thank you. i will remove the vapour seperator then, i have plumbed in a fuel return pipe as i did it all before i managed to get a pinto block. i would like to go Zetec or XE in the future but i think i will just try to finish building it before i start having such heady thoughts. I have planned a visit to the scrappy this weekend, trying to find a mini brake bias valve, i will add the nippon alternator to my list. cheers
-
Can any one advise on cross engine ancillaries compatability please..... My donor was a DOHC injection but i am using a 2.0 ltr Pinto engine with carb, and i have had to use the DOHC ancillaries. Am i going to have issues with: DOHC Ignition coil to Pinto Distributor ( & DOHC earthing capacitor) Is a fuel vapour seperator required? (i am sure there are other items also that i have not thought of) Also on the compatability front, i was thinking of trying to source a motorbike alternator, would this have enough grunt? any ideas please?
-
cheers, ill check my connections, incidently when the bulb has gone, it was quite bad. the bulb is all smoke white inside and the bulb was cracked
-
i have just replaced the nearside rear breaklight with a new bulb and 3 days later it has burnt out already!!! i guess it is getting to much current, or something but i dont know my *** from my elbow with electrics. can any one suggest what the problem might be??????
-
good morning, i have not thought about mounting the radiator horizontal, but as there is not enough space to mount it on an angle, i think flat would an even greater problem. Part of my issue is in keeping the alligator bonnet type (as RH recomend & have designed into the kit), limits the available space to the font chassis cross member which just isn't enough space for the RH supplied rad. (which seems a bit of a design contradiction??)
-
i think a smaller radiator may be the way forward. picture of the supplied radiator
-
Help, i bought a 2B+ and the radiator that was supplied by RH seems a tad on the large size. I have looked at quite a few of the members cars on the web site and the radiators all seem to be the square black type that sit on/just behind the front bottom cross section. (ie the lower front wishbone mount cross section) and look as though they are mounted almost vertical. Mine on the other hand is an ally rectengular radiator. The width will fit through the chassis members with a wiggle but...... it is so long that even when touching the cam wheel, the bottom still sticks out the front beyond the bottom cross section. This presents the problem of opening and closing the alligator style bonnet. ie. i cant because it would take off the bottom of the radiator. hopefully i am doing something wrong as the only solutions i can think are 1/ buy a smaller radiator (expense, overheating??) 2/ dont use an alligator style bonnet (not confident of cutting up my bonnet) 3/ set the whole thing on fire and claim off the insurance (as you can see i am a bit miffed :boohoo: ) sorry for the long post, any ideas?????
-
success!!! Fitting the brakets with the RH alloys gave clearance for the cycle wing brackets, yeh!
-
As far as i have got so far on my 2B+ that would seem to comply with what you are saying. The wing brakets are pre shaped with the 2 bends. The mounting itself is pre welded by RH to the dummy McPhurson strut and there are no tabs that are require drilling and bolting to the hub/pinch bolt.
-
ahhhhh!!!!! i see. I was trying do fit the original Sierra wheels, they are Sierra pepper pot alloys. I will try the kit alloys to check the clearance and wing bracket alignment. I may just have to continue the build on axel stands. i will let you know how it goes. This forum is great. thanks for all the advise
-
hello, i can not get the front wheels on my 2B+ as they are obstructed by the cycle wing brackets. The brackets came complete in the kit from RH but looking at the photo's on peoples web sites, the brackets i have seem to be a little different. i hope this is clear: 1/ the taper of the dummy McPhurson strut should be to the inside? 2? the cycle bracket arms should be on the inside to allow clearance of the wheel? 3/ the forward arm should be the bent upwards arm? if this correct, on the brackets i have the cycle bracket arms are on the outside and hence i can not get my wheels on. i have attached a pic of one of the brackets i was supplied. Can anyone tell me if these brackets are ok or am i the dummy? please help?
-
sorry for starting this string, it seems a few people wanted to have the last word. :gdit: I have got my under floor strengthening in place. 40mm angle welded into a 'H' shape. Of which the back is bolted to the rear sub frame flat mounting plates and the front is bolted through the chasis side tubes. The seatbelt mounting angle 'U' has been positioned inside the tunnel in line with the outer seatbelt mounting holes. using a captive nut (welded) i still have access past the seats to the inner seatbelt attachment bolt. I am using bucket seats from the scrappy out of an old (L reg ish) honda accord and they fit comfortably into the 2B for width & hight without modification (i am 6ft 1). I am not sure if i will use the runners yet and have yet to mount the seats. thanks for all the advise everyone
-
Excellent, thank you for the welcome, underfloor frame attached to the chassis & floor panel, bit of 'U' inside the tunnel it is then. They are nice web sites lots of detail (Battery Bill) thanks. and mark my words, it'll be done soon..... oh yes.....it will be done soon! :boohoo:
-
hello everybody, i am a new member and looking for a bit of advice. Does anyone have any photo's on where/how they mounted the inner seat belt attachment points & seat mountings on a 2B? There does not seem to be much strengthening and a lack of chasiss members in the floor centre. I worry a length of 1" x 1" angle bolted under the floor panel (as per the video) would just flex. I am a bit worried about this as it is a bit of a safety issue and an SVA worry. please help?????