Sid76
-
Posts
45 -
Joined
-
Last visited
Content Type
Profiles
Forums
Events
Store
Community Map
Everything posted by Sid76
-
Well - hello again! Its been a while! Thought i would add a few more photos. Really pleased with my progress of late. I have fabricated the cross-bracing for which my seats will be mounted to (eventually). I have also added some strength to this and braced it against the upper chassis rails. Finally i have welded in some brackets which will hold the brake pipes through the body. This is the view from under the car. You can see the cross members running from n/s to o/s. The rear ones i welded to the plates that the rear subframe is bolted to. I have tried to mirror the shape of the upper chassis tubing out of angle that is running front to back. This is welded to the cross members for strength. Lastly i welded in some support bracing to the upper chassis tubes. Under which i have drilled into this for my inner seat belt mounts. I am deliberating whether to weld in some captive nuts. The seat are in - well i can kid myself! These are the simple brackets i have welded in. and yes she complained with being cold in the garage!
- 39 replies
-
- 1
-

-
- Sliding Pillar
- Build Diary
- (and 2 more)
-
Hello all Anyone know if any members in Sussex (East and West, Brighton too!) are active and/or link into any other areas. I know the Surrey area rep is vacant at the mo - makes most sense to buddy up here. I am based just outside Chichester and i am in the process of building my 2B Sliding Pillar. Let me know your thoughts????
-
I had the same problem. I'll be posting photos of what I did on my build thread later today. In short though. I got some angle 3 x 3. I made two cross members running from n/s to o/s. Then I made and shaped some angle to follow the form of the upper chassis tubes and welded this in place. To stop these flexing and bowing. I have welded bracing from the upper chassis tubes to my piece. This is also where I have drilled for my inner seatbelt mounts. I am now deliberating whether I weld captive nuts in situ or use locking washers etc. I think I have added some strength to the chassis as well - so that's cool.
-
i got in touch with bajman on ebay. They will do a run of badges if we are interested. i think the minimum was 250 units. Anyone interested?
-
Been a while since I last posted. I now have the chassis stripped (last week) and have a superficial covering of primer on as I need to weld some support for my seats and inner seatbelt mounting points. Along with strengthening the bracketing for the steering column and probably other bits. I would like to get bits back on the car soon...
-
also picked me up a set of 7 spoke Ronal Wheels from eBay. Happy days - definitely better than the mix of steel wheels i currently have. (pics to follow) S
-
I will jump forward today; Been off this week and had intended taking the rest of the subframe out - the floor off and shot blast the chassis ahead of the rebuild. I have had most of my gang off this week with a bug of some sort so my plans have has to change. I have however, cleaned up and painted the gear box (pic to follow). Have cleaned up the drums and various small parts from the engine. The chassis is looking like this (will i ever get it blasted!?) I did make a start on the wiring - cutting out all the bits that aren't needed ahead of the trail fit for but down. This clean up continues...
-
Hi Ken Not sure i would trust myself to drill that free hand - you haven't seen my hands! I wouldn't make a brain surgeon!!! S
-
Hi Maccavvy i think i read somewhere that if you have twin webers - they often struggle to get the amount of flow from a mechanical fuel pump. Have you found this? S
-
Thanks for that... I did try to add them to my (original) thread. I kept getting an error message to say i had reached my quota. Its great that you guys had all seen them - i hadn't and i guess some others may have not found them either (the luck devils). When i searched for them on the forum i couldn't find them. I stumbled across these on YouTube. I am just trying to pull together info i have found which has helped (or hindered depends which way you see these)in one place and also put up a brief index to save everyone the torment and torture of watch all 12 hours!!!! S
-
Thanks Ian (& 2b Cruising) I really would like to do. I visited GBS (and Kit spares) a few weeks ago to pick up some bits and I got the hard sell regarding the zero using mine as a donor. The trouble is i don't have the £2345 for the starter. I was considering the wishbone upgrade until i saw a post on here saying it would cost an extra £4-500 on what i originally thought would be a £600 outlay. Again £1100 is a bit much to swallow at the mo. The plan is to get the car up and running at SVA'd. Simon at GBS said you can modify the sliding pillars to accept a high tensile M12 threaded rod which will strengthen the whole system. I think i am going down that route (for now). Just need to find an engineering firm (around my way) who can accurately drill out and tap me the hole to accept the new rod.
-
Hi Longboarder Thanks for the info. Would the L be a clear L. I have what looks like an 'I'? Looking through the Burton catalogue i think my engine was built in 87. This for me works as my donor was an E reg. Its a 2 litre which is good. I have a 3.62 diff - this is what it said on the tag. Sid PS apologies for the dodgy spelling my auto correct is on form it would seem!
-
Build Video 5 http://youtu.be/gQ1VgRD4_ZQ At a minute in we start to look at the rear panel fitting. 17 minutes we are looking at the donor tank again and has references to the RH tanks - 1 large and 1 small. at 27 Minutes it jumps to the seat back panel. at 41 minutes we are back to the fuel tank and at 42 minutes we start to look at the installation of the engine, gearbox and driveshaft. Joking aside - thank you Ivan Sanford for uploading these on YouTube. I will post more later...
-
Build video 3 http://youtu.be/lzfzO-LfJvU we start off with the header tank, jump to the interior and then have a H&S interlude and we haven't even reached a minute. We then come to what i think is the intro and helpful information about the design weights (info needed for the IVA). At 12 minutes we are then jumping to the rear axle (cue references to the short legs of 'the wife' and how the car has been built to accommodate fat people! Oh and referring to the cameraman all the time when she is clearly a woman). At 31 minutes we jump back to the front suspension. Build Video 4 http://youtu.be/3kvkZuTl230 We start off with the rear subframe and fixing the floor (the under chassis) and at 1 min 30 or so star to look at the rear suspension.
-
Oct - 2014 Other than the forum - i have really struggled to find any reference to the build of the car. I have purchased an old S7 build book from Kitspares along with some old catalogues. I am really trying to find reference to sliding pillar suspension. I know this is made up of a myriad of parts. When i was digging around on the internet i came across these. Robin Hood Build Videos on YouTube Build Video 1 http://youtu.be/CoXGacMEi-E Video 1 looks at the following; H7S, changes to car updates etc, at 23 mins he goes into talking about the wishbone set up. My first impressions were "is this guy for real" and can i please get these videos so that i can edit them in some sort of order. But i think thats just me OCD coming out!!! Seriously - if anyone has these on DVD i will gladly do this. Any money then raised (after costs) can go to Charidy. Build Video 2 http://youtu.be/rLjLI2t0r7A video 2 looks at the following; suspension continued and looking at the cycle wings, after 5 minutes he then jumps to the steering rack, 5 minutes later he moves onto the anti roll bar and at 17 minutes he starts lookg at the donor tank (from the sierra) and the rear boot cover. 2 minutes later we are back to the multi bend tube for the cycle wing brackets. at 22 mins in we start to look at the wiper motor (from the sierra), the bonnet and pick up (Bonnet catch). On to the heater matrix and fire wall at 27 minutes. Back to the cycle wings at 30 minutes, at 33 back to the luggage/boot cover at 38 minutes we are back to the cycle wings and plates for the cycle wing brackets. before finishing off at 39 minutes to look at the radiator. I am now dizzy and need a lie down!
-
The strip continues into October - I have taken a lot of the body panels off; I am trying to take it to pieces methodically (will i ever get the engine out?!?!?) - i am boxing and labelling at i go. Does anyone know the size of this tank? I am also going to install a fuel pump - has anyone done this and have you got pics of how you have done yours? Looking at the firewall and the strength of the pedal box and steering column. I am going to strengthen all this up when i rebuild. I am also going to change the alligator bonnet for a conventional scuttle and bonnet option. However, when taking the panels off. The cover that was on top of the gearbox held a little secret... like most of you the wiring keeps me awake all night!!! I will go through it and strip out whats not needed. I have hung it up on the wall and using hooks i have hung this up with a very dodgy drawing outing the whole car. More on the wiring later...
-
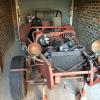
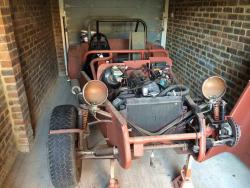
Hello all I thought i would have a go at starting a build diary... The story so far…We moved house in the summer of 2014. To my luck (albeit my wife (Jo) would say otherwise) the house came with a car in garage! I had always hankered after a seven type car! After cleaning up the garage - and sorted out some parts this is what i had been left with; Not bad i thought. After a bit of digging around i found this forum and agentzed, Ian & Carole and tazzzzman1 helped me to identify that i had a Sliding Pillar car. The engine turned over as well - yippie. However, i will be covering to an unleaded head at some stage. I do know that i have a fast road cam. So, i made the decision as the car had never been finished to strip the car and start over. I have the V5 and i will at some stage have to write to Ford to verify the age of items (Engine, Gearbox and Diff) for the IVA. Stripping it will give me a chance to recondition and clean bits up and i will be safe in the knowledge i know my car. Most of this work took place in September 2014.
-
Thanks for all the replies. Useful to know they are mini shocks. I got a couple of vibration mounts the other day which I think will do the job and act as the bottom bump stop or bush. I will post photos soon. I have her nearly stripped (the car that is...) with only the rear subframe and diff to go.
-
Thanks Agent Zed for the quick reply. Do you know where I can get a bottom cup/bush from. It's looks like the original was make from a plasticky/foam substance. Or is this something to fabricate?
-
Hello all. New to the forum, membership and ownership. I inherited a 2b but know very little about it. I'm really starting from scratch as the project wasn't finished I thought I would disassemble and then build it from scratch. Which will also give me an ideal opportunity to service and recondition parts. The question I have for you good folk is what 2b type is this? I have noticed the bottom bush is u/s so need to know what I am replacing with. And also is there a conversion I can do here to bring the handling up to date! The front hub has a spring above the hub and to the front of this is a separate front shock. On the rears their is a spring which sits in the bottom trailing arm, housed at the top by what looks like a modified front sierra suspension upright. To the rear of the is a large rear shock. If I can work out how to I'll post pics later. Thanks in advance