James Agg
 RHOCaR Member
-
Posts
47 -
Joined
-
Last visited
-
Days Won
1
2 Followers
.thumb.jpeg.47e57fe9adcb060f138d8eee7fc70bac.jpeg)
James Agg's Achievements
")
Getting there Builder (3/6)
2
Reputation
-
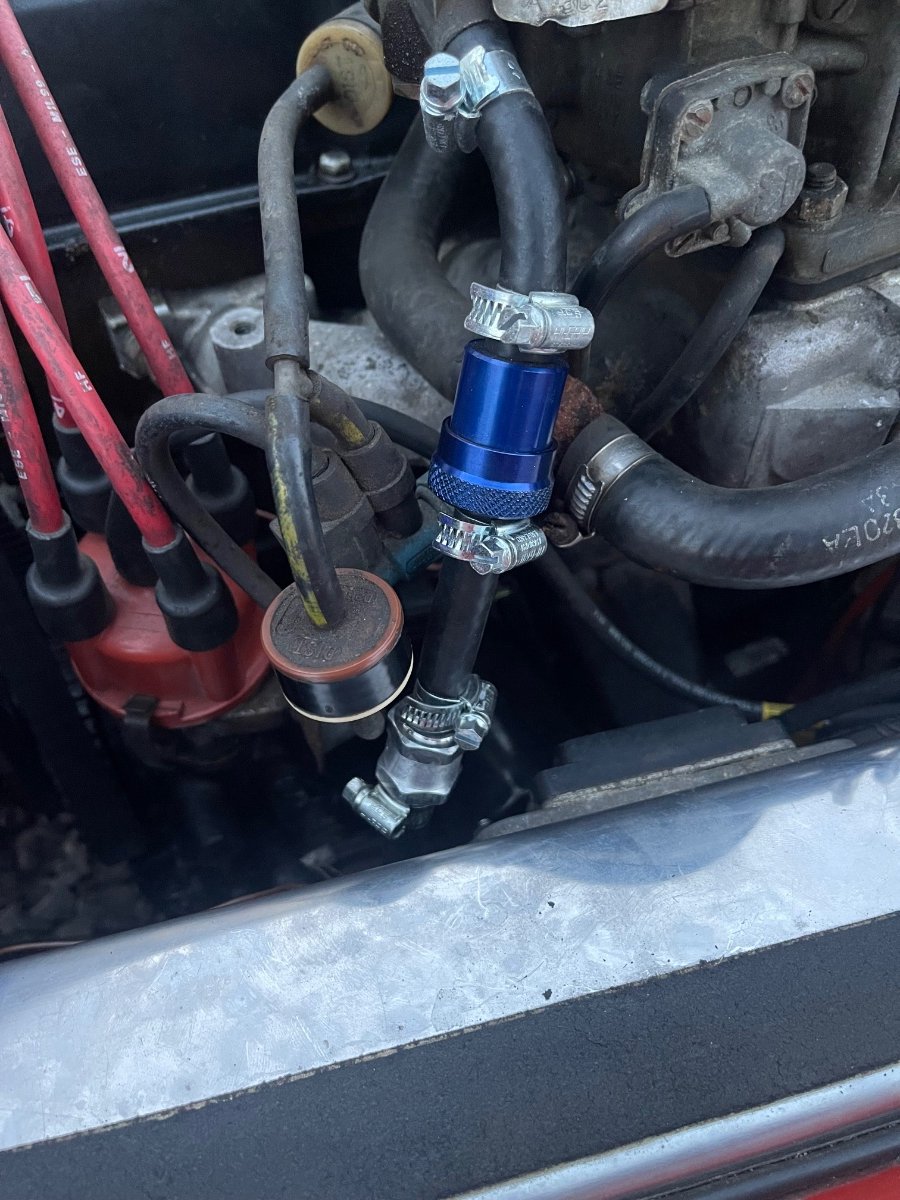
It doesn’t act as a filter - that’s what the blue bit is. The valve is the silver bit immediately below it. The non return valve was readily available at Halfords of all places! Plenty of online places do them too.
-
In all the time I’ve had my RH Series 2, it’s always taken a long time to start it when doing so from cold and yet when warm, it’s fine. I always attributed this to being something to do with carb balance or something up with the choke assembly… I have been helping a friend troubleshoot an issue with his Bentley Arnage where it seems to be suffering from fuel starvation on startup. Having looked extensively into the cause of the issue, the part in question is a dodgy non return valve in the fuel line shortly before the fuel filter. It was at this point that I suddenly had a brain wave… It dawned on me that mine was never built with a non return valve in the fuel line, and so it was in my mind feasibly very possible that inevitably the fuel in the lines before the carb would simply dribble its way back towards the tank the longer it sat there, hence the long long time cranking as being a mechanical fuel pump, there is no priming and the fuel has to find its way along the length of the car before it reaches the carb. I have just spliced in my non return valve just before the fuel filter which means that a little reserve of fuel sits in the filter basically and is ready even after the car has sat for a while. If you haven’t done this and you’re having slow starting with your carb based pinto, do it! Mine is more or less an instant start from cold every time now! Soon going to be popping my FAJS throttle bodies on this thing so that it becomes fuel injected. The car just keeps getting better and better

-
Hello all. I found this thread when searching for the typical oil pressure range on a pinto engine - I know it’s an oldie but if anyone is watching it, perhaps someone can enlighten me? My values seem to be mostly normal, however I have noticed that my oil pressure drops by as much as 20psi if I’m giving it the beans. Is this normal? And if not, what is the likely cause for the drop?
-
here we are… https://www.rallydesign.co.uk/product_info.php?products_id=21723
-
I too vouch for Trackace - I have the kit and in my view, it’s a must have for any kit builder/tinkerer. Seeing as the tracking is all done with the car on the ground, it’s far more realistic and accurate than tracking that’s done on car lifts. I’ve always been very happy with the results of my self tracking using it. I think I got mine for £60-70 but yes, it’s gone up, but even then, you can pay that for one tracking session at a tyre place these days so it really does pay for itself. Re track rod ends and getting the reach right - if you’re finding that you don’t have sufficient thread on the track rod, you can get extenders. There was a kit I was building about a decade ago that needed some owing to the rack (a Sierra one I seem to remember) not reaching wide enough for the hubs and I seem to remember getting my extenders from a site called Rallydesign. They have lots of goodies like that.
-
Thank you both. Your fault finding ideas were extremely helpful and I learnt a lot in the process - electrics on cars have never been my strong point, but I feel more confident with them after this experience.
-
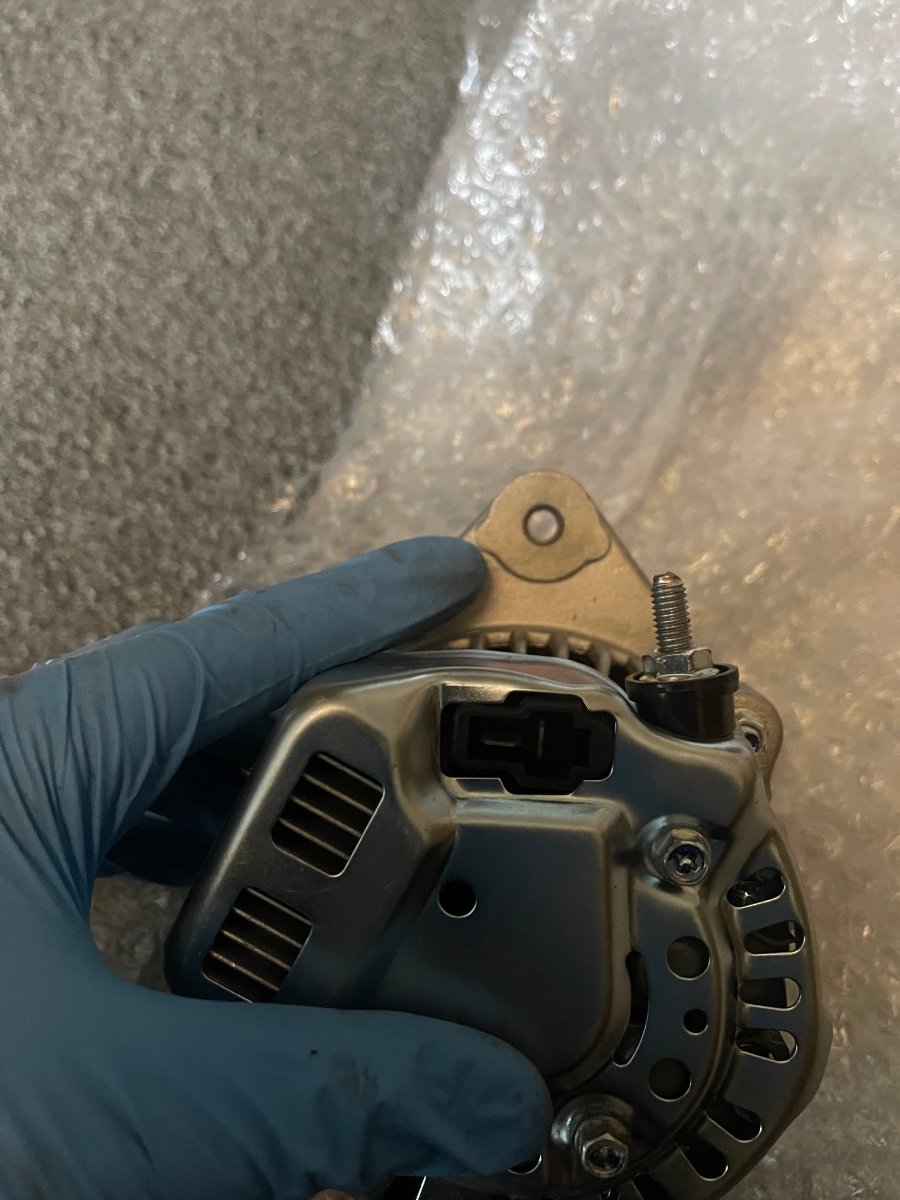
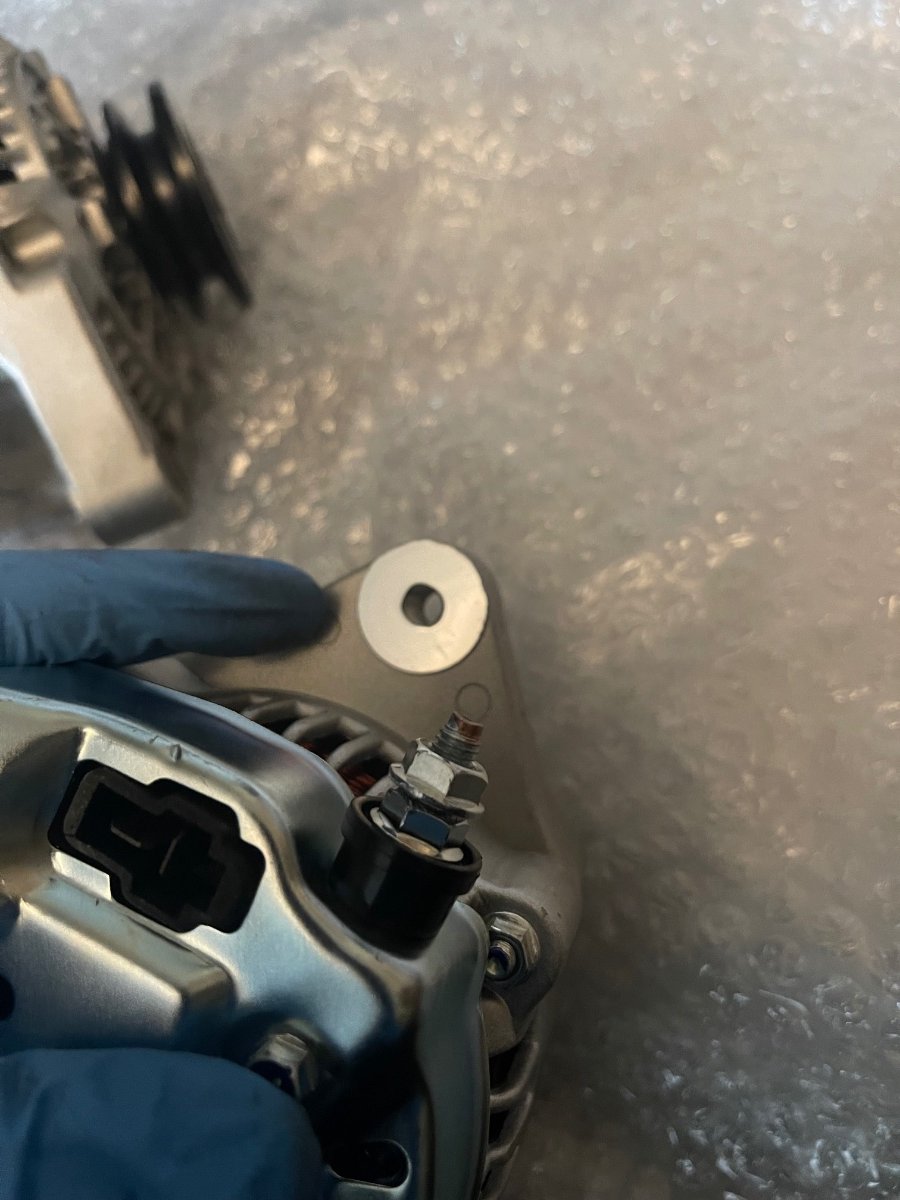
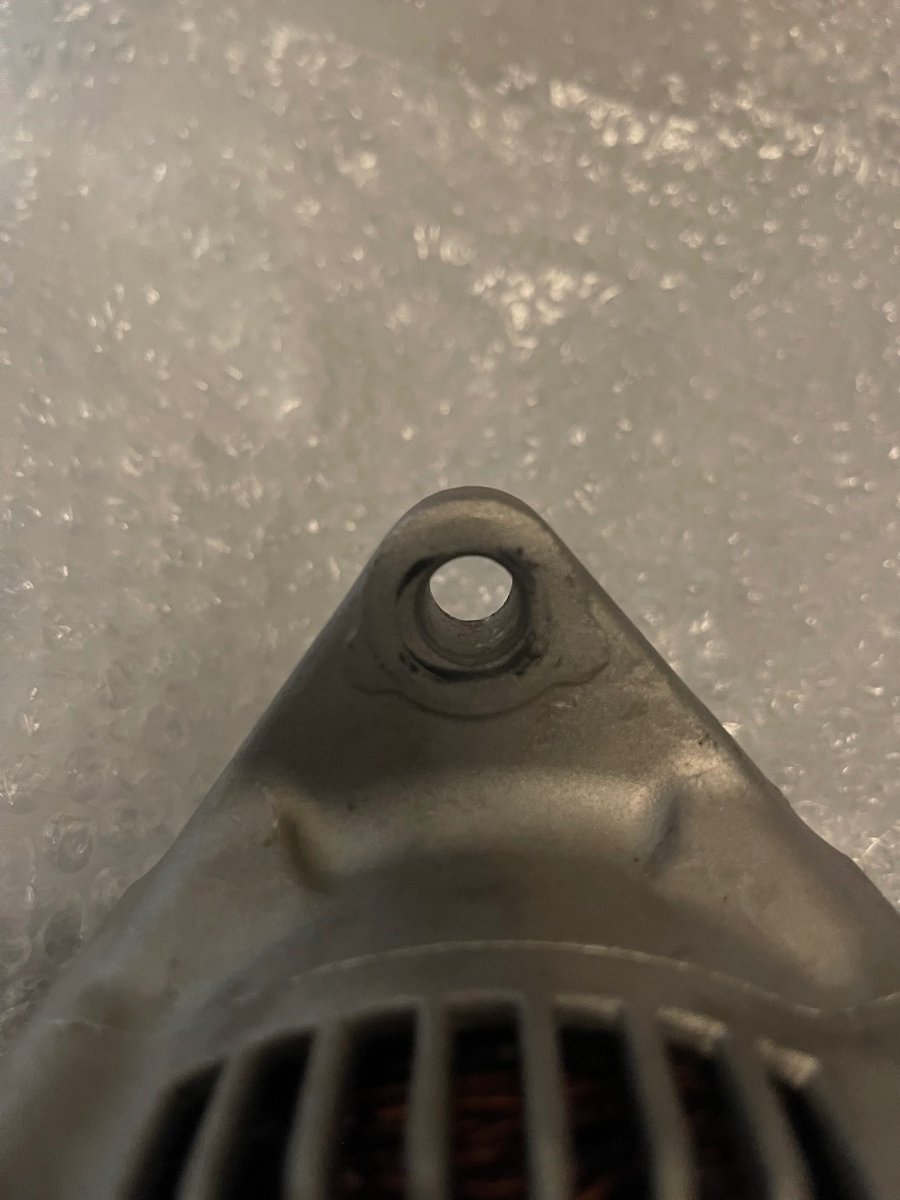
Hello all. Thanks for your help with all of this. A replacement arrived today and having compared the two side by side, the problem became alarmingly obvious. The trouble was earthing all along, but not because of my mounting bracket or my wiring, but because whoever did the quality control at the alternator factory failed to spot that they had powder coated over the surface of contact with the bracket (see photos!) My explanation for my theory on it briefly giving charge can be found when you look closely at the lower mounting eyelet which is of course a swing/pivot to allow for belt tension adjustment. Whilst I was faffing around with it, I likely gradually wore away some of the paint on that eyelet at which point it found a tiny bit of earth, but given that it was a fairly bad earth due to there only being very small contact, my guess is that when I drove it, it pushed current through the alternator thanks to that small spot, but resistance would have presumably been very high and the alternator became toast after a fairly short drive owing to needing to push all that current through a lot of resistance. Just a theory anyway - not saying it’s correct. Thanks again. Very happy now and great to see a good steady 14.26v even with a load test!
-
Yeah, I’m inclined to agree… definitely 12V, unless the advert for it is wrong…
-
Still nothing. See video… I’m stumped, and defeated and am more and more of the thinking that it’s time to return the alternator ffbfef16-3167-449c-bd42-3df07890fec1.mp4
-
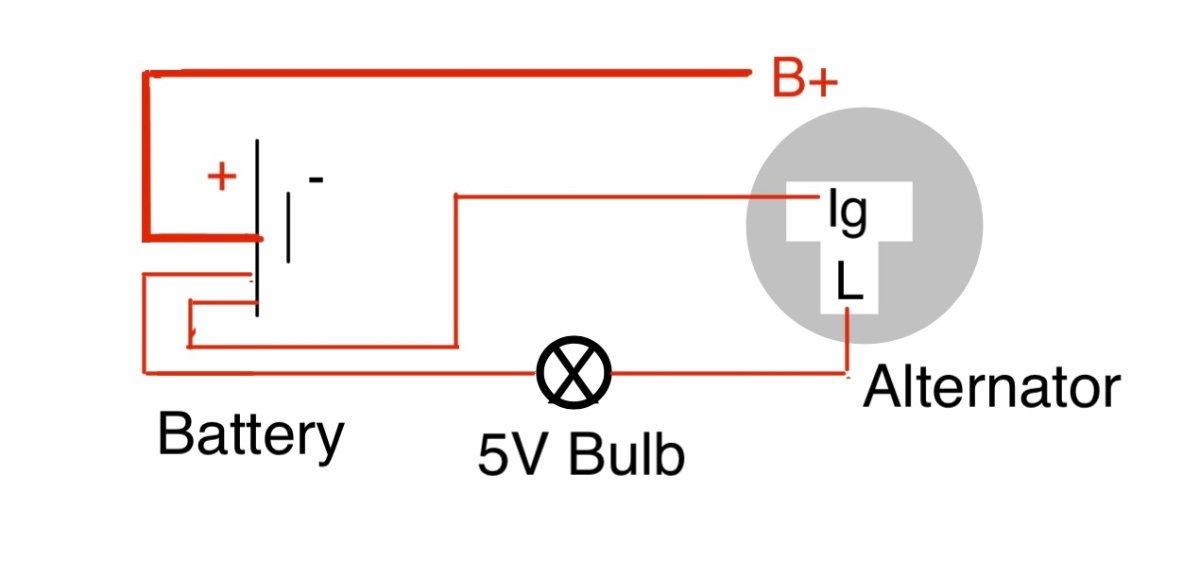
Oops, that meant to be 5W bulb, not 5V
-
Oops, that meant to be 5W bulb, not 5V
-
Yeah sure, I’ll definitely have my voltmeter on there as well to see what it’s doing. Does this diagram look correct for a test? If so, I’ll get to it right now!
-
Ah ok, so, when you say eliminate all wiring, you’re suggesting a direct wire from the positive terminal of the battery to the ignition terminal on the alternator so that it isn’t switched at all? I guess that’s ok as a temporary measure as it’s just for testing - I imagine the purpose of the 12v feed to the regulator being switched is so that the regulator doesn’t drain the battery when the car isn’t in use right?
-
Alas, I have tried all suggestions, and the alternator is still not doing anything at all. As far as I’m aware, the alternator only gave charge to the battery a grand total of once and it was over a 3 or 4 mile journey having not worked before, and after that, it stopped giving charge again. I also tested the alternator’s voltage from the B+ terminal without it hooked up to the battery and with the car running and it seems to only give a reading of 0.4volts with it being turned by the engine on idle. I’ve checked the ground, I’ve even sanded back the bracket to ensure that there is bare metal, and it’s still not working. I sadly think I have a duffer of an alternator or a duffer of a regulator built into the alternator. Can’t think of anything else… how disappointing. I don’t think it can be returned as it was an eBay purchase
-
Ah I get your suggestion fully now, and it’s a goodie. I will try this next… I didn’t seem to have a charging issue before. The alternator I removed was working fine. The reason for changing alternator was to put a smaller one in given that the standard alternator I had in there before was much bigger and was in constant contact with the steering column. I had to raise the column to give my 6ft3 frame more room, but alas, clearance of the alternator wasn’t there.