PaulF2B
-
Posts
106 -
Joined
-
Last visited
Content Type
Profiles
Forums
Events
Store
Community Map
Everything posted by PaulF2B
-
The upper mountings are the standard Robin Hood 4 tubes welded to the cross member, that was fine, seems I just need to use the correct bolts. Checking my bolts they only had 1 radial line so from Phil's link that must be below a grade 5, I'll just replace with a Metric 8.8 and all should be fine.
-
Well done Pete, a great result, a first time pass is better than some of the manufacturers can achieve!
-
mmm it has just made me re-check the IVA manual and we don't have to use 7/16 UNF we can use metric bolts. I know traditionally seatbelts have always been fitted with a 7/16 UNF but It is probably easier to use a M10 which will be easy to get with a 8.8 stamping. The book says: "Bolts used in structural areas should be of grade 8.8 or better. Such bolts will be marked 8.8 or 12.9 on the hexagonal head, however, cap-head bolts or 7/16" ( 11mm ) UNF seat belt anchorage bolts (with an anodised finish) not marked in this way may normally be considered to be of equivalent strength. Bolts should be M8 or larger."
-
Thanks for the link Phil, I will need to check them. But that answers why I am struggling to find imperial bolts with 8.8 stamps.
-
Thanks all for your comments, I think my target has to be to get on the road for the Donnington show at the end of August, then maybe a trip over to the Waterside Inn They are very careful on anything that is safety related, checking for Nylocs or double nutting on all critical bolts, also ensuring all bolts are long enough to have a few threads coming through. Any Ford blue locking compound from the original bolts had long since worn away over the years so it was a good point I had not considered. Cheers
-
Hi All, Just been through my first IVA this week with my 2B SubK at VOSA Derby, afraid it failed, but I think most first time self builds do, actually one of the guys there said; even many of the Westfield factory builds fail first time. The test started at 8:00am and lasted over 3 hours followed by about another hour while all the paperwork was sorted. But at least I have a reasonable list of issues to fix (about 19 in all). Here's some of the points they picked up that are worth watching out for: The first issue was a bit of a fuel leak between the tank (standard 60L sierra) and the filler pipe, I think this catches many of us out as the first time I fully filled the tank (a requirement for the test) was on the morning of the test sitting on the trailer, we all tend to work with a couple of can fulls of fuel in the tank during the build. So I need to drain out some fuel and refit a new seal. The next issue we spotted backing the car off the trailer, one of the brake lights had failed, was working fine when we loaded it, so must have got shaken up on the trailer (was a bit tight going over Swarkstone Bridge!), so may be worth taking some spare bulbs for the test. All other lighting was fine. The emissions went through fine, next up checking all the build quality, sharp edges etc. The bolts I used for the harness mountings were HT Steel 7/16 UNF the standard for seatbelts, but mine had not got the telltale 8.8 (or higher) on the heads, as I also did not have documents proving they were HT they will need replacing. The only other thing that needs replacing on the interior was the gear knob, I had a Chrome Golf ball style knob, I need to replace it with a standard ford one for the re-test as the dimples were just too sharp. Also on the harnesses, the back edges of the upper mounts need to meet the 2.5mm radius so I need to fit covers or some edging. There is also an edge on the plastic of the fog and reversing lights I need to round off. I will need to raise the headrests as they do not currently raise high enough, so will probably need to weld some longer rods to them. The head rest has to be high enough to support the head not just the neck as mine did. The brake tests all went fine until the handbrake was tested, it seems the O/S rear lever was sticking so only the N/S was working effectively, something to investigate. There were a couple of things picked up on the front end steering / suspension, the brackets underneath the anti roll bar (holding the rear rubbers) were not tight up to the floor of the car (a few mm gap each side), I couldn't tighten the bolts any more as it would crush the rubber, so I will need to fit some spacers (or lots of washers). Also on the front hubs I have fitted spacers to clear the wheels of the calipers, but this did not leave enough of the stud left for the nuts to fit on, then only went through about half the nut. Generally all bolts need to come through a nut with at least a couple of threads to spare. So I need to fit longer studs to the hubs or different spacers with extension studs. The front brake host was not adequately supported as it went through a grommeted hole in the bulkhead, so I plan to get some new hoses made up with integral support brackets, also the bolts holding on the front calipers had no locking device, I need to use some threadlock and then make sure I take the tube/ bottle with me to the retest so they can verify it is OK. The fuel pipe in the engine bay needs shortening a bit to stop it touching some of the edges of components (Distributor vacuum connection) and some of the wiring looms need moving away from the fuel pipe too. The battery +Ve lead was too long and unsecured out to the starter motor and needed a cover to the terminal to protect it (from dropped spanners etc), so shorter lead and a rubber cover will sort that one. Next was to take the car outside, the examiner drove it round the block and verified the steering self centering was fine and verified the mirrors were all OK, but afraid it just failed on the noise came out at around 103/ 104 dB, so I will need to find a baffle to attenuate the sound, surprising as it does not sound that loud. I think that's about it, a fair list for me to work through and a very fair test, the examiners at Derby VOSA were very knowledgeable and helpful throughout the test, giving some good advice on how I can resolve the issues. Now just need to get together a bit of a shopping list for Stoneleigh at the weekend, I plan to be there Sunday so hope to meet many of you all there, fingers crossed for some fine weather!
-
If you have Sierra hubs, these wing brackets from Rally Design fitted perfectly on my 2B, See link: http://www.rallydesi...oducts_id=11857 Looks like they do ones for the Cortina hubs too.
-
I found this company on e-bay that sell various types of marine canvas with and without PU coatings, I have bookmarked it for when I plan to make my Surrey, link: http://stores.ebay.c...ricspecialists/ They also sell various fixings/ press studs that may be needed too. I guess if it is good enough for a boat it should be waterproof enough for a hood! Not sure if anyone has used them?
-
Well done Mark, congratulations! I have my 2B SubK with Pinto booked in for next Monday (28th) at Derby, fingers crossed. For my 2B the plate GBS provided for me is at also at 1050Kg (450Kg & 600Kg on the 2 axels) same as yours, but then I have bigger steel tubes and all steel panels (except nose & rear wings) then add in the required full tank of fuel (I have the standard Sierra one), hopefully if it is out I will also just have to sign off a declaration Although when they called me from the test centre to arrange the date they did say 99% of kit cars fail first time, very encouraging! But then went on to say bring lots of trim, edging & tie-wraps as lots of things can be sorted on the day. .
-
Mine is noisy with the ignition on but engine not running, I don't think they like running into a "Dead end". When its pumping it quietens down nicely. I fitted a local isolation switch so you can work on the car with the ignition on and still hear the radio It could act as another anti-theft device too!
-
mmm I did say ball park figure, maybe you need to be looking for a figure below 90db from a phone/ tablet to be confident.
-
I Like Pete Lee's idea of the scouring pads - Brillo! I am currently waiting for a date for my test at Derby (forms all in and monies paid), I plan to use a trailer you seem to be able to hire them for £50-£60 per day seems the safe option. Don't forget to check the speed rating on your tyres when specifying the max speed. There are a number of Sound/ noise meter Android/ Apple apps you can download for use on a phone / tablet, they are no substitute for a calibrated noise meter, but should tell you if you are in the right ball park.
-
Thanks Dan, Nice template
-
Thanks David, That is a second option
-
Great, thanks Ozz for the quick response. That's clear, I will create my own VIN number based on the rules. Best regards Paul
-
Hi, I am hoping to be going through IVA in the next few months with my 2B Sub K and applying for an age related plate (G Reg'). What are the options on the VIN Number? Should I be creating a brand new VIN number where I guess a new G Reg plate will be allocated or can I re-use the donor VIN number and keep the existing Reg from the old Sierra? Thanks for any advice on this one Best regards Paul
-
Hi Steve, I had the same problem and was not able to find anything off a newer Ford that would fit either. So I ended up soldering wires to the pins and pushing a PTFE sleeve over each terminal to isolate it. Then I took the wires out to one side of a set of Molex connecors to make it removable. Made a nice clean job in the end! It's a bit fiddley and you have to take care not to get too much heat on the terminals as you could melt the internals, but it may be an option if no one has any at the bottom of their parts boxes (or man draws!). Cheers Paul
-
Hi, Just wanted to add an explanation on why you put the switch on the –ve side. Although as stated above, this is a circuit and the current out should equal the current back, this is only true when the motor is already spinning and there is steady current flowing. The issue is at the instant (time 0) when the starter switch goes on, the initial inrush current can be very high flowing from the battery to the motor to create the magnetic flux and start to move the motors armature. So this energy used to do this will be in the form of a Spike or pulse leaving the +ve terminal and going to the motor to be dissipated. It is this short spike or the back EMF from the motor that can damage the isolator switch if it is places in the +ve side. If you look at a battery it may be rated for CCA (Cold Cranking Amps) at say 280A but you would never be able to run a steady 280A through a cars electrics without melting the wiring, but it can provide that initial momentary surge of energy required to get the starter motor moving on a cold morning. Hope this helps explain why you should fit the isolator in the negative. Regards Paul
-
Hi, Yes, the buzzer will sound at any time when the fog light switch is left on when it is not allowed under the IVA rules. This was how I interpreted the reg's. So if you have been driving in fog, then turn off your head or side lights the buzzer will sound to inform you the fog light switch was inadvertently left on. Seems to work OK this way in my testing. I guess the ideal thing is to use a door switch in series with the buzzer, but we don't have such luxuries in a Hood Until we get a few people going through their IVA's and get some feedback, we will not be 100% sure how the examiners will interpret this. The ideal thing would be if they could put the required logic in a truth table. It will be interesting to see what response TurnipFarmer gets from VOSA. Regards Paul
-
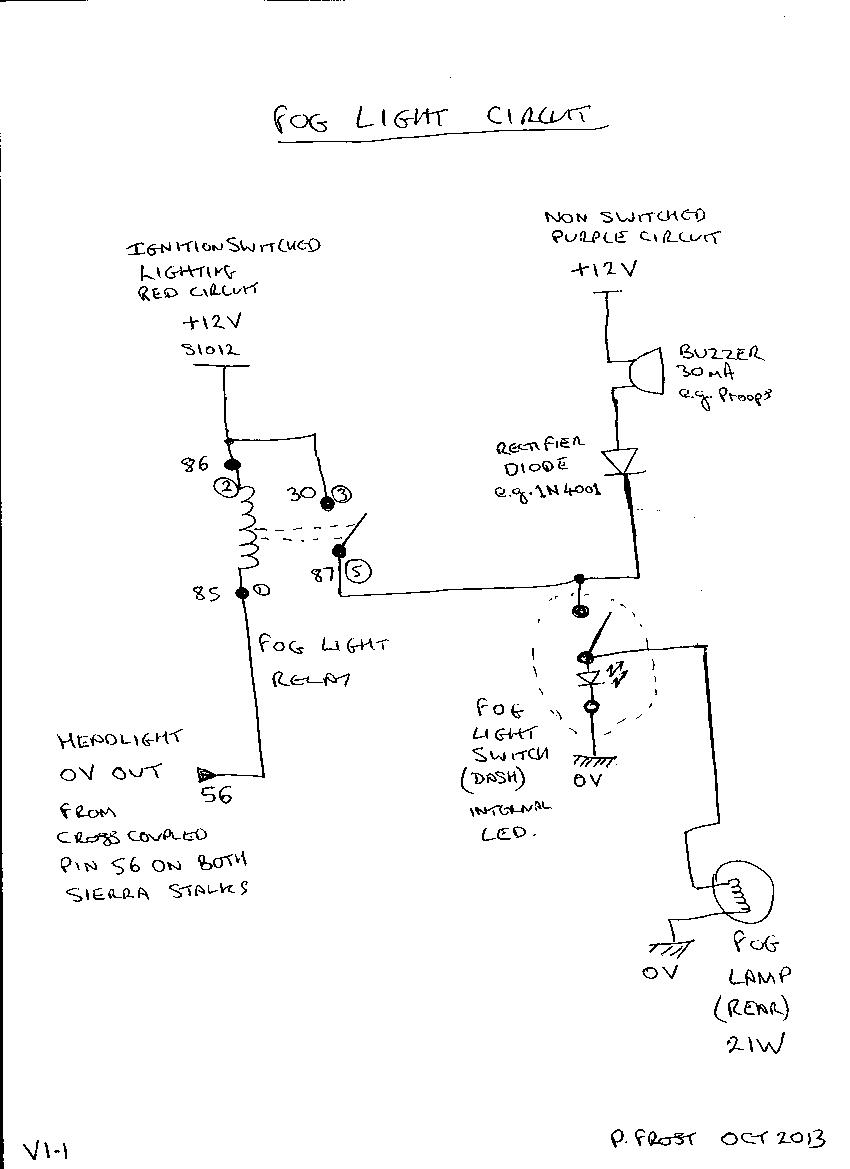
Good spot Simon, Sorry was a typo' when I drew it out, I have corrected the drawing as per the circuit in the above post. The Diode is for protection should one of the fuses go, but it can be omitted if required. Regards Paul
-
Hi, I attach a copy of the fog light buzzer circuit I have just implemented on my 2b, this only requires a single relay and still allows the single pole switch to be used. When the main or high beam is on the relay will be energised allowing the fog light to operate, otherwise the relay will be off and no fog light will be on, irrespective of the fog light switch position. However if the relay is off and the switch is turned on, then the buzzer circuit is active, allowing the buzzer to be grounded through the switch and the lamp itself making an audible tone. As the buzzer only takes a few mA (30mA for the one used) this is insufficient to light the 21W fog lamp itself which takes 1.75A. So whenever the you do not have both the ignition and headlights on, the buzzer will sound to tell you the fog light switch has been left on. This should meet these latest IVA requirements. The buzzer was only £1.50 from Proops (Ebay) and a few pence for the rectifier diode so this should be a very cheap, quick solution. The numbers on my diagram are based on the Sierra stalks and colours are from the Vicky Green loom. Hope this helps Regards Paul

-
Hi Tim, If you follow the topic in electrics "New Iva Fog Light Requirements" there are a bunch of options people have come up with there for the fog lights. Also I am sure Pete Mar will send you his circuit if you PM him. I will put any updates I get there too. Hopefully the wiring diagram will allow you to check out the voltages at the different points with the switches in the different positions. Have you got a Haynes manual for the Sierra as that will have the internal wiring connections within the stalks? I checked on Ebay and there's lots for sale for a few quid, definately a worthwhile purchase. Good luck Paul
-
Oh, forgot to mention the troubleshooting 101, to check the fuses in the loom
-
Hi, I am also following a similar route to you, buying a part finished 2b project that came with all the electrics in a box with the VG loom & Sierra switches. My electrics are almost finished now (just to sort the fog light to the new regs), but I have attached a copy of my indicator circuit. The colours are from the Vicky Green loom and I am using the Sierra instruments, I hope this helps diagnose the problem. On the Headlamp Flash, make sure you have put in the link wire from the left to right switch assemblies, connecting the terminal 56 on both units. If your headlights are working then you should have the 0V connected to the angled spade terminal 31 correctly. As for the brake light you will probably need to check the 12V through the pedal (or hydraulic) switch back through to the brake lights, then check the ground from the light cluster. Hope this helps Paul Indicator circuit.pdf