


AndyW
 RHOCaR Member
-
Posts
395 -
Joined
-
Last visited
-
Days Won
6
Content Type
Profiles
Forums
Events
Store
Community Map
Posts posted by AndyW
-
-
Yes please. Add me to the list.
-
On Safari browser on phone it's under hamburger menu (3 lines) and Portal >
-
 On a desktop browser...

-
I bought my Lucas wiper motor used off eBay, but both SVC and Car Builder Solutions do a complete kit new for about £160 +vat. Comes with the motor, mounting strap, bundy tubes and 2 wheel box gears with wiper spindles. You can choose different gearing to get the correct sweep angle.
-
Which wiper motor do you have? The Superspec was supplied with a Sierra motor with cut and modified linkage rods. As this is quite bulky behind the dashboard lots of people fitted the Lucas 14W wiper motor instead. This is quite compact and simple with a push-pull cable drive to the wiper axle boxes.
I can’t help if you have the Sierra motor, as I fitted the Lucas motor to my Superspec. Parts can be obtained from SVC and they have the 5 pin connector available…
https://www.s-v-c.co.uk/product/wiper-motor-connector-kit/
and a wiring diagram is athttps://www.s-v-c.co.uk/wiper-systems/
Let me know if you need more help.
-
When I fitted the Lucas Mini wiper motor to my Superspec (similar to 2B) I mounted it on the inside of the firewall in the passenger footwell. Used 2 short bolts to hold the U bracket securely to the firewall. It’s at 45degrees so the drive tube curves smoothly up to the spindle gearbox on the scuttle. Has been secure and worked fine for the last 4 years.
-
 1
1
-
-
I’ve always found Woolies good for all trim materials
-
 2
2
-
-
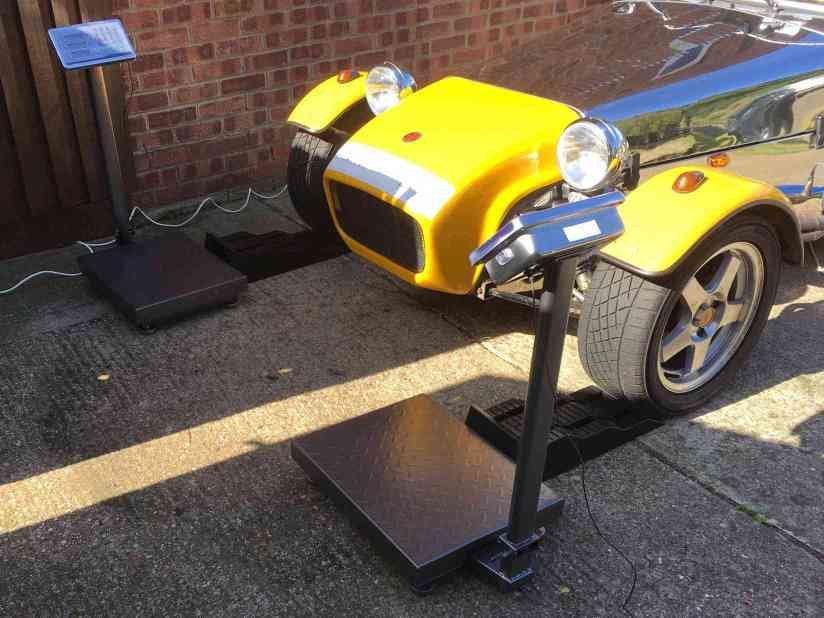
I corner weighted my RH Superspec (similar to a 2B) last year, mainly to sort out the handling and ride height.
I found the car weighed 814 kg including approx half a tank of fuel and the spare wheel, but without driver or anything in the boot. I'm not saying what it weighed fully laden and with me in the driver's seat!

-
Scales now sold.
-
I purchased 4 heavy duty scales from another club member a while back so I could measure and adjust the corner weights on my Superspec. Now I've finished the work and successfully balanced the car so that it feels much better on the road, I need the garage space back, so would anyone else like the scales?
They are heavy duty steel parcel scales each capable of weighing 300kg, so 4 are more than enough for a Robin Hood or similar kitcar. They run on mains or built-in rechargeable battery (will need charging) and have adjustable feet for leveling.
This external link is to similar scales currently available for £100 each
https://www.ebay.co.uk/itm/284366531566I would like £60 for the set of 4.
As the scales are quite heavy and bulky even when folded down, and the boxes are not in very good condition, I would prefer collection. I'm in Bedford.

-
Like you my garage is used for other storage, so my Superspec stays on the drive all year. If you don’t want to pay the price of a Stormforce cover, which are very good, there are some cheaper options. But to a large extent you get what you pay for!
I’m now on my 3rd car cover in 6 years. Got my first one from CBS which wasn’t bad and lasted nearly 3 years. It had a fleecy fabric surface that eventually ripped from repeated putting on & off. I then replaced it with a cheapo 2 layer cover but that only lasted 2 years before the outer plastic surface started to crumble and disintegrate.
I’m now using a Halfords All Seasons cover which seems much better. It has several breathable layers with a plasticised outer and a fleece liner and is more heavy duty, but needs a bit of effort to lift over the car. Time will tell how long it will last but it seems fine after one winter. It has 3 tie straps that are supposed to go under the car to hold it on, but I found them difficult to use quickly so I now hold it on with long bungee straps over the top. I would say check the measurements and don’t get a cover that’s too large for the car or it will flap about. XS was fine for my car.
-
My understanding is that shielding should only be earthed at one end to prevent transmission of electrical noise, so it’s normally earthed back through the ECU. But yes, if you earth your new sensor shielding and keep it separate to the engine loom shield you should be ok. Unlike Al’s wiring I used 2 core shielded cable to follow the Rover wiring diagrams where both signal +ve and -ve are shielded. No idea if it makes any difference though.
-
A sorry tale Graeme
 . Two months after I got the car the left front shock absorber snapped. Story here...
This caused the coil spring and top cap to fly around between engine and rad - snapped the aux belt - wrapped itself around crankshaft pulley - seized engine - snapped cambelt. I eventually found I had several bent valves, scratched pistons, and some cracked valve guides.
I was in at the deep end as a mechanical novice, but I had lots of help from club members showing me how to strip the engine and remove the head to make the repairs. However I did need a local engineering company to clean the head and replace the valve guides for me.
Second time I had to remove the head again 9 months later to change the valve stem oil seals. I found that the gasket kit I used for the original rebuild had the wrong oil seals. There are two height variations for early/late T-series engines, and using the wrong ones caused excessive oil consumption.
Strip down becomes easier when you’ve done it once before

-
Whoops! Payback for giving it a good thrashing
Are you going to replace it yourself? Having taken the head off my Superspec twice now, as a novice mechanic I can say it's perfectly do-able and straight forward with normal tools and a torque wrench. I've got the Rover T-series overhaul manual if you want a copy of the pdf (pm me).
Also remember to replace the head gasket with the later Elring Klinger black multi-layer metal plate head gasket.
-
I’ve had dodgy relays before that wouldn’t switch first time or consistently. So it’s worth checking the earths and all pin connectors and try swapping the relay for another good one just to check.
It might also be worth checking the hoses to the fuel pressure regulator. Particularly that the small vacuum pipe is connected, not blocked, kinked or perished.
-
When you turn the ignition on before engaging the starter can you hear the fuel pump run for a short time? It should prime for a few seconds to pressurise the fuel system. Check the fuse and relay to the fuel pump.
-
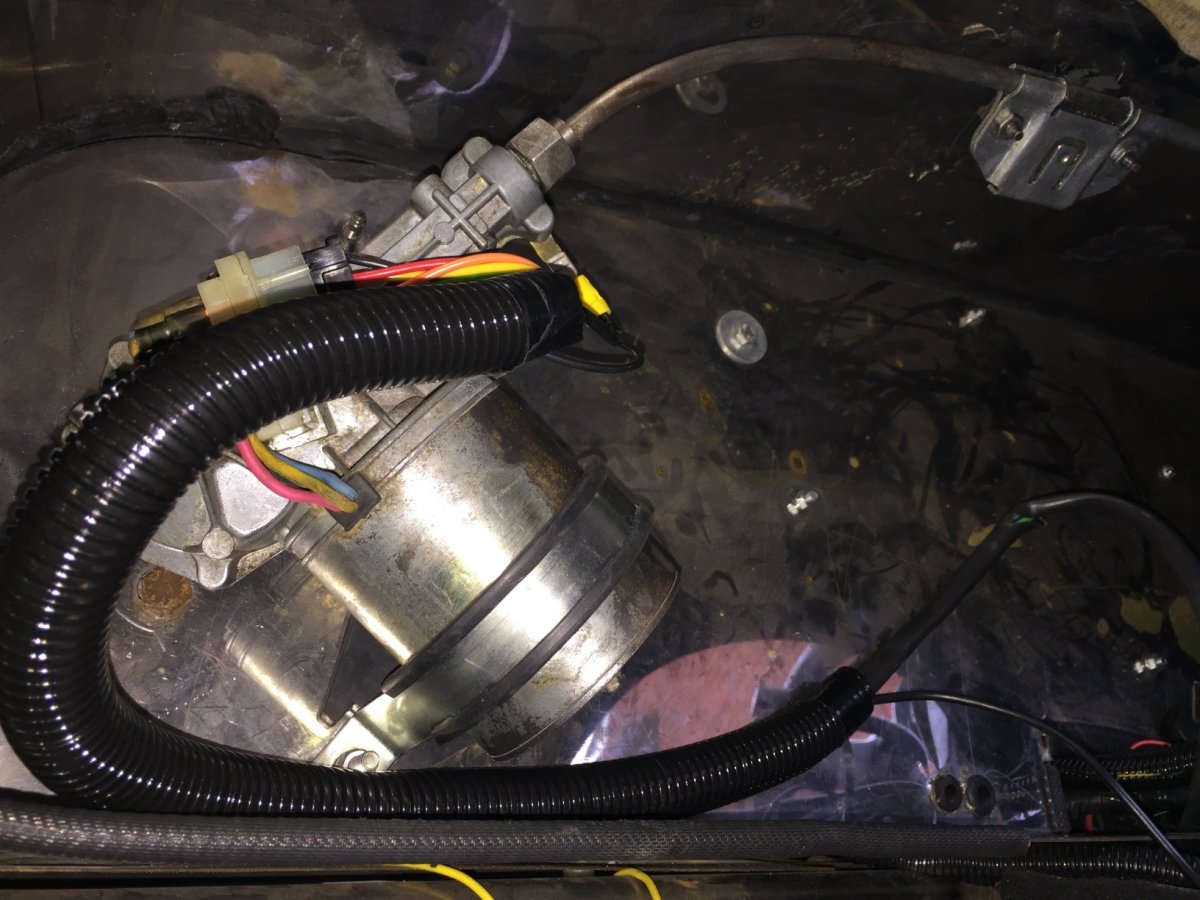
Hi Graeme, yes I fitted the Lucas wiper system a couple of years ago. Here's a photo of my setup taken from the passenger footwell. I mounted the motor on the inside of the firewall, and at an angle so that the bundy tube was lined up as much as possible with the wheel boxes.
-
I don’t see how it would work without the bundy tubing. The tube provides the resistance and fixed distance to the wheel boxes for the motor to push and pull the cable through. Without it the motor would just straighten the arc of the cable and not move the wheel boxes.
I have to admit I found it tricky to fit the bundy tubes. The lengths have to be correct and the ends of each section have to be flared to hold into the nut on the motor gearbox, and into the clamps on the wheel boxes. Curves have to be gentle and it’s easier if you bend the tube with the inner cable in place. And use lots of grease in the tube when you assemble it to reduce friction.
-
My Superspec has the MT75 gearbox and a 3.92 diff. Seems to be the luck of the draw when the kit was bought as some other Specs came with the 3.62 diff.
The 3.92 ratio does give better acceleration through the gears, although first gear is almost redundant. I often start off in 2nd. The downside is cruising on dual carriageways and motorways when it all gets a bit frenetic and buzzy with 70mph in 5th coming coming in around 3500rpm (speedo isn’t that accurate). We’ll certainly frenetic and noisy compared to cruising in my diesel car!
-
Hi Graeme, I'm interested to know how long you've had your cover, and how it's standing up to wear. Like you, my car lives outside all year round.
I've had 2 covers so far. First one from CBS lasted just over 2 years before it started ripping and letting water through the multi-layer fabric. Then I went for a Halfords cover which has lasted nearly 2 years so far, although the plasticised outer surface of the multi-layer fabric is starting to crack and perish, presumably from UV exposure and where I fix it to the car with bungy straps. It's still water tight, but I'm going to need a new one before winter.
Both of those covers were mid-range £40-50, so I'm wondering if the more expensive covers would last longer? Anyone have any other recommendations?
-
I’m pretty sure all Lucas 14W motors are interchangeable. The variations for manufacturers were 1 or 2 speed, sweep angle and length of tube and cable. Best to get a 2speed if you can. I don’t think you can tell the sweep angle from the outside as it’s marked on the gear under the cover
SVC has lots of parts and some useful info at
-
1
-
-
The Lucas 14W wiper motor was used on many British cars, so just find the cheapest you can. Parts are easy to get, and you can swap the gear wheel to change the sweep angle, or invert the wiper arm wheel boxes to change the handing.
I fitted one on my Superspec. Can’t get out to measure it atm but I think my sweep angle is either 105 or 115 deg which is fine. But the gear wheel can be changed if you don’t like the sweep.
-
You could try covering it with roll bar padding or sleeve.
-
Ditto Richy. The paint on my roll bar was always chipping and flaking and looked a mess so I removed it all 2 years ago. Used a flapwheel in an angle grinder then finished off with satin wheels and scotchbrite pads to give a nice brushed finish. I've only had to go over it lightly once since to remove odd rust spots with a pad.

Sierra Drum wheel cylinders
in Mechanics
Posted
I replaced both seized rear cylinders on the Sierra drums on my Superspec a couple of years ago. Without even knowing any specs my local motor parts supplier provided them off the shelf. Apec BCY1210 labelled to fit Ford Consul, Cortina, Escort, Focus, Granada, Orion, Sierra & LR Freelander. They don’t mention a size but I believe they are 20.6 mm bore.