


AndyW
 RHOCaR Member
-
Posts
373 -
Joined
-
Last visited
-
Days Won
5
Content Type
Profiles
Forums
Events
Store
Community Map
Posts posted by AndyW
-
-
Well done! Up and running after all that time. Who’d have thought all your problems would be down to a duff ECU.
-
Did you find the MKC number marked on your ECU anywhere, or are you going by the list on that website? Let us know how you get on with the company - might be useful for the rest of us with Rover engines.
-
The MEMS unit fitted to my Superspec doesn't have any part number marked on it either, just a Robin Hood label on the back warning about tampering.
The original ECUs fitted to Rover cars did have stickers on them with part numbers like MKC103310. So I suspect that RH bought a special batch of ECUs without labels when they had them modified to remove the immobiliser function.
If it helps there's a list of ECU part numbers for the different Rover cars at http://ecusdirect.co.uk/Catalogue/rover.htm#Rover Engine Management ECU
-
Hi Kerry, I'm interested in your scales. PM sent.
-
Hi Graeme,
Like you I’ve also been planning to redo the dashboard in my Superspec, but other jobs have got in the way, so not sure when I’ll get to start it. Same as you I was going to keep the existing dash shape as it’s welded to the scuttle, but re-trim it, and then put a plate on the central angled section to hold a new set of gauges. I like your shape by the way! I was going for a more trapezoid shape.
I’ve also been looking for suitable materials to make the plate. Rather than smooth or polished aluminium or stainless steel which would be too shiny, I’m tending towards a brushed, or machine turned finish or maybe a hammered or embossed texture. Another possibility is a matt finish plastic. You can get large kitchen or craft cutting boards in various colours and thicknesses.
Be interesting to see what you decide on.
-
Great feedback thanks Jim, Steve & Bob.
I'm not sure if or when the previous owner changed the brake fluid so I was going to do that anyway. And as far as I can see there are no leaks from the system. But I'll give the brakes a complete strip down and clean and see if anything looks amiss with the pistons in the calipers.
BTW, does anyone know what size/type the unions are on the Superspec Sierra front brake hoses? I might as well change to some nice new braided hoses while I'm stripping the brakes down, but not sure of the fittings. There are banjos on the calipers and some sort of bulkhead bracket/joiner on the chassis rail to the copper pipe.
-
Lately I'm finding that the left front wheel on my Superspec is very prone to locking up with only moderate pedal application. That's on a good dry road; on loose surfaces or wet roads I have to be SO careful not to lose the front end under braking.
What would make one disc brake more sensitive than the other side? It seems much worse than it used to, so what should I be checking, cleaning or replacing to get more equal and progressive front brake performance and stop the lock-ups?
Brakes are the normal Superspec Sierra vented discs at front and drums rear, with standard pads and shoes that have only done 6k miles so plenty of meat left on them, although everything is now 9 years old.
Andy
-
You can check resistance across the terminals of the sensor with the plug disconnected. To check the voltage with it connected you can sometimes get a thin probe into the wire entry point of the connector to reach the metal terminal. If not, in the past Ive pushed a needle through the wire insulation which is better than cutting it.
-
Al forwarded me your MEMS logfile to look at, and I agree with his comments.
As we've mentioned before, you've got something wrong with your air temp sensor as it's showing a fault code. But very oddly it seems to be producing inverted values, starting with high temps and getting cooler as the engine warms. Either the sensor is duff or it's the wrong type, or it's connected wrongly. Did you make the checks I suggested previously? Disconnect the multiplug and check the resistance across the sensor pins - it should be about 2400 ohms at temp 20 deg C (range from the manual is 5700 ohms at 0 deg and 1100 ohms at 40 deg C). Also, with multiplug connected and ignition on, check the voltage the sensor is providing to the ECU - at 10 deg C temp, the green/black wire (to ECU pin 16) should show about 2.8 volts, and the pink/black wire (to ECU pin 30) should show an earth.
Also as Al says, your battery voltage looks very odd, and I wonder if this is the root cause of your issues. The alternator output when running isn't high enough, as it should be in the region of 13.4-13.7 v, but yours is mostly 13v and below. Also it doesn't look very steady or consistent, whereas mine stays 13.5v +/- 0.1v for the whole of a journey until turning off when mine drops to battery voltage about 12.4v. The end of your log shows the battery voltage gradually tailing off down to 11.5 v over a minute which is not normal behaviour. It's as though your battery isn't holding voltage, or the alternator output is declining.
Engine voltage is critical to many MEMS functions, including air flow calculations, stepper motor control and resetting it after stopping, and coil output. I just wonder if this is the cause of the problems you are seeing. If the voltage is declining after driving for a while maybe the ECU can't function properly and is shutting down? I would get your alternator and battery checked, as well as the wiring between them and all their earth points.
Cheers, Andy
-
Sorry Al, cant make that Sunday this year. Daughter is running a half marathon in Oxford.
-
Hi Al, sorry I can't make this weekend either, much as I'd like a run out.
Cheers, Andy
-
Thanks Dave & cb750. It looks as though midi and mega fuses are much the same thing, except megafuses are larger and go to higher amperages.
Ill go for a 60 amp midi fuse and holder. Hope thatll be high enough to protect all the circuits.
-
Thanks Bob. Fusible link cables don't seem to be available now, apart from scrappies, so I wondered what current practice was. Anyone know if midi fuses serve the same purpose?
-
A question for the electrical experts, as I'm about to do some work on my Superspec wiring to sort out the rat's next of cabling and add extra fuses and relays.
Looking at wiring diagrams in various Haynes manuals, I noticed that many older cars seem to have a fusible link between the battery and the rest of the permanent live circuits, with something like a 60 amp rating. Presumably this gives some protection for the alternator circuit and the wiring upstream of the normal fuses.
Is it worth adding something like that while I'm redoing my loom? And if so, are fusible links still used in modern cars, or what's the recommended alternative nowadays?
Andy
-
Slight correction - it's the Halfords Autocentres that do battery tests, not the normal shops. I removed the battery from my car and took it in separately, where they put it on a test machine and gave me a performance printout. I presume you could just drive in and they'd have to remove the battery from your car to test it. BTW, they will advise and quote on a replacement if needed, but no obligation to buy.
-
It would be worth having the battery tested. I had similar problems with my Superspec for a couple of years. It would crank and start fine from cold, but when hot the starter motor would barely crank or just click. Went through all sorts of fixes with thicker battery cables and thinking the starter motor was overheating. But in the end I had the battery tested (free at Halfords) and found it only had half the cranking amps. A replacement solved all my problems.
-
Hi Steve,
You may recall I had to replace both belts on my Rover engine a couple of years ago (long story but broken shock absorber > flying spring hat > cut auxiliary belt > jammed around crank pulley > seized engine > snapped cam belt !!)
My car had been on the road for 8 years, although only done 3k miles, but the actual condition of both belts was ok. None of the cracking as seen in the photo above.
Parts I used for the rebuild were:
Cam belt - ContiTech CT803 (Eurocarparts p/n 325770465)
Alternator drive belt - ribbed 1152mm long. Rover PQS101590 (Rimmers) (Eurocarparts equiv p/n 202660085
Some Rover engines have a different alternator position, so it might be worth checking if the aux belt run and length is the same for both. Im not sure. My alternator is at top above the water pump.
Andy
-
That long L shaped bracket is correct for Superspecs. It holds the adjusters for the handbrake cables and also goes across the car to give a strong mounting points for the rear seat bolts.
Mine is exactly like that and has passed SVA and all subsequent MOTs without a comment. However it is low to the ground and often catches on garage ramps. Some people have mount the L the other way up so the upright is upwards.
-
The previous owner of my Superspec had the nearside wishbones replaced. They were only in steel not the gold passivated finish of the originals.
-
I believe that GBS took over the jigs from Robin Hood and can make up wishbones to special order.
-
The rubber block inside the square bracket is supposedly an engine mount from a Fiesta Mk 3. Quinton Hazell EM4063.
-
It’s a photo from last year when I had to remove the radiator to get at the front engine mount. The L shaped plate that goes over the cross tube had cracked so I had a new bracket made and welded on.
-
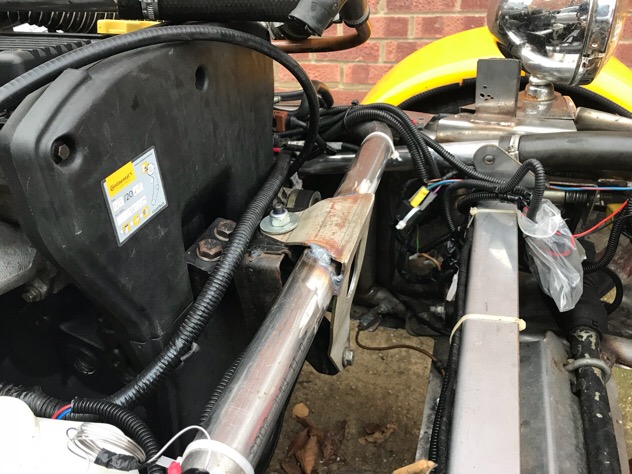
This is my front engine mount. The bracket that bolts onto the block looks different to yours?

-
Mine had cracked on the drivers side and was simply welded up to the chassis tube by the previous owner. Still seems to be holding several years later but I do check it regularly.
HELP!! Building a Super Spec From Rolling State
in Fitting & bodywork
Posted
Hi Lloyd
Welcome to another Superspec. There are about a dozen Superspec owners that we know about, but not many of us actually built our cars, so there is not much first hand building knowledge around. However, if you search back over the posts in this forum you can find quite a lot of information from the people who originally built the cars between 2003-2009.
You've got the Superspec build instructions in the 3 DVDs, but they were meant to provide extra details and differences from the Robin Hood Project 2B build instructions. I think there are 16 videos for the 2B that were uploaded to YouTube, so they would be worth a watch for basic build info, if only for a laugh! See part 1 at www.youtube.com/watch?v=CoXGacMEi-E
There's also a Superspec build diary by an original builder with blog and photos at http://www.super-spec.com/index.html which I've found helpful for information about the car.