


ozz
-
Posts
610 -
Joined
-
Last visited
-
Days Won
30
Content Type
Profiles
Forums
Events
Store
Community Map
Posts posted by ozz
-
-

(Zero 2.0 pinto injection now on ZX6R bike carbs kit collected end july 08.)
1st try fuel from carb breather -fires on 3 cylinders will not start.....-
solution. fitted presure regulator.
2nd try slightly less fuel from breather fires on one cylinder will not start.......
solution. New distributor cap and rotor arm.
3rd try no change
solution. stripped bike carbs found a sticking open needle valve - cleaned out crap
4th try no more fuel from breather fires on one cylinder sometimes two will not start ......
solution. checked timing belt timing settings realised that the yellow blob on dizzy is not a timing mark so I'm way out
Timing belt off. set tip of rotor arm to the previously invisible scribe mark (on the other side of the dizzy from the yellow blob) refit cap upside down.
4.5 try almost goes then realise dizzy caps only fit one way
......solution. cap off leads moved
5th try ...Cough Cough Cough...I've gassed myself .. the b***er started in the garage with the door shut I didn't expect that
.. solution. opened garage door
6th try starts on the button
:D :D :D Idling very rough, temp gauge off the scale but I've got oil pressure and rev counter and its theroretically a car now
Thanks to all the help and inspiration from this site (and I'll need loads more before its finished) a mile stone has been reached.
Andrew
-
Hi I Found this link to a Kawasaki Manual when researching my bike carbs.
The Manual is for a ZX6R 1998/99 and shows the carbs I got from GBS. Maybe someone else has them too so here's the link.
I found the link via a Zx forum Link - free to join and they have a manuals section so maybe other Kwacker manuals to be found.
HTH
Andrew
-
-
Having ruined my injection manifold trying to get it to clear the chassis I have now fitted bike carbs so the injection bits are now on ebay.
The air mass meter, throttle body, fuel regulator, idle contol, and fuel rail with injectors.
The throttle is item number 320424741182 from there please look at my other items.
Cheers
Andrew
-
Hi OZZ
When you need to fit the P-clips in the tunnel the best way is to workout where you are going to drill for the tunnell pannels.
Then drill right through so as to rivet the P-clip form one side the the tunnel pannels from the other...
Thanks Mike
Hi Mike,
I did this too last year when got the kit and afterwards thought it might be a bit naughty putting too many holes in the chassis but its good to get confirmation that its ok. Thanks.
I made up a drill guide from a strip of steel from the side of an old compuer case with holes at 50 mm centres this gives two runs 100mm apart inside the tunnel on the drivers side for wiring and brake lines. Then every other hole on passenger side for fuel line. I then riveted out side every 100mm with a bead of pu adhesive running accross all outside holes
Andrew
-
The tool i use the most is my handy reamer from axminster tools great for opening up holes.
-
there is a list I've seen it........ It is stuck on the bench in the parts department at gbs. I can't count the number of times i said "oh thats what that is for"
Fit what fits where and buy a big box of m10 and m8's with nylocks.
Watch out for the suspension bolts and nylocks because they are a finer thread.
Andrew
-
In the book build your own sports car......... by Chris Gibbs the suggested spacing is max 250 mm in engine bay and max 100 mm in transmission tunnel. This is for brake pipes, fuel popes and wiring.
Andrew
-
I've got the rubber ones from GBS/Kitparts Direct look the same a CBS and same price.
Found the fitting guide this morning they are the small ones ref C7-10
http://www.southco.com/resources/documents/c7.en.pdf
HTH
Andrew
-
you could try the Newark Auto jumble at the Newark Show Ground bigest one of the year. Tomorrow from 10.00 loads of stalls and a good day out. About an hour and half from Leeds just off the A1.
-
the steering rack for the zero is from a mk 2 escort. The mark one is an imperial spline i beleive. I got a uj for a mark 2 from rally design who also do a splined shaft. I got plastic fuel pipe from gbs.
Andrew.
-
I used and angle grinder with a 2mm cutting disc followed up with a powerfile.
It was scary but produced a chip free cut.
Andrew
-
I am using the same size wheels on my zero and went with 19 mm universal spacers and extended studs from rally design.
Hubcentric spacers would be better at this thickness but are very pricey.
Changing the studs was not too bad. I knocked out the old ones with a couple of sharp taps with a lump hammer and wound the new ones in with a big nut a stack of washers and a wheel nut. The hubs have a space in their design to get new studs in and the big ones do just fit. Its not a job to do every other week but twice does not seem to me too bad.
By the way my zero is not running yet so can't say how the set up performs.
Andrew
-
-
thanks guys for this info.
been in garage trying to mod the efi plenum with the old b+d powerfile ...... to very little effect.
Looks like it might be bike carbs then.
Andrew.
-
If I replace my efi with Bike Carbs on my 2.0 pinto can I just bolt them on and leave the eec iv ecu to run the ignition timing or will it simply revert to limp home mode because there are no injectors or air flow meter?
I don't have the cash to go megajolt and edis or megaquirt just to run the timing.
My Distributor is a non vacuum advance hall effect.
Thanks
Andrew.
-
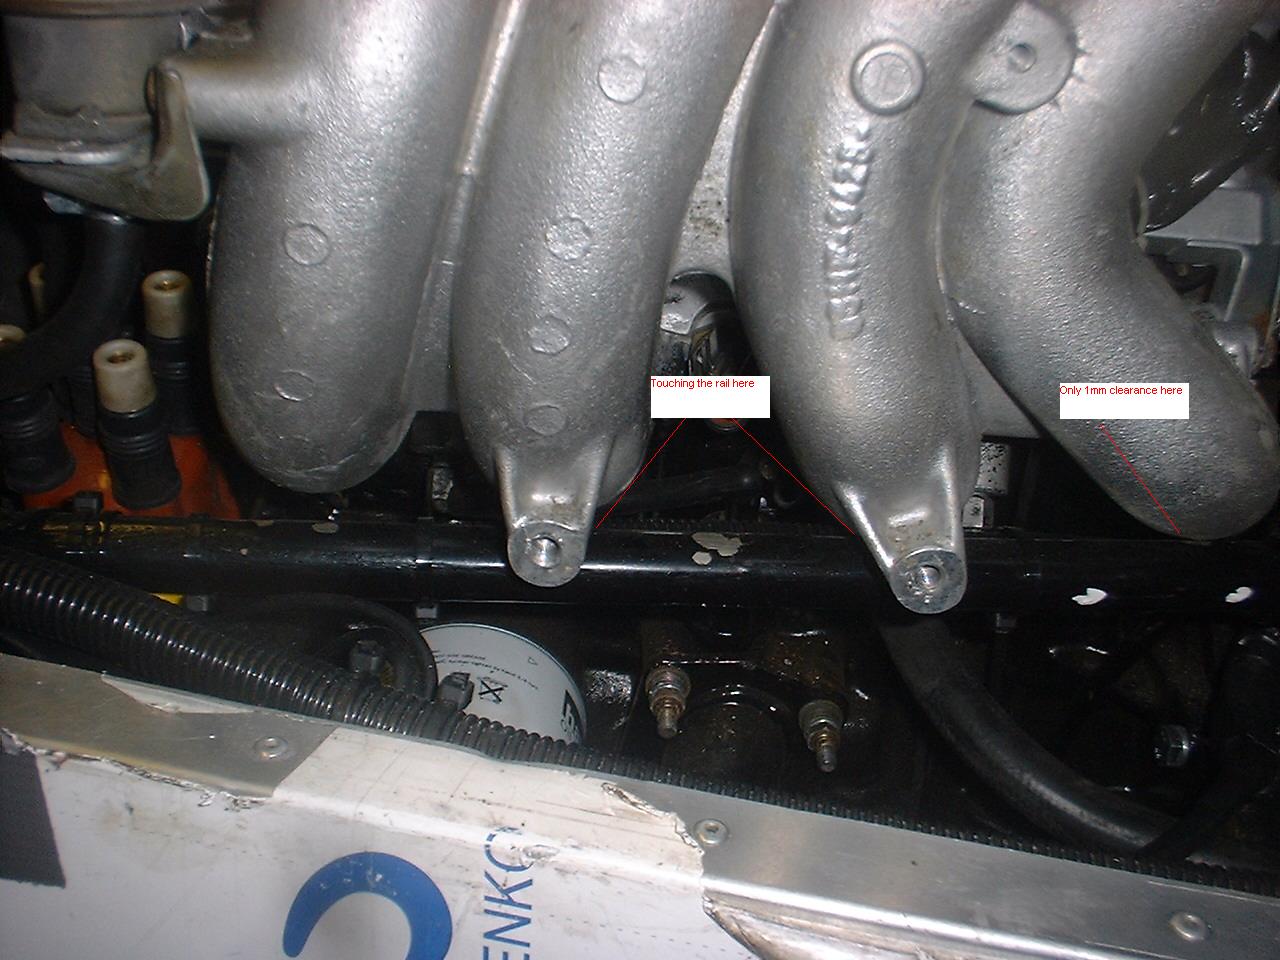
Hi,
I'm trying to fit a 2.0 pinto efi to a zero. The efi Plenum is touching the diagonal top chassis rail in a couple of places.
How much clearance will i need to "obtain" to ensure that it does not contact the chassis when the engine is running?
I am using rubber engine mounts got from GBS and they seem pretty stiff.
Has any one else tried this or got any ideas how to solve it?
Thanks
Andrew
-
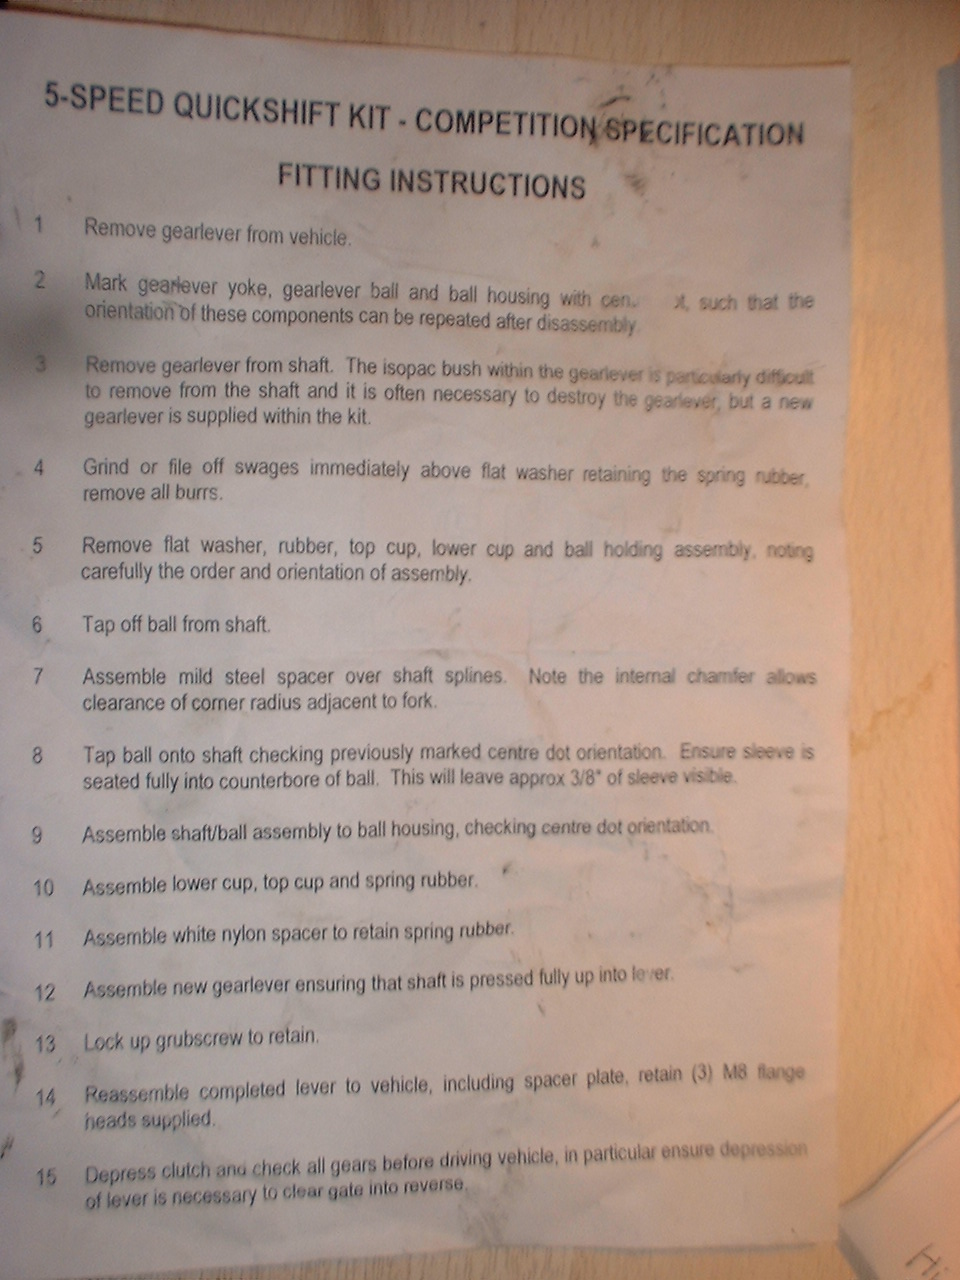
Hi Bob,
I got the competition kit from rally design which sounds like the one you have.
Heres a photo of the instructions (sorry my 1990's scanner decided not work).
You have to remove the top part of the old gear lever and remove the rubber bush. I had to make two cuts in the bush housing and pry the housing apart to get the the rubber out.
The shaft with the kit is then an interference fit on the lower lever and held with a grub screw.
The split palstic collar presses down on the rubber spring and is held in place by the shaft.
The intructions do make more sense as you do the conversion.
Andrew
-
Hi all
I'm selling some of my sierra bits on ebay.
Pinto vicous fan http://cgi.ebay.co.uk/ws/eBayISAPI.dll?Vie...em=320359432337
pinto engine mounts http://cgi.ebay.co.uk/ws/eBayISAPI.dll?Vie...em=320359433483
pinto exhaust manifold http://cgi.ebay.co.uk/ws/eBayISAPI.dll?Vie...em=320359434839
pedal box http://cgi.ebay.co.uk/ws/eBayISAPI.dll?Vie...em=320359438815
Thanks for looking
Andrew
-
I am building a zero and have not a clue what these panels are for.
I do figure the one marked '1' are the rear wheel arches but what are the other ones for.
Thanks
If I remember the collection day talk through correctly the square with the hole fits onto the drivers side front footwell panel to cover the hole where the steering column comes through. The square with the horseshoe is a replacement for the aforementioned panel if you have fitted the column and forgot to fit the aforementioned panel.
I don't have the rest of the panels so I'm assuming wheel arches.
-
Thanks for all the help everyone.
Thanks to Marcus for the pics they have set my mind at rest.
That bracket looks good I may copy that later.
Cheers all
Andrew
-
Hi
I used a small denso alternator mounted on a home made bracket which raises the alt about 2 cm. the top adjuster is the ford item (2.0.lts injection engine)
which is mounted to the block at the left hand cam cover bolt hole. This used a 800 length belt and just adjusts tight before it hits the engine bay chassis brace.
Will post some pics asap but cant find the adapter for the memory card (sorry)
Also my engine is mounted towards the passanger side also and i might cut the bellhousing as its very close to the chassis, and i think my engine is about 3cm forward of the correct position as i used a westfield gearbox mount.
Marcus
Hi Marcus
Thanks for that, I have made a bracket for the alternator but think I may have it too high and I've mounted the alternator level with the top mounting bolts on the block.
I don't have an exhaust manifold yet so I'm pretty much guessing the clearance required there, a photo of your set up would be brilliant.
As for the top adjuster I will try the cam cover bolt hole.
Cheers
Andrew
-
Hi Lewis,
I did a bit of research a while back on the tax exempt status and discovered that this relies upon date of build and for our purposed the date of build will be deemed to be the date of SVA so the short answer is no you will not get tax exempt status.
As far as the engine is concerned I suppose it depends on what type of engine it is if is a 1.6 pinto then look at burton power web site they have some guides to tuning most ford engines. If its a CVH then the exhaust will be on the right side for a later zetec swap.
If you go for a zero you won't need the swing arms at all as it comes with double wish bones you will keep the diff, drive shafts and brake drums. These can be removed without dismantling the sierra suspension. If you decide on a 2b I think you need to keep the sierra suspension (but I don't know someone else will tell you)
The rear uprights that come with the kit do both drums (in a different orientation from the sierra) and so a disc conversion should be a case of sourcing the rear callipers and discs.
As for where to start - you have started in the right place with this site but I suggest getting 2 books - the haynes manual for the sierra which will give details of how to strip it and How to build a sports car on a budget by Chris Gibbs (its not about a Robin Hood but has some excellent tips and is a constant reference for me at the moment).
Keep as much sierra as you can, Clean and paint everything that comes off NOW there's nothing worse I've found than having to put off building while paint dries or you scrape 20 years of cr*p off a part.
If that shell is rust free I bet one of the cosworth boys will pay better than scrap value for it.
Andrew
-
Hi i too had this problem when fitting my pinto 1.8 engine. The engine sits about 2cm off the centre line! Im guessing your using the type 9 gearbox? Have you cut the back off the starter housing on the gearbox bell housing? You have to cut a section out so it misses the chassis and this will allow it to line up in the centre. I then filed it with a peice of metal.This will then allow the prop to line up. I spent ages on the alternator but after fabricating a bracket and putting the adjuster on the bottom of the top hose outlet pipe and a smaller fan belt it seems fine. Hope this will help.
James
Thanks James I am thinking of going done the alternator bracket route too as it seems simpler and cheaper than an extra uj. What did you make the bracket from? (Plate? Box section?).
The bell housing is cut took two slices as did not cut enough off the first time there is now clearance between bell housing and chassis so that's not causing the misalignment.
Been looking at Baxter Bear's build site and the engine mounts shown there are further over than mine. How have Baxter and his assistants fitted steering column/alternator?
Andrew


 ..
.. 

Can You Id The Parts Please?
in Engine
Posted
E = float chamber breathers (where I pumped fuel out of before fixing stuck needle valve) mine goes into a 2 into 1 pipe which vents to air.