eddieH
 RHOCaR Member
-
Posts
144 -
Joined
-
Last visited
Content Type
Profiles
Forums
Events
Store
Community Map
Everything posted by eddieH
-
Hi, Robin - that would make sense! Funnily enough, that won't be the only part we got from RH which wasn't designed to be used with the rest of the kit . Steve - thanks very much for the offer! We've just about worked out how to cut and re-bend the one we have to produce something reasonable. However, if that doesn't work or we mess it up, we might take you up on that! We'll be tackling that job in the next week so I'll let you know shortly. Thanks and best wishes, Edward
-
Col, it's a 2B/4 which came with videos labelled Z, E, U and S (something to do with Richard's dog being called Zeus!). Jamie and Eric - thanks for that! I see how that would create four identical parts. However, I made a template this morning and held it up to the bracket. Which ever way I position it on the front of the bracket, the bit that should be straight across the tyre is angled sharply into the tread. It does work well for the rear of the bracket (with a slight amount of re-bending). I've watched the videos again which show different multibends (about 1hr 5mins into video Z and 2hrs into video S) and Richard produces simple 'L' shaped parts for the front - I can see how they would work but not how to create those from the style of multibend I have. I'm almost certain that there isn't another bit on the videos as I haven't listed it on the index I made. What possibly isn't helping is that I didn't fit the brackets that came with the kit. They were just solid bar with a plate welded on. I replaced them for a set of the more substantial ones with tabs which are held by the stub axle pinch bolt. The new ones also have provision for putting a small bolt through into the stub axle to stop any possible rotation. Oh well, if it was easy then it wouldn't be fun would it? Cheers, Edward
-
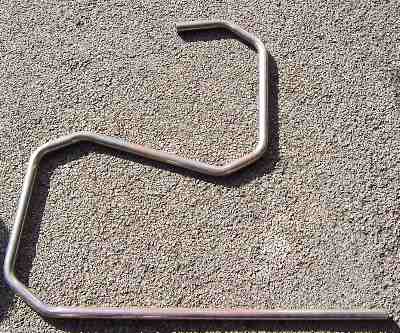
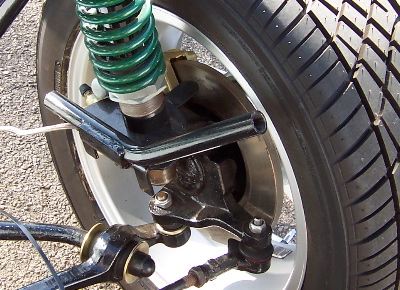
Hi, I'm a bit confused about how the multibend tube is supposed to make up the cycle wing brackets on a 2B/4. The ZEUS build videos show two different style multibend tubes (one on video Z and another on video S) which are cut up differently. Our multibend tube is different again and we can't find anywhere on the videos which shows how to cut it up! It isn't even easy to see how to make suitable brackets without massively altering the angles of the bends. I've put a picture of our multibend tube and the wing bracket below - if anyone knows where to cut it to make the correct brackets, I'd be very grateful for the information. Another thing is that the multibend tube is the same diameter as the cycle wing bracket tube - I suspect we should have had some larger diameter tube (which would slide over the joints and be bolted right through) included in the kit. Or is that something else that needs to be sourced elsewhere? Many thanks for your help. Best wishes, Edward

-
Hi and welcome to the forum! Send me a PM with your email address and I'll email you a photo of the diagram (I think it's too big to upload into a post). Best wishes, Edward
-
Thanks Enforcer. I'll just make sure they're done up properly and I'll put some fluid in today. Cheers, Edward
-
Hi, we're just finishing off the brake fitting and we're not sure whether we need a spring washer or something where the front flexis screw into the calipers? When the wheels are steered, it appears that a torque would be applied to this joint. Surely it is possible for the flexi to loosen itself over time and cause a fluid leak? What have you guys done? Many thanks for your help! Edward
-
Congratulations Scott!! Just a bit of paperwork and then you're all sorted. Enjoy driving it!
-
Hi, we fitted the big radiator that came with the kit, although we now wish that we'd bought a Coolman one. The problem is that we wanted to make sure that the nosecone wouldn't foul on the bottom of the rad that sticks out forwards, so we didn't mount it especially low down. We're struggling to find an expansion tank that fits under the bonnet and has enough expansion space above the level of the top hose (otherwise loads of water would overflow when it warms up and air will be sucked in to the system as it cools). I think we're going to have to get a custom header tank made - it probably won't be much cheaper than buying a new Coolman though. Best wishes, Edward
-
Yes, that would be great! I'll PM you with my address. Cheers, Edward
-
Excellent - you can tarmac the drive whilst you're here! Edward
-
Hi, if anyone is going to Newark kit car show on the Friday and camping overnight, you are very welcome to pop over to my place for a cup of tea and biscuits in the afternoon / evening. I only live about 10 minutes from the showground (just the other side of Newark). I've got a 2B/4 that I'm hoping to finish this summer. We haven't done any work on it since the Christmas holidays but we've got a few months now to crack on with it. If you want to have a look at it and make suggestions for the SVA (or laugh at things we've done wrong!), it would be greatly appreciated. Anyway, I'm hoping to go to the show on the Saturday so I'll see some of you there as well. Best wishes, Edward
-
I'll be able to help it back to 100k soon. Just one more exam tomorrow and then nothing to do until the middle of October! Well, nothing except get the Hood finished and post on Rhocar! Edward
-
Hi Andy, I've got an old style 20 gig iPod (no colour screen). I've had it about 18 months and dropped it a few times - still no scratches! I don't know if they've changed the materials since then but mine seems pretty durable. The iPod can also be used like a memory stick so you can back up work and stuff. It's a bit cheeky of Apple to charge you extra for a mains charger but it's still very good value. Also, if you're at school or uni, there's the Apple Education Store - you tell them where you're studying (they do check though!) and you get a 10% discount on just about everything Apple. The April '06 edition of T3 magazine reckons the 30 gig iPod is "the best hard disk MP3 player. Period." and gets 5*. The Creative one gets 4* although it "tops the iPod in several areas". Regards, Edward
-
Hi Dave, is that a hybrid motor? I've been into rocketry for quite a few years now and fly with the UK Rocketry Association. Did you see that Top Gear Winter Olympics special with the rocket powered mini on the ski-jump? A few guys from UKRA that I know went to Norway for that little project. The mini was powered by three Contrail hybrids. I've always flown with solid propellant motors so far, but I'm hopefully going to get to use a Skyripper hybrid this summer. The rocket I'm building for it should get to about 4000 feet! Anyways, cool photo - I'd love to see the car on a powered run! Regards, Edward
-
Hi Phil, sorry to hear that it failed - at least you know what modifications have to be done. The car looks awesome, I bet you can't wait until all the paperwork is done and you can get out and enjoy driving it. Best of luck for the re-test! Edward
-
Hi, I saw this game linked from the Kaiser Chiefs website - it's reasonably amusing. See if you're as good at parallel parking as you think you are! Here's the link: Parking Game Cheers, Edward
-
My history teacher at school said that during the cold war his dad was paranoid about the Russians invading the UK. He used to remove the rotor arm whenever he parked his car just in case the paratroopers needed transport. Strange but true!
-
I'd love to go as well please! If I'm lucky I might even have the Hood finished by then. The museum is quite incredible. The hangar with the American aircraft is amazing - there was a U2 spy plane suspended from the ceiling the last time I went. Cheers, Edward
-
Hi, I fitted the standard Ford alternator on the original sliding bracket thing. The slot needed filing out a few mm on the engine side of the bracket. The alternator is now closer to the engine than it was on the Sierra. I've had a look for the drive belt packet to see how long it needed to be but I can't find it - sorry. There is no problem with fouling the steering shaft, radiator hoses or the exhaust manifold (I've got the RH 4-into-1). Cheers, Edward
-
Maybe you've all seen it before but I found it amusing
-
A bit late I know - sorry! Anyway, Happy Birthday for yesterday!! Hope you had a good one.
-
Happy April 1st!!
-
Hi Col, the exhaust manifold studs are very prone to snapping. I think that the temperature cycling causes then to fatigue. I snapped the last one as I was tightening it up to the final torque setting (why is it always the last one that breaks just when you think you've finished?). If one has gone it's probably worth replacing the others at the same time. It could save you the trouble at a later date. I think it was less than a tenner for a full set of exhaust and inlet manifold studs and nuts from the local Ford dealer. The local motor factor would almost certainly be cheaper. Regards, Edward
-
Hi, Maplin (maplin.co.uk) do larger blanking grommets for the chassis tubes. They're sold as 'cable sealing grommets' - £2.49 for a pack of ten. The Maplin code is RG00A. I found that they need a little bit of trimming with a small pair of scissors to chamfer the edge. This makes them easier to fit into the tubes. To keep them there I used a small amount of epoxy resin. I haven't got a photo of them on the car but they look good and there's no way that water will get in. I didn't put anything in the tubes before sealing them although a bit of Waxoyl wouldn't hurt (and could stop the rivet bits rattling about)! I hope that helps. Regards, Edward