Thrashed
 RHOCaR Member
-
Posts
987 -
Joined
-
Last visited
-
Days Won
14
Content Type
Profiles
Forums
Events
Store
Community Map
Everything posted by Thrashed
-
Congrats
-
See you all Wednesday
-
Hi. I have ZX6r bike carbs on my pinto. I have a facet fuel pump and a pressure regulator set to 1.5 psi. Most bike carbs can suffer a max of about 3psi. I have a Sytec regulator which cost less than £30 and a Facet red top fuel pump, which will run at about 7psi. I needed the red top to get the fuel flow levels as the original Facet posi flow has almost the right pressure (max 4 psi) but didn't deliver enough flow as I found out on the first rolling road session! I then had it set up on a rolling road, which involved drilling out standard jets.
-
Basically ran the car with my foot on the brake whilst the drums tried turning the wheels. Bit like a rolling road. Would let the machine running the wheels at speed and then use the brakes. Did it for about half an hour and the at the test did a similar thing to get the pads up to temp and it passed.
-
p.s, wish my fail list was that short when I failed first time! That's a nice list to have. Good luck for the 31st.
-
I had a similar issue as my front brakes were brand new with zero miles. They needed bedding in, which the garage round the corner from me did on their brake tester for MOT's. Or if you can do similar on a `private' road. Could the kink in the brake line by the master cylinder be reducing the pressure to the fronts?
-
Hi, Yes, still available. If you go onto my ebay advert you can put in a best offer for £10 and I will accept this. You can then collect or I can post as per ebay? Link on ebay is - http://www.ebay.co.uk/itm/272706942940?ssPageName=STRK:MESELX:IT&_trksid=p3984.m1555.l2649
-
Hi Denso alternator. Perfect working order as had it tested 2 weeks ago. 2 mounting points. Only selling as bought a smaller version. 3 pin connector but i only ever used 2. Can post for cost of courier (parcel force or similar) but collection preferred. https://goo.gl/photos/KaBFQFXXyeaN393S8 https://goo.gl/photos/CFnWcEfiBRJHVvV78 https://goo.gl/photos/uT5vSA8dEBasTfa7A £40 ono
-
Hi All Pinto alternator mount. Completely original. Collection preferred but will post at cost of packaging and courier (parcel force or similar). £10 ono. https://goo.gl/photos/qqXWWoQwAMtV8UTZ6
-
Is that the same head off the engine in the back of your van? Thats proper cleaned up. What do you use?
-
Thanks guys My battery terminals are both easy enough to get too and both run away from the battery as the main earth is only 6 inches from the starter terminal. As I have the switch and can fit is anywhere. I plan to have it fitted properly so I can cut the engine without damaging the alternator as I have no other `emergency' features to shut of fuel. I did think about fitting an inertia switch but that's just more work, so thought this would serve 2 functions. With my install am I right in thinking just take the coil + to one side and add a lead from the other side back to the coil +?
-
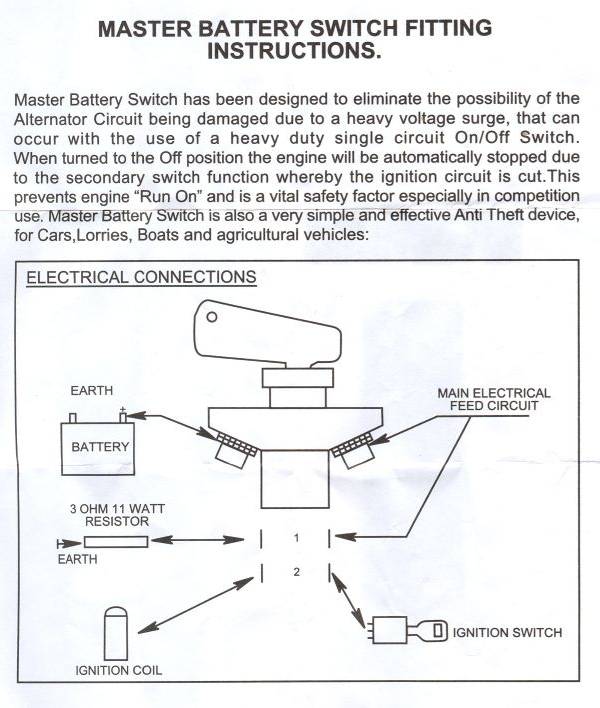
Hi all After my recent `excitement', fitting an FIA battery isolator just seems like a smart move. I have the attached wiring diagram for the switch, but have a few question I am hoping someone can help with. Just a bit of background on my car. I have a Premium wiring loom which is all standard and run a pinto with a coil with a Accuspark Stealth Blackbox programmable ignition. The easy bit is the big posts which go from the starter solenoid to the battery positive. I can then add a jumper cable between the feed and the W/1 terminal and the other side of that goes to ground with the resistor inline. This I am happy enough with. The bit I am struggling with is the Z/2 terminals. From my ignition switch I have 3 wires, Red (Supply), Black/Yellow (Ignition On) and Black/Blue (starter solenoid). The other side of this Z/2 terminal is to go to the coil plus. At the moment on the coil + I have a Black wire that comes from my Stealth Blackbox, which controls ignition timing etc (basically replaces the Ford ignition amplifier). So, is it as simple as take the black wire from the coil, run to the Z/2 terminal and the other side back down to the coil +? If anyone can help that would be great. Thanks Steve

-
Just a quick update.... That's to Gaz and Bob for their help, but over the bank holiday weekend got the whole thing finished. Replaced and terminated all the burn wires. The whole process was easier than I imagined to start with as the plan worked first time. Car is now back on the road and made the club meet last night. Thanks for everyone's help and advice. I will be starting a post on the FIA battery isolator next, so will need a bit more help yet.
-
Bob, I have nowhere near that sort of clearance with the current setup. I have been looking at the carbuilder alternator which is 40mm between bolt holes smaller and the body is about the same. This would give me the clearance on the chassis and steering shaft but I suspect will require a new mount being made which is not a big issue really.
-
Nigel. I had a nut protector on it and had obviously popped off, so will be using one of these next time around. I suspect as the alternator was so close to the chassis rail (probably less than 3mm) as the engine rocks it knocked the nut cover off, but with the rubber cap I suspect will rub through and could cause the issue again, so I think getting rid of the issue is best bet.
-
Thanks Dan, That was the one I found too. Carbuilder do one what could be the same unit but is only 40amp (part number ALTE) . Working out what I run this should be more than enough for a pinto with just lights. No heater or wipers to worry about?
-
Thanks for the pics. Just what I had planned but in the zero there is a cross brace of the chassis right in the way. Think I am going to get a smaller alternator and fit it between the chassis and steering shaft. My current denso is 160mm between bolt holes and 160mm from pull face to back of the casing, so need to be smaller than that
-
Thanks Mark Have seen loads of kits for Zetecs. Pinto ones just seem non existent. Get the feeling I will just find the smaller alternator possible and make a bracket to fit
-
Hi all After my recent mishap I have been trying to re angle my alternator so that it can't happen again The issue I have is that it either hit the round chassis tube that braces the engine bay or the steering shaft I just don't have the space! I have a smallish Denso alternator on a pinto engine For the last 2 evenings I have been googling looking at ideas but they are very thin on the ground for pintos. What I need is ideas or pictures of how other did theirs on a zero with a pinto. Failing that I will see what the smallest possible alternator is and see if I can get that to fit so any ideas on suppliers if ultra small alternators would be greatly appreciated Thanks in advance
-
Nige, the plan is to replace the 21 wires that have burn through and then re-cover and cable tie the bundle back to the chassis. As they do not need to move I am hoping the heat shrink will offer a bit more rigidity to the wires. Might go belts and braces and cover in the tape as suggested before putting back in the convoluted tubing. Also thinking I might run the alternator wire to starter wire away from the other wires, so along with a designed alternator mount to ensure if the engine ever moves up the output can't touch anything and a cut off switch the chance of damage or issues again should be zero. Well that's the plan!
-
Thanks for the offer Craig. I have a proper crimp rachet tool, just never felt like a good connection. I did think about connectors. I am replacing the standard ones I have on the lights with these and have already ordered the parts to do this. I currently have just the standard 4 way white plastic black connectors. Because its a Pinto it only has 5 wires attached to the engine, 2 for the dizzy, water temp and 2 for the oil switch. The rest of the loom and mostly what got destroyed are the alternator wiring, lights and indicators and fan. No real need to have them removable.
-
Dino. Is it back firing or popping on deceleration? I had popping on deceleration due to air leak in exhaust system. I have a black soot make on side panel that gave it away. Might be worth checking?
-
Thanks for the tips everyone. Surprised about the crimps. Because of the space I don't think having 21 crimps next to each other is going to work. Going to go with the twist solder and shrink method as I am hoping it will have the smallest footprint. Should have the parts for Wednesday/ Thursday so will keep everyone posted
-
Dan, that makes sense, just looks more dramatic when its happening and the battery sparking when undoing the terminals, whilst choking on a big cloud of smoke. The net result is better then I could have imagined. I have ordered the new wires, so the next question is........ What's the best way to replace the damaged loom? 1 - Cut out old wires and crimp them? Not my favourite option, but quick and easy. 2 - my personal fav - cut out old wires and solder and heat shrink together. When I do option 2 what is the best way to do this? Do I twist the old and new together, blob with solder and then heat shrink? Are there any fancy techniques I can use to give the best possible connection that is strong and reliable?
-
Well, think I might go buy a lottery ticket as I am the luckiest person around at the moment. Just had the starter and alternator back from the electricians and they are both in perfect working order! Would never have thought they would have survived but they have. Just waiting for the new wires and connectors to turn up and then I can start the chopping! Thanks for all the help and support.