Grizzly
-
Posts
1,495 -
Joined
-
Last visited
Content Type
Profiles
Forums
Events
Store
Community Map
Everything posted by Grizzly
-
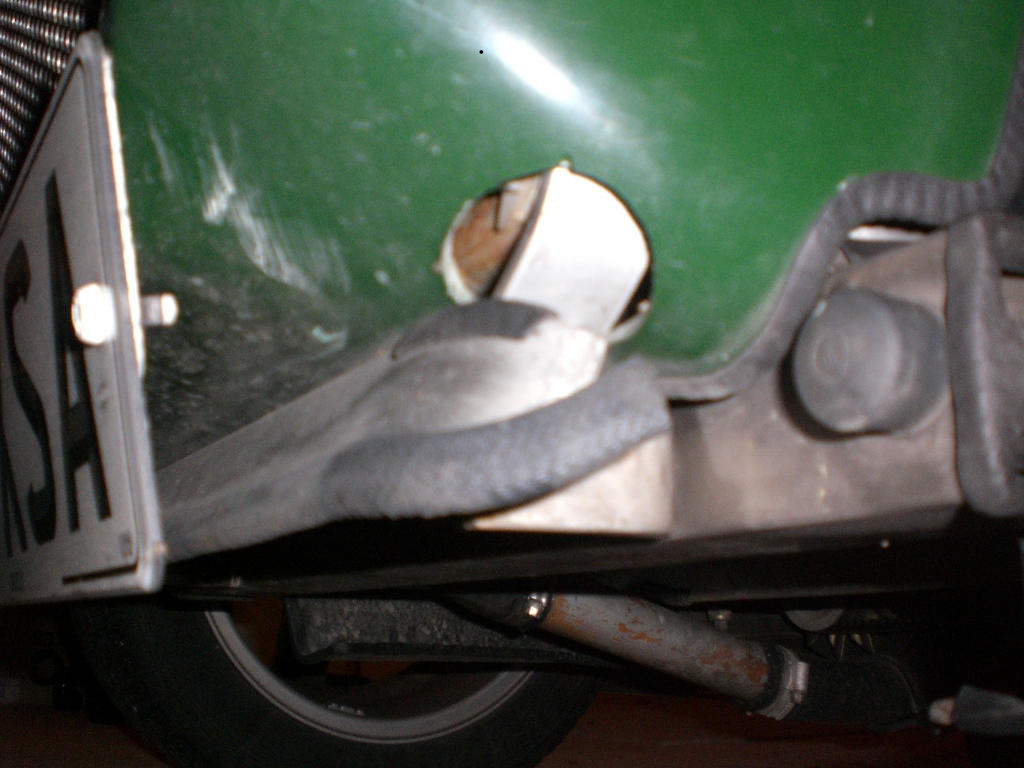
OK. Here's some pics which should hopefully show the hinge arrangement on my set up. All pics are of the nearside hinge. This is from the underside with the bonnet closed, showing how the framework goes through the drilled part of the nosecone.

-
35 Years in IT for a handfull of conpanies and still a Technician. Currently responsible for a small but fairly happy bunch. That's the way I like it though, as up until now it's pretty much kept me out of tiresome office politics. Just undergone a 'merger' though, so now it's a bit fraught and getting bogged down in 'process'. Very frustrated at the Company's over-optimistic ambitions on one hand with 'decision paralysis' on the other. Somedays acheiving/doing chuff all - Often wonder if I'll end up going down Nigel's route.
-
... Darn it! Very sorry - Forgot to take pics. Won't have time tonight, but WILL post some tomorrow evening.
-
Yes, I cut a hole for the framework on each side to reach each hinge using a hole saw on the underside of the nosecone, but it's not noticeable. I'll post a pic or two tomorrow.
-
The term "Aligator Bonnent" is derived from the type that hinges as per the Robin Hood instructions - Scuttle, Bonnet & Nosecone all in one piece and hinging by the dash, so that the whole lot lifts from the very front and takes the winscreen with it too.
-
Hi Alan, I heard the horror stories too, so went for a forward hinging bonnet during my build. Click the highlighted text in the following link for some close up photos. My Website Let me know if you need anything further.
-
Andy's right. We nearly died last year as it was sooooooo cold. I kid you not - There was ice on the outside of my tent and it was May! I'll be taking and extra sleeping bag, that's for sure - or at least keeping a better eye on the weather forecast running up to the event
-
Ideally. it's best to run this pipe internally. Sorry Graham
-
Hi Paul, If I recall correctly, my 2B Plus weighed in at 764kg at SVA. I agree with Dan though. I can just about hold onto the tail of my mates Elise up to 90mph (private road of course)
-
Pintos were designed for 20w/50. I wouldn't run with anything thinner.
-
Hi Alan, Welcome to Fraggle Rock. Plenty of info to be had here and we're a friendly bunch. As many people have said before, the only daft question is the one that doesn't get asked. Maybe see you at a show or two next year.
-
Ouch! Not nice. Glad you're OK though. Was there oil or something on the road?
-
Congrats Robin. Just as loud at night too? Best wishes to you all!
-
Merry Christmas to one and all from the Grizzly Household. Very festive Steve, but is that a double yellow line you're parked on there?
-
Hi Andy, I have a full set of Videos. I can put 3 & 4 onto a couple of DVDs for you for a few Beer Tokens.
-
Hi Steve, I remember these on my VG loom. Couldn't fathom what they were, so cut them off and did without. Soldered straight through to the relevant wires from the stalks etc.
-
Out of interest Mark, what make are the tyres? Can you confirm the 15mm offset?
-
I can recommend Woolies. You only really need the Lift-The-Dots for the front where they fix to the windscreen though. The std press studs will be OK for all round the rest of the hood, but I did use a couple of the turnbuckle type by the back of the door each side.
-
Thanks. I've been thinking about this very thing. Nitromoors - Then get them down to the bare alloy and then get some decent polish onto them (was hoping it'd last longer than a week though ) Thanks for all your input guys.
-
Hi All, Right. Once I've got my old tyres off the rims and before I get my new tyres fitted, I've been looking into getting my 5 Array Wheels refurbished. A couple of them are pretty much like new, but the other three are blemished due to salt getting under the lacquer and making them look a bit tatty. The problem is that I've been onto a few 'shops' that specialize in this process, but they're all wanting around £50 per wheel and I'm obviously too tight to shell out £250! Nobody will be able to get them back to original spec, as the polished & diamond cut finishes are ex-factory, so I guess I'm just wanting them sprayed really. I don't have a compressor or anything like that, so my question is: Can I do this myself with aerosols or am I just going to have to bite the bullet?
-
No - Sorry, but someone on here will probably have?
-
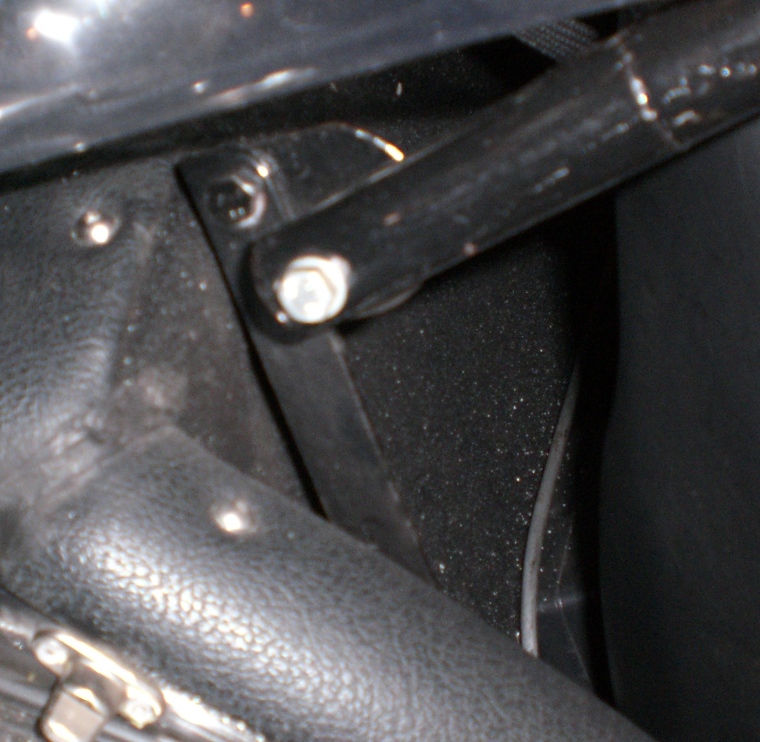
Here's a pic: Simply a length of angle with a mounting plate at the top and bolted to the inside of the inner wing.
-
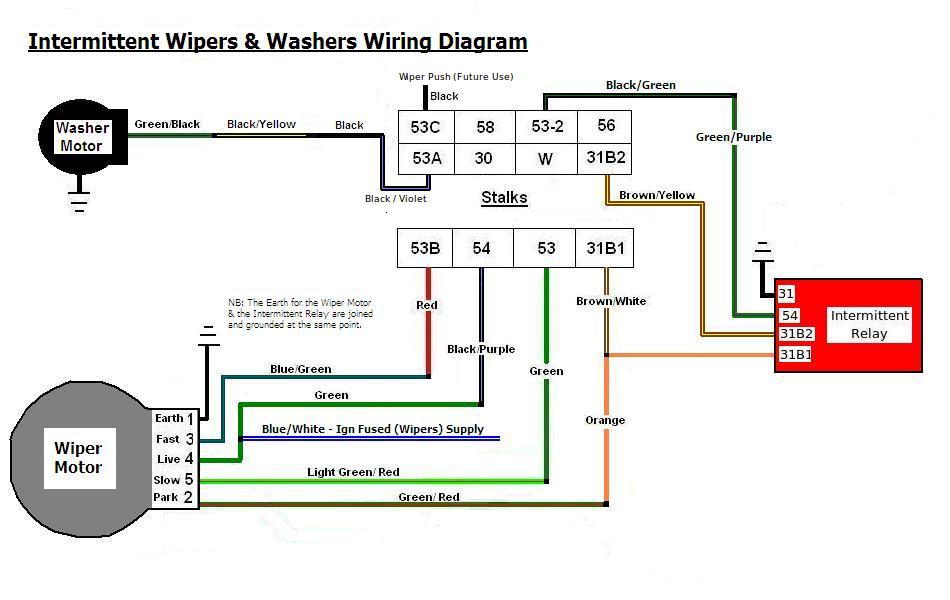
Hi, Assuming it's a Mini system, here's my diagram. HTH?
-
Hi Craig, I'll take some pics of mine tonight and post them on here for you. Basically though, you're looking to get the rails into the correct position to support the Hood when up. At the same time though, these need to be pivoted in such a way that they fold back neat & tidy when not in use. I made up my own brackets and remember that it was a nightmare job to get right.
-
Ah Ha! That may well explain why my MPG isn't particularly great then? I had my vac pipe disconnected when I took the car to Bogg Bros Dave said the Dizzy was worn and was giving too much Advance with it connected. He said that the Bob Weights alone would provide enough Advance and so we left it at that. Hmm - Maybe I need to look into getting my Dizzy reconditioned and bring the Vac Advance back into play?