nelmo
-
Posts
2,170 -
Joined
-
Last visited
-
Days Won
72
Content Type
Profiles
Forums
Events
Store
Community Map
Everything posted by nelmo
-
I partly chose that route because I couldn't find any Sierra stalks with wires and I didn't want the difficulty of trying to fit another make to my Ford steering column. I'm sure they're better ergonomically but I like the idea of something different.
-
Thanks longboarder - and yes, I see what you mean now that Park must be to pin 5. Yes, the hazard switch looks darn complicated but there is a decent diagram in the CBS catalogue, so hopefully that will be OK. The fog light looks very simple - only 2 pins so isn't that just output from the dipped beam switch to one (so fog only comes on when dipped is on) and the fog signal to the other? What I can see being tricky is the main beam switch (I haven't got stalks so all switches on the dash, in case you were wondering). The main beam rocker switch has 6 pins which seems weird for a one position switch but I'm guessing it has to link up to the sidelight switch so that it only comes on if you've also got dipped beam on? Strangely, no diagram in the CBS catalogue for that...
-
Ah OK, I think I've got it - I've been trying to get power in the park position but I get it, there shouldn't be any in park. So it think it should be like this: Loom Switch ===== ====== + ---> pin 2 Slow ---> pin 4 Fast ---> pin 1 Park ---> pin 5 (or 4 - doesn't matter as long as it doesn't involve pin 2 which has the power). If anyone could confirm, that would be great...
-
Why is the motor an issue? Surely a switch is a switch? I used the wiper switch just as an example - I have other switches I also have to wire up (lights, hazards etc) and I thought it was just a matter of the principle of how how these rocker switches work. Lots of people use them so there must be a method of connecting them up, no?
-
OK, that's sort of what I hoped 'made' meant...but I assume that means you need the '+' to one pin and the signal to the other and I can't work out a way of doing that. For example: Loom Switch ==== ====== Wiper + ---> pins 2 and 5 Speed 1 ---> pin 1 Speed 2 ---> pin 4 Park ---> pin 4?? Hurting my head...
-
OK, I thought I'd be able to work this out but I can't... I've got a 3 way rocker switch (page 142 of the CBS catalogue) for the wipers which has 4 pins on the back and 2 side terminals for illumination. Switch position 1 (slow speed) = pins 1 and 2 made (I don't really understand what that means). Switch position 2 (fast speed) = pins 2 and 4 made. Switch position 3 (Park?) = pins 4 and 5 made. I need to connect this up to the GBS loom which has pins labelled: Wiper + Speed 1 Speed 2 Park Can anyone explain how this works?
-
I'm surprised the testers will let you get away with that - pretty darn obvious you're gonna rip it off on the way out of the test centre :-) I've got a wheel (not IVA compliant) from GBS and they never mentioned you can just stick a pad in the middle - I've been planning to borrow a Sierra wheel for the test but that's annoying because the wheel I've got has got a horn button in the middle which I want to use. But if I replace with a Sierra wheel, would have to put a button somewhere else... If yours gets you through IVA, first dibs to buy it off you... :-)
-
What's the IVA pad from Westfield about? Can't see it on their website...
-
Thanks Richard... good to know that having cable ties used at all is acceptable.
-
With no water rail, I have a lot of coolant pipes just floating in the bay. They seem pretty stable anyway but I should really have some sort of support structures for them. Is there any recommended technique for this? I really liked the technique I used elsewhere - a cable tie through a piece of fuel pipe and then round the supporting structure and the pipe to be supported. However, not sure if that is OK for hot coolant pipes? Although they're only going to be a max of 100degC and I imagine a cable tie is OK to that temp?
-
True - have to wire and crimp 38 pins...if I'd done it myself, the plugs alone cost £25 and I would have then had to wire and crimp 76 pins!
-
Well, GBS have also offered to make up a wired plug for the 18-pin plug as well. Not cheap (probably about £50 for both plugs wired up) but I'd rather not have to hack off a professionally wired plug and replace it with my home-made effort, especially considering I've already done my own engine loom which is a potential snakes nest of problems - be good to be fairly sure that I shouldn't have to worry about the dash instruments.
-
Well, a partial solution - GBS do a dash extension which has the male 20-pin plug and wires attached for only £28 (the replacement plugs I've already ordered (!) have cost me about £10 but I'm happier to pay the extra to use the original kit). Annoying that they didn't tell me this originally but I guess there are so many parts, it's difficult to keep track. They really need to get it added to their website... Still an issue with the similar 18-pin plug for the stalks - GBS assume your stalk plugs will connect straight in (I'm going to check on that - is it likely the Ford stalks fit that plug?). I never managed to get any stalks with wiring so I'm putting all those controls on the dash, so I will need to hack that one. ..
-
Bit harsh - GBS have been very good with everything I've asked them. This particular plug is not fitted by them so the fact they have any is a bonus. They clearly sell a sub-loom for the instruments which I am choosing not to buy, so it's my lookout if it's extra work. I've done as you said, ordered 4 10-pin (in fact, 15-pin) plugs which I plan to just replace on the loom. It's not ideal but my choice and not a huge effort.
-
I have to agree - I've never been a believer in warranties and if my loom doesn't work (even if I hadn't hacked it myself), my last thought would be to take it back under warranty. I would expect there to be a lot of other potential causes first.
-
Your lucky day, I am at exactly the same stage and I just asked GBS the exact same question. The 20 pin and 18 pin plugs are special items fitted to the loom by the external company that GBS use to build the loom. GBS have a couple of the plugs floating round their workshop which they would sell for £30 BUT they have been told by the company who do the loom that you need a special tool to fit the pins into the plug and that tool costs £200! Ive decided I'm just going to chop them off and replace with standard plugs available from CBS.
-
Sorry to be the bearer of bad news but I would suggest you will struggle. As others have said, I'm sure it could be got through IVA if you are experienced, have all the kit, the time and deep pockets. No offense but that doesn't sound like you... ...and probably not the other guy, which is why he sold it... Keep it as a track day car, maybe?
-
I don't presume to question more experienced people but none of the GBS kit has swaged pipes and apart from the 100mm section in ozz's post, I can't find anyone selling decent lengths with swaged ends. I'll just stick with what I have and hope the clamps are enough... Back to the original question - if I overlap a lot, I might need 2 clips, no? One where each pipe ends?
-
Balls - really? Is there a simple method to manually swage a pipe? I don't want to pay a fortune for a dedicated tool...
-
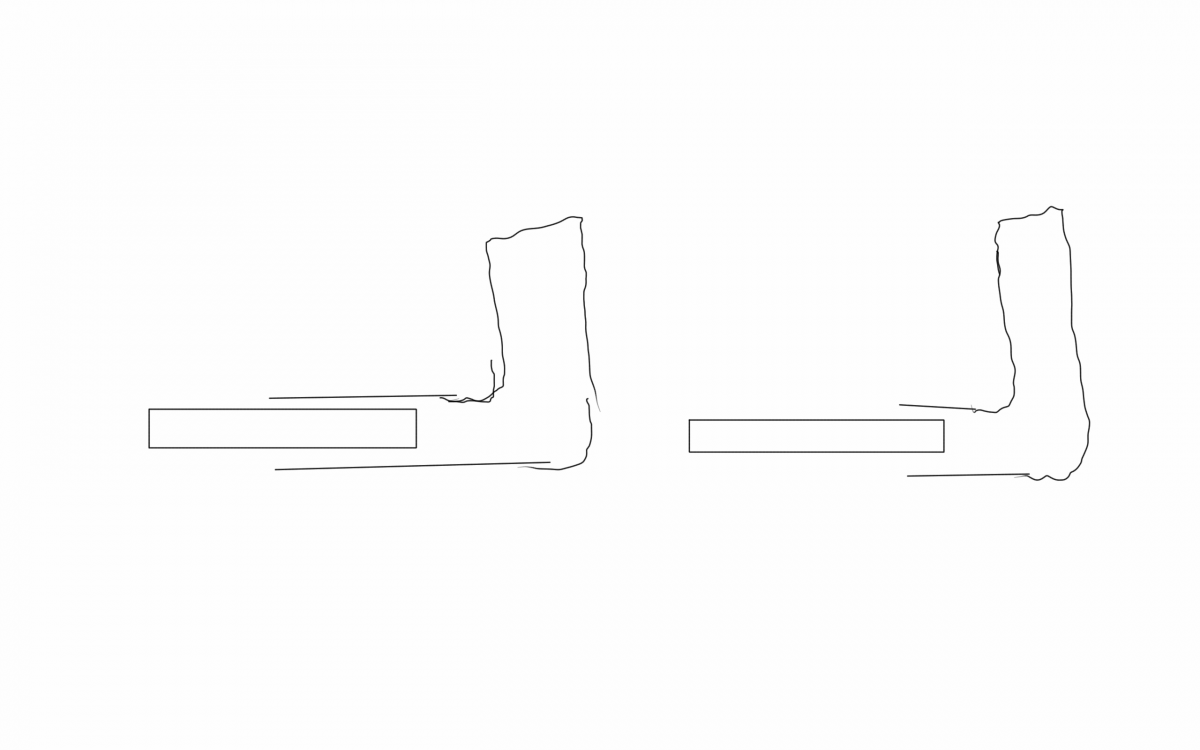
I may be over-analysing this so apologies if it is a stupid question but... I'm not using a water rail and I have a bit of a maze of ally pipes and silicone rubber bends. The final result will have a potential world record for number of jubilee clips in one engine bay :-) When joining a silicone pipe to an ally pipe, is there a correct amount of pipe that must fit into each? Do I use as much pipe of each as I can (ie. a lot of overlap) or just enough to get the jubilee clip on (with a few mm either side)? Intuitively, it would seem that the more overlap, the better but maybe not? See very bad diagram I've attached...

-
Sad to see how little our kits are worth - he must have £5k worth of parts there, even allowing for the age. A lesson for anyone thinking you'll make money out of your kit - even when built, no-one will pay £15k (as he has in his ad) for a second-hand, hand-built (by an amateur) car. Obviously, you can't put an amount on the enjoyment you get out of the build process...
-
The bodywork is the relatively cheap part of a car. Sounds like fixing the chassis will cost as much, if not more, than buying a new one. And then you will have a fixed but obsolete chassis. Then all the usual costs for everything else... Unless you've got an emotional attachment to the car, and assuming you would rather build than buy, then a new kit is the way to go...it will be much cheaper and easier than starting with a wreck.
-
Beautiful BRG but red with it?! Sorry, doesn't work for me - I'm out...