AndyW
 RHOCaR Member
-
Posts
373 -
Joined
-
Last visited
-
Days Won
5
Content Type
Profiles
Forums
Events
Store
Community Map
Everything posted by AndyW
-
They are Arrays. Robin Hood specials they bought in bulk from China.
-
I was in the same position recently until a kind member managed to find a badge for me. But I was also looking at alternatives. If you can get hold of a large enough example picture or graphic of the RH logo, then there are vehicle graphics companies that will make up vinyl stickers. Some will even do thicker resin domed badges like for wheel centres.
-
Having had a flat tyre in my normal car caused by hitting a pothole and splitting the sidewall, I would always opt for a spare tyre. Gunk just doesnt work in those circumstances. The time and agro of finding a phone signal, waiting for the breakdown cover to arrive, going to buy a replacement tyre, and getting it fitted, all takes hours and ruins the rest of your day. With a spare you can be on your way in 30 mins. In fact I wont buy a car now that doesnt have, or I cant add, a spare wheel.
-
In your first photo the top one of the 3 pieces is actually the firewall. The rectangle goes on drivers side round the brake master cylinder and the pair of holes are for the brake hoses to the reservoir. Not sure what the bottom one is but as Al says it might be an expiremebt at another dashboard. Your extra photo is one of the crescents that line the body inside the rear wheel arches. There should be two.
-
The footwells arent very well sealed or insulated on the Superspecs. On my car the centre tunnel area under the dash above the gearbox where the wiring loom hangs, doesnt have any covering, so theres a big hole where the hot under-bonnet air can get into the interior. As Al says, its great in the winter (no heater needed), but in this hot weather temps in the footwells can become almost unbearable. I can tell when my radiator fan turns on as I get a rush of extra hot air into the footwells!
-
UHU. Remains flexible, waterproof and uv resistant.
-
When I changed the badge on my nose cone I removed it very carefully with a heat gun and a thin blade.
-
I believe those remote gear changes were made by Robin Hood, so theres a chance theyre not all the same length of tube. Or maybe the has bent and could be straightened a bit.
-
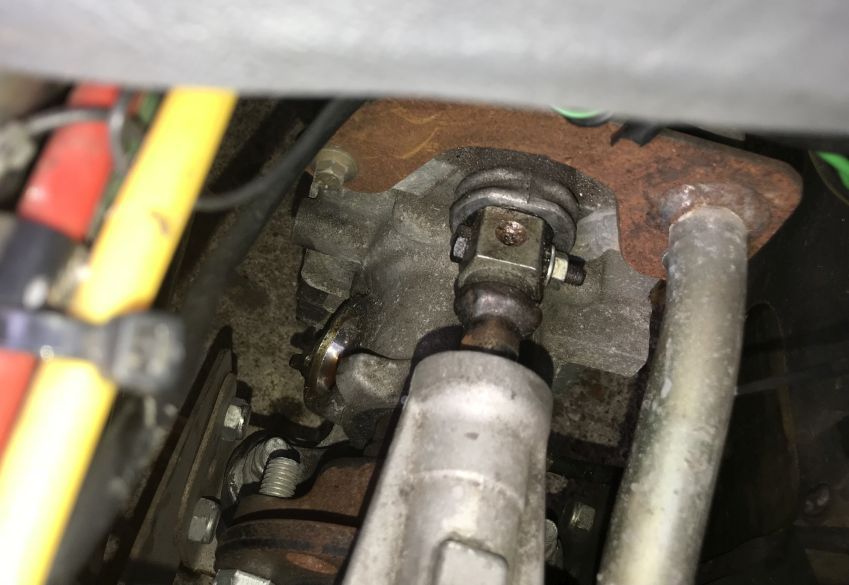
It's a bit fiddly but you can easily remove the remote gear shift mechanism to have a look at the alignment. (I took mine off to get at the UJ underneath). The whole shift mechanism is only held on with 2 bolts through a C shaped plate into the end of the gearbox, plus the clamp bolt onto the gear selector shaft. One bolt is underneath the locating tube on the right, which is really the only thing that holds the gearlever to the gearbox. The bolts are a bit of a pain to get at. With the mechanism removed you can straighten it or check the alignment.

-
Just a thought. I had problems with alignment of my clutch cable in the pedal box. The outer cable was fixed at 90deg to the front wall of the box but the inner cable bent up at an angle inside the box to align with the clutch pedal fixing. Not only was the angle causing roughness and fraying, but it was causing the plastic inner lining of the cable to be pulled out causing extra resistance. When I changed the angle of the outer cable fixing to match the the alignment of the inner cable, it became a lot smoother.
-
Can I echo all the sentiments. Was a cracking weekend on a great site, with perfect weather, evening bbq and breakfast, and a good chance to catch up with everyone over a drive out then a few beers. Thanks for the hospitality Craig and family, and to Keith for helping to organise.
-
Also check your front engine mount. A couple of people, including me, have found a crack or separation in the L shaped plate welded onto the front circumferential tube. On my Superspec the front of the engine was sagging a couple of cm which I regained as ground clearance when I had the plate replaced.
-
The UJ grease nipples on the Superspec are particularly awkward! The rear one at the diff can be reached ok from underneath with the car up on stands, but the front UJ is hidden by the gearbox mounting. Only way I could get to mine was by removing the tunnel cover and unbolting the gear-lever mechanism from the gearbox. Then youve got access down to the UJ. Even then I found I couldnt get my standard grease gun nozzle between the UJ yokes onto the nipple in the centre. I had to buy a smaller nozzle and even grind flats on the side of it so it would go in far enough!
-
The MOT doesn't say anything about how dip and main beams are switched, just what results must occur. The key word seems to be 'immediately' - there mustn't be any lag or gap between the beam switching.: * Dipped or main beam headlamps must immediately light up when they're switched on (depending on the position of the dip switch). * Headlamps must switch immediately between main beam and dipped beam when you move the dip switch. * Moving the dip switch must do one of the following: - extinguish all main beam headlamps and leave on at least one pair of dipped-beam headlamps - deflect the main beams to make them dipped beams * Dipped beam headlamps can remain on or switch off when main beam is selected. Full MOT requirements can be found at https://www.mot-testing.service.gov.uk/documents/manuals/class3457/
-
Battery or alternator warning light doesnt go to earth. It should connect between 12v panel power and the thin wire from the alternator. Equal potential when engine is running will mean the light goes out. Gets more complicated if you have an LED though.
-
We’ve decided that the Superspec column stalks are Rover but non-standard. They’re opposite handed and might be a special batch made for left drive export cars. There are no relays for the main and dipped beams so full power goes through the switches. It’s a possibility they could have failed although not a known problem. My light stalk switch has 6 wires from the connector blocks to these pins: 1 12v perm from brown in 3-way block 2 dip beam to blue/red 3 sidelights to red in 3-way 4 & 6 12v from purple 5 main beam to blue/white 7 not used
-
Is this a turbo engine? Most of us SS owners have got the naturally aspirated T16 so we probably cant help you much. All the nasp engines have distributors, no cam sensor and a crank sensor on a two gap flywheel. I believe the early turbo engines had a cam sensor on the inlet cam, but we just have a blanking plate. After about 1996 all the engines went to wasted spark, had no distributor, no cam sensor, and used 4-gap flywheels. I cant help you with the injectors as never taken them out. But Rimmer Bros is a good source of parts and info on the Rover engines. Cheers Andy
-
Many of those fails you could have checked and fixed for yourself before you went in for the MOT :-) And I'm surprised it failed on the main beam and speedo illumination - surprised actually that they could see any of them! Even when it's dark I can only just see any of the warning lights in my Escort dash - not sure why mine are all so dim? I fitted a set of repeater warning leds so I could see them. Interesting about the cracked bracket on the steering rack. If you mean the flat cross plate between the chassis tubes that the rack is clamped to, then mine also has a crack which has been welded by the previous owner. Must be a Superspec weak point. BTW also check the front engine mount L-shaped bracket. Mine and a couple of others have cracked, maybe from grounding the engine. My Superspec also has trouble getting through the MOT emissions. I've tried checking and fixing/replacing all the following - new air filter, new spark plugs, exhaust leaks at manifold plate and 4>1 joint, lambda sensor, cat, and coolant temp sensor which are about all you can do! Throttle potentiometer is a new one on me. As Al says, I always take my car for a 10 mile thrash in 3rd/4th gear on the bypass to get it really hot before going to the MOT place, then I have to rely on the skill of the tester to get it through.
-
The cross piece is joined to the main guard with 6 countersunk head bolts from the underside and nyloc nuts on the inside. Iirc theyre 15mm x M6.
-
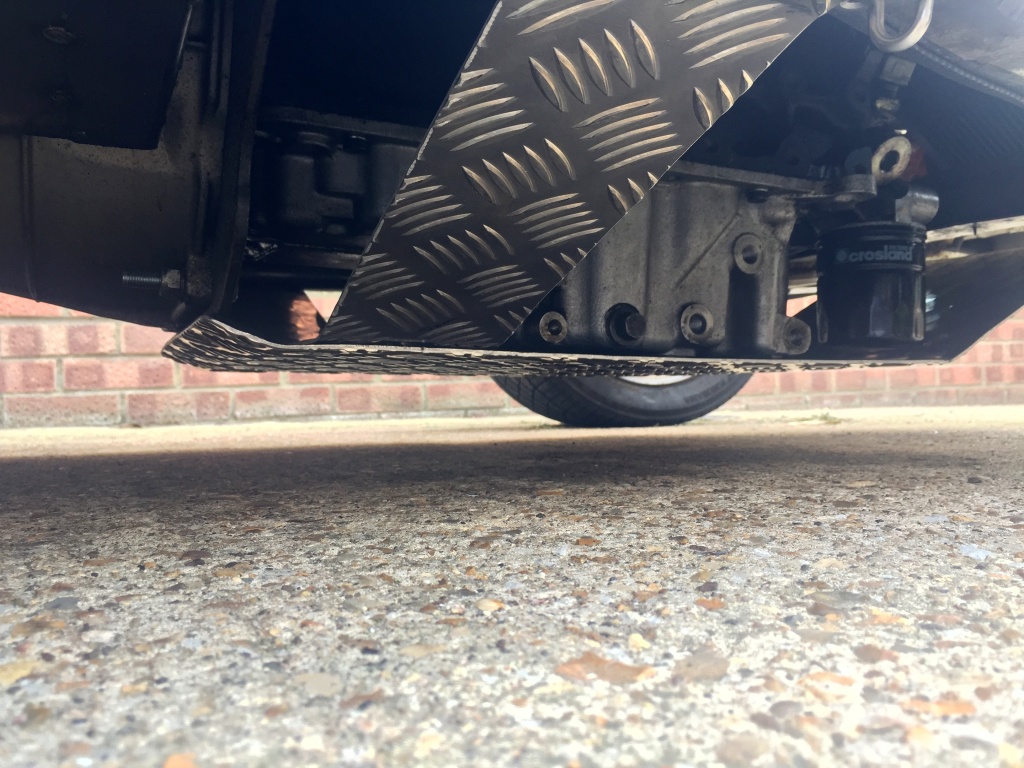
Graeme, Yes the support wings at the rear of the guard are fixed on each side to the lower side chassis tubes using large hex head self-tap screws (2 each side). I was a bit worried they would break or work loose when the sump guard took an impact, but they seem to be holding so far. The front of the guard extends under the oil filter then bends upwards to the nearest suspension square tube cross-member, where it is bolted on with 2 rubber bobbins to give it some flexibility. The rear of the guard isn't fixed but just has a bend upwards to protect the bellhousing / engine joining plate. So effectively the guard is fixed to the chassis and the engine is able to move over the top of it. That's different to some other people's sump guards where they have fixed the guard to bolt holes on the sump / block itself. Also there's about a 3mm gap between my sump guard and the bottom of the sump with some neoprene strips stuck on to stop stones getting between and also dampen any resonance.
-
The alloy sumps are about 7mm thick so luckily they will survive a bit of abrasion. Mines actually got a hairline crack in it but it doesn't seem to leak so I'm leaving it alone. Oil filters though are only thin steel and vulnerable as you've found out, so it's worth fitting a short one. I'm using a Crosland L10288PS filter (Eurocarparts p/n 501750018)
-
Mines the alloy sump, about 12cm deep. I think the steel sumps are deeper. Which has now confused me!! From previous digging around I understood that alloy sumps were fitted to Rover 420 and 620, and steel sumps to 220 and 820. My engine number indicates it was for an 820 but its got an alloy sump, which doesnt tie?! Maybe my original builder changed the sump. Btw the alloy sumps have larger bolts and are thicker, as some had engine mounts fitted to them.
-
Graeme, I'm plagued with cushion type speed humps where I live. The sump clearance on my Superspec is only about 5cm so I was finding the humps too high to straddle and I was forever rubbing over them. Once I even got beached on top and had to get out the car to push it over! I now find the best way is to run one wheel over a hump and put the other in the gap between. That's when I remember! To protect my alloy sump I've fitted a shorter oil filter which doesn't go lower than the sump, and also built a sump guard out of alloy treadplate. It's more sacrificial than resistant but 2 years on it seems to be providing good protection. I'm now not so worried about grounding the bottom of the car.
-
Sprayed all my suspension bushes and pivots with GT85 ptfe. Stopped the creaking for nearly a year!