AndyW
 RHOCaR Member
-
Posts
392 -
Joined
-
Last visited
-
Days Won
6
Content Type
Profiles
Forums
Events
Store
Community Map
Everything posted by AndyW
-
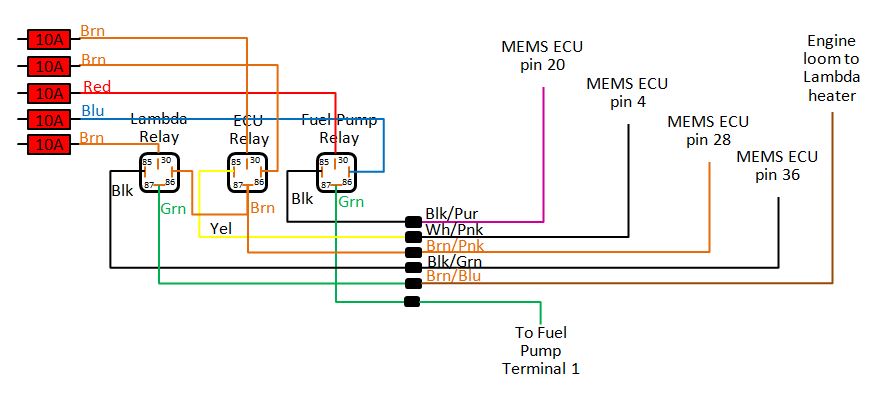
Hi Dean, This is the relay wiring on the Rover engine in my Superspec. I've got most of the wiring captured in a diagram so let me know if you need more details. ECU relay term 30 fed from 10amp fuse term 86 fed from 10amp fuse term 85 to ECU pin 4 term 87 to ECU pin 28 and also to Lambda relay term 86 Lambda relay term 30 fed from 10amp fuse term 86 fed from ECU relay term 87 term 85 to ECU pin 36 term 87 into engine loom to Lambda sensor heater Fuel pump relay term 30 fed from 10amp fuse term 86 fed from 10amp fuse term 85 to ECU pin 20 term 87 to fuel pump (or via inertia immobiliser switch) Cheers Andy

-
Yes please Bob. PM sent.
-
Has anybody got an old Robin Hood nosecone badge lying around? The metal enameled type, but don't mind if it is the original yellow archer or the later RH Sports Cars one with flag. Cheers, Andy
-
Yes a small meet but a great drive cross country in the sunshine there and back.
-
Removed duplicate post!
-
Yes Dave that was me. Was on my way up to Stibbington Diner on A1 near Peterborough for their monthly classic car meet. Met up with Al Richey there for a coffee and look around the cars. First run out of the year in the car after doing some winter mods. And boy was it cold this morning but wrapped up warm it was a great drive in the sun.
-
I'm up for that one Al. Will give me a good run out to test my rebuilt cooling system. Andy
-
The build videos for the similar 2B are on YouTube http://www.youtube.com/playlist?list=PL9qrNZjmGh8M7oESfvvuf3bIBqoyvnsen Not sure if the Superspec videos are uploaded anywhere - perhaps someone else can comment.
-
I got an outdoor cover from CBS early in 2016. The small size fits my Superspec just nicely and has a sort of soft flock inner lining. It has attached straps with buckles but I've never used those, preferring to hold the cover on securely with long bungees. https://www.carbuildersolutions.com/uk/outdoor-car-covers After 2 year's continual outside use I've found it's not completely waterproof as after heavy rain the outside goes darker grey where it has absorbed some water, and the body underneath shows a little wetness. Unfortunately the slight seep-through the material has meant my chrome headlamp cowls are now showing signs of rust. Annoyingly they are the only part of the Superspec not stainless steel or glass fibre.
-
I'd say it was definitely the stainless steel chassis as used for the Superspec. It's got the diagonal bracing tubes in the sides, and the extra tube that goes round the engine. You can also see the double triangular plate wrapped round the centre of the front engine tube where the Rover engine mount fits. (I know 'cos I've just had my plate replaced!)
-
The stainless steel tubing used for the Superspec chassis was 304 grade, 38mm od and 2mm wall thickness. They are pretty meaty, and as Al says, not known for problems. The chassis on my car (2003 kit) still looks pretty clean with virtually no rust or tarnish apart from the weld areas.
-
Ed Ive always had one exhaust tailpipe blocked up. That was one of the first things I did (on Als recommendation) last year, so dont think that had much effect on the popping. Since the rebuild the popping on overrun has just about gone although I can still hear the occasional quiet pop. Ive only driven a couple of hundred miles since the rebuild so need to get some more miles under my belt to really check it. When the weather warms and dries up a bit Ill get out there and check all the exhaust joints again to see if they still show any signs of leakage.
-
Big thanks to Kevin Booth for getting a new stainless steel bracket laser cut, and then coming round this morning to weld it on for me. Now sorted. Thanks Kev.
-
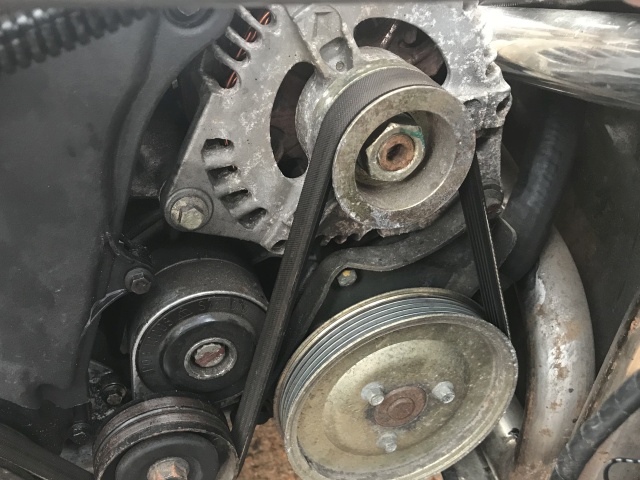
Unless yours has been changed, the standard alternator on the Rover 420/820 was a Lucas or Magneti-Marelli A127i 85amp. This is one on my car if it looks the same?
-
Great. Nothing to worry about then after all.
-
Kevin, thanks for the offer, but Im not sure it would show anything in just a few days. I understand the hoses degrade slowly over time. Andy
-
That sounds promising with no damage happening from normal usage. Although I suspect Samco hoses might be higher quality than the ASH hoses if price is anything to go by. Id thought of waterless coolant, but expensive to waste judging by the number of times Ive had to drain and refill my cooling system in the past year!
-
Hi Kevin, Yes that was one of the pages I found which got me thinking. I don't think I can use a different antifreeze, as the Rover T-series engine is mixed metal and the workshop manual (and the Halfords selector) recommends OAT antifreeze. I looked at fluoro lined silicone hoses but they are 3x the price and not all shapes are available, so that rather puts them out of reach. I just wondered if anyone had used normal cheapo silicone hoses, eg from ASH, with OAT antifreez and whether they'd had any adverse effects? Andy
-
I'm replacing part of the cooling system hoses on my Rover engine where one of the bends has been rubbing, and to redesign the expansion bottle system. I was about to get some silicone hoses to replace the rubber bits and pieces I've got, but I've just read on a couple of websites that silicone hoses shouldn't be used with OAT antifreeze. Apparently it degrades and perishes silicone hoses quickly. Is this true? Anyone have any experiences? Should I stick to rubber hoses? Andy
-
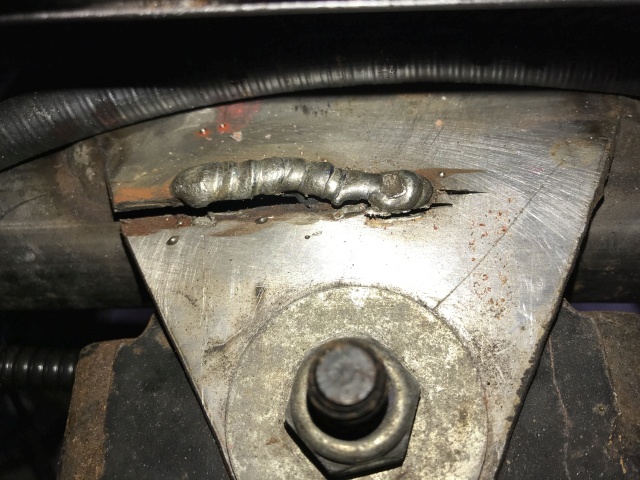
Hi Kev, yes it does look bodged even to my inexpert eye and not surprising it failed. Im quite willing to cut the old L shaped bracket off completely, and I could get some stainless to make a new one, but I will still need someone to weld it on for me.
-
Bob unfortunately I cant weld and have no equipment, so doing it myself is out the question. I need someone with the skill and equipment to do it for me.
-
Hi Ivan. Got your photo thanks. Interesting that your bracket split on the vertical part of the plate below the cross tube, whereas mine is going on the horizontal bit before it wraps round the tube. The plate is obviously not strong enough to take the loads, or else the two horizontal and vertical mounting bolts on the engine mount are not well aligned and put the bracket under strain. My bracket has been bent to fit. Did you make your extra bracket out of stainless?
-
I've discovered that the front engine mounting plate on my Superspec chassis has a large crack. It's a large 3mm stainless steel triangular plate welded onto the front stainless chassis tube. The crack needs welding closed and I'd like to get a reinforcing plate welded on top, as it looks like a repair has been attempted before by previous owner that's now failed. I've asked at a few local places that do body and car repairs and light engineering, but no-one is interested. They say they don't/won't/can't weld stainless steel. So what sort of place should I be looking for that is willing and able to weld stainless steel? Anyone know anywhere in the Bedfordshire area? I'd prefer a mobile service as I think I'm going to have to remove the radiator for access which makes driving anywhere difficult. Andy
-
Great. Thanks everyone. Just wanted to make sure I wasn't going to cause problems by changing everything to 32mm.