Longboarder
 RHOCaR Member
-
Posts
8,200 -
Joined
-
Last visited
-
Days Won
70
Content Type
Profiles
Forums
Events
Store
Community Map
Everything posted by Longboarder
-
I was hoping for a more sophisticated version of the early hands free bluetooth thingies. Ebay at £20 would be about right. I wasn't planning on changing the radio at £300! Or buying a new car that's got the bits in it at £25000!! Nigel
-
I have a lot of stored pics and diagrams somewhere on the board. I can view them which is not much use to anyone else cos I drew them and know what's in them. I have had a hunt to see if I can see anyone elses stored pics and can't work out how. Probably me being dumb. Is it possible to view other members stored pics apart from in the relevant threads? Nigel
-
Being a bit of a dinosaur I don't quite keep up to date with the last 20 years of electronics. So I want to get in the car and use my mobile phone without having to stick an irritating bluetooth dongle in my ear when I drive 200 miles. Something to plumb into the car electrics would be nice so I just rest the phone in a cradle. Preferably without having to fiddle with settings. Samsung Phone with Android. If it mutes the radio and talks through the cars speakers that would be nice. What do I look for on ebay or wherever? Nigel
-
Agree with above. I assume you have the sierra semi trailing arms. You may still have the sierra rear springs and the dampers can be either attached to the original lower mounts and upper end to the side of the body tub or in the centre of the trailing arm 'dish' possibly with coilover springs. The latter is probably the best set-up. Upgrades are to better quality dampers, decent tyres and wedge shaped spacers to dial out the excessive rear negative camber. Nigel
-
Can you get it to a rolling road? If you do not have the mapping skills to fiddle with the ECU you need to find someone who does. Nigel
-
I would only look at 1 and 3. 1. Bike carbs with megajolt. Rolling road to set up the carbs and proper 3D ignition should result in a tractable and powerful drive. 3. Lurk on ebay to await a bargain when someone is selling throttle-bodies. Often come with all the bits and at a reasonable price. Your engine probably came with injectors which will do fine. Add in megasquirt and you know you have all the potential. Using the OE kit is a non starter and bike throttle-bodies are a bit of a bodge (or they were for me.) I always looked at them, thought about the steps in the manifold throat going from ally to silicon to ally again and wondered how much flow disruption there was. And the welded ugly butchered fuel rail to get the spacing right and wondered how much power I was wasting. Eventually bought ITBs. Despite being fuel injected for 10 years I still regard bike carbs highly. Budget adequate rolling road time. Perhaps even look at 1 as step 1 to be followed after a year by 3 as step 2 if you're not happy with 1. Nigel
-
You're welcome. With a bit of luck the squeal will be a bit of slack in the alternator drive belt rather than one of the bearings giving up the ghost. Nigel
-
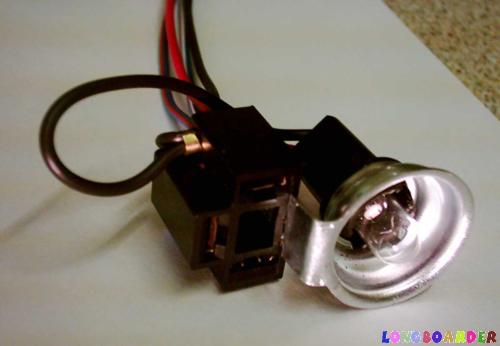
Headlights And Side (Iva Front Position) Lights
Longboarder replied to peter_m7uk's topic in Electrics
I think having sidelights is obligatory. I don't think you can just say the dipped heads are your sidelights. Many headlight reflector units have a non silvered area just below the main bulb, about 10mm in diameter and the bulb carrier can mount a separate sidelight bulb to shine through it. Pic below. Nigel
-
MoparAl, that's the symbol to show the crank sensor cable is a screened cable. There are two wires inside it which connect the sensor to the ECU and the cable is wrapped either in a built in wiremesh or metal foil, which is connected to earth at one end of the cable only. Object is to screen the two inner wires from picking up any extraneous electrical signals and keep the sensor signals 'clean' for the ECU to read. Very unlikely that's anything to do with your problem. Nigel
-
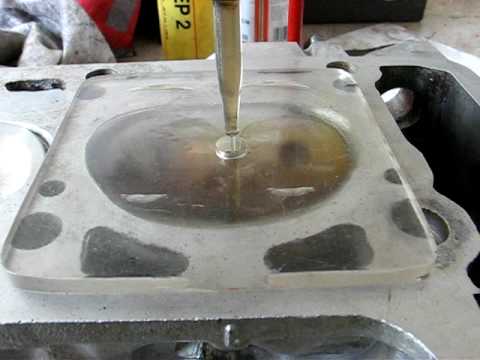
GeofP. Can I recheck with you the method of measuring combustion chamber volume. This is critical as to wether this head is not practical. 38cc is too small.; However 45cc is OK with a standard head gasket. Chamber volume is possible to measyre accurately if you lightly smear each valve seat with vaseline and then use a greased flat plate to almost close off the head surface leaving a small hole to allow you to squirt in the liquid. You should do all chambers in turn. Doesn't have to be with perspex as shown nor with a central hole drilled although it is nicer doing it that way. Usually done with paraffin as it flows nicely. Don't forget the combustion chamber volume includes the bit in the cylinders with the piston at TDC and a bit for the head gasket. Nigel
-
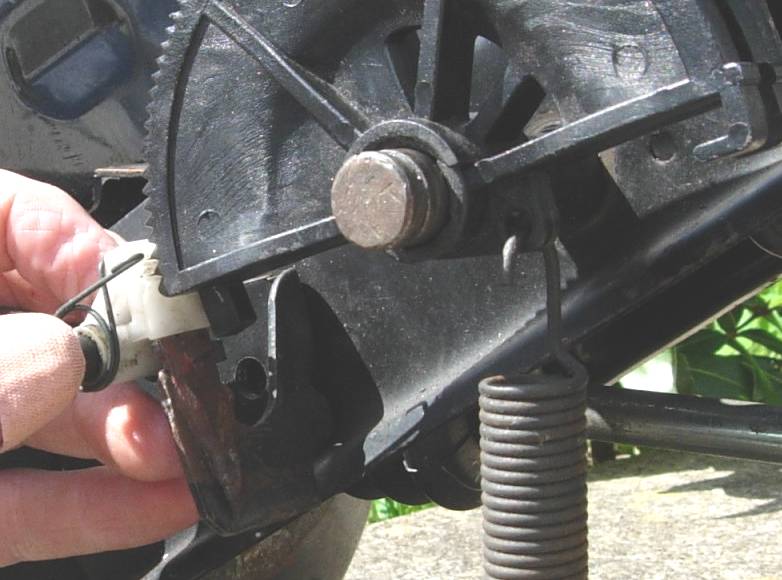
The quadrant you have in the picture is as it should be (without the bolt). Your pic does not show the other part of the self-adjusting tensioning mechanism which is shown in the pic I have included. This bit has to be present to lock the quadrant and pedal together so they move as one. My pic shows the positions, but the pedal and its cage are absent. The little toothed pawl sits in the pedal cage. The tongue attached to the side body of the main mounting cage is there to lift the toothed pawl out of engagement to allow the quadrant to rotate free of the pedal position when you fit a new cable. To free the pawl the pedal is pulled back toward the steering wheel. A length of rope will do this easily. If the pedal is not locked to the quadrant then this mechanism is not operating correctly, the teeth on the pawl have worn or the spring has failed or it's been removed. So quadrant looks OK. You need to check the toothed pawl. Nigel
-
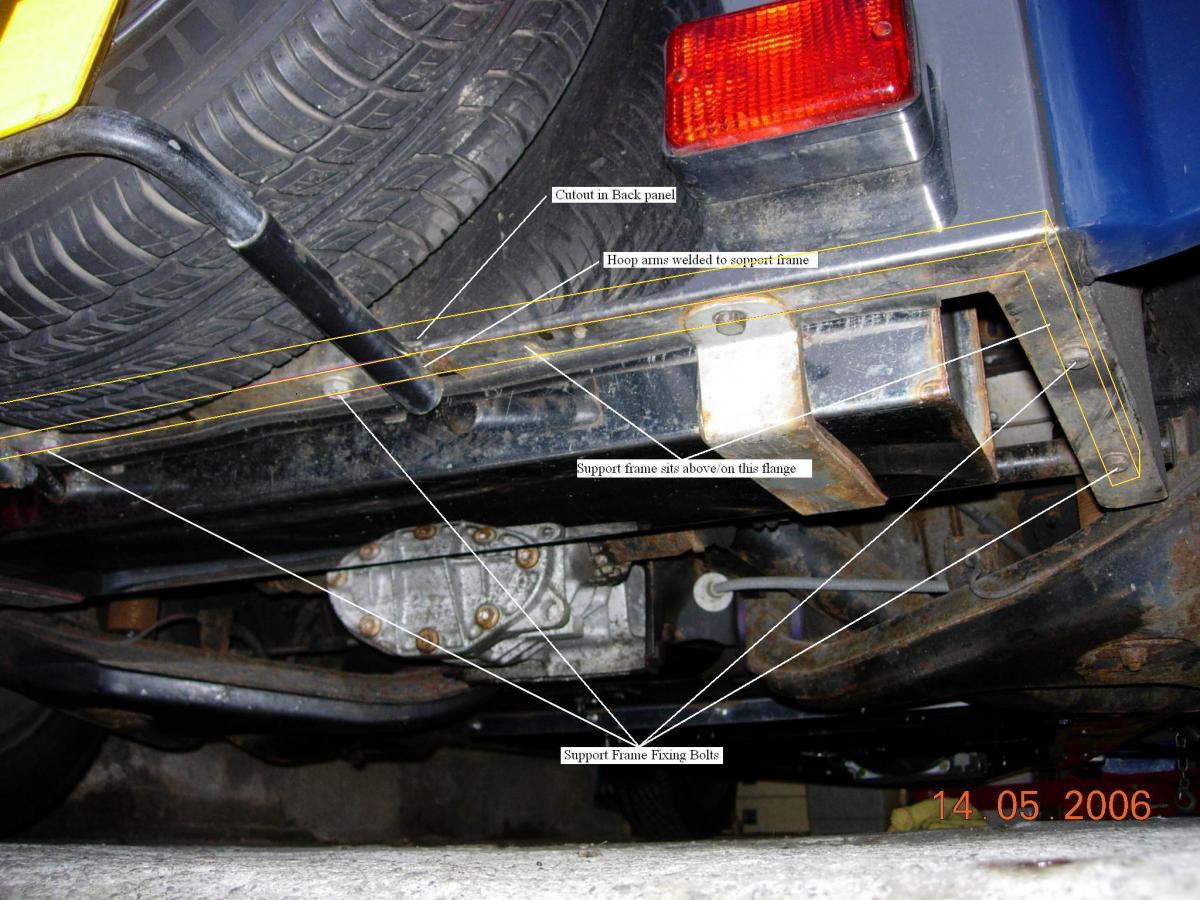
I found an old pic of mine. I put a frame round the inside of the back and side panel lip for a bit of extra strength and support of the spare wheel hoop. But the tank and one mounting strap is clear. Nigel
-
Excellent mod for a seven is a viscous slipper but they are getting rarer and expensive and the push-in shaft ones are like hens teeth. Be not dismayed however because it's easy to change the inner tripode joint on the driveshafts to take a lobro so you have a hybrid type that bolts up to a flanged diff. Job done. Of course if your donor had a disc rear end then you should have lobros already. Nigel
-
I would do more than three times on the basis you don't want to miss a small leak by taking too small a sample. Test is sensitive and a negative is very reassuring. So it's probably airlocks in the system and the system is not self purging air as it heats up and then refilling with coolant on cooling down. Must be drawing air back in as it cools. Nigel
-
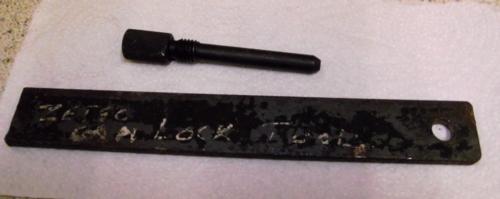
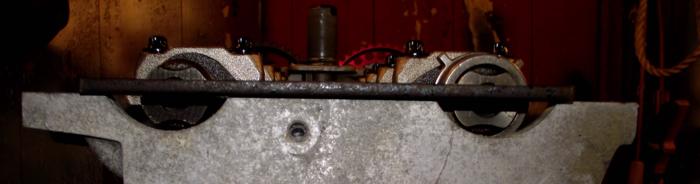
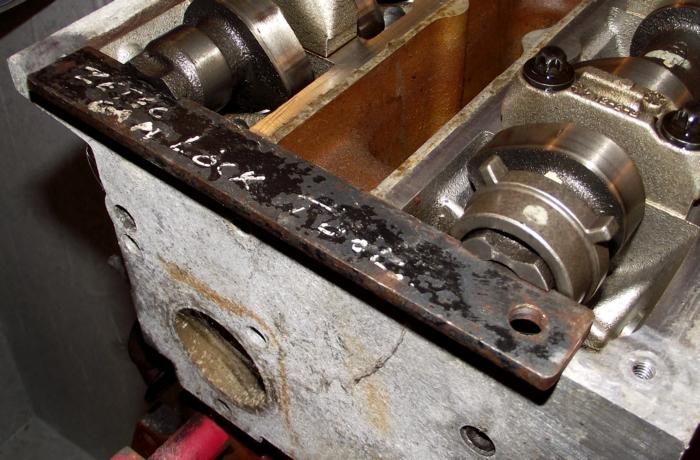
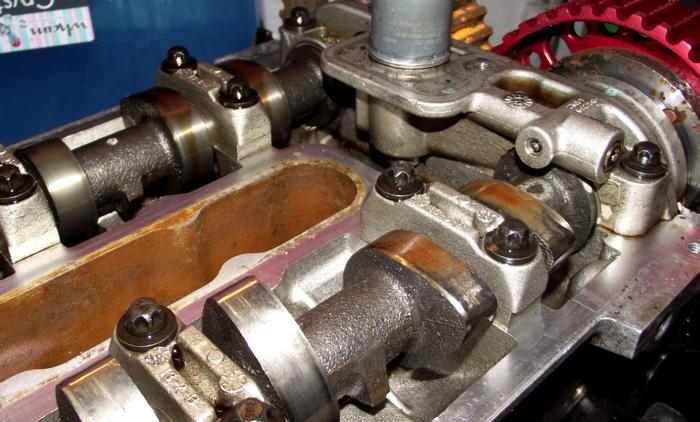
OK. You need to get accurately to TDC for No 1. Best way to do that is to use the TDC pin which is a special tool that screws into the side of the block beside the crank ventilator take-off point. Looks like pic 1. Next is to slacken the cam wheel bolts and as tractor says the inlet one is accessed by removing the bolt that looks like it is the correct one but is just a chamber cap in the centre of the inlet cam wheel. With it out the cam wheel bolt proper is exposed. With the engine at tdc use an adjustable spanner to turn the cams till you can tap a 5mm bar in the slots of the cams like pic 2. No need to slacken the cam belt tensioner. Then tighten the cam wheel bolts. The 5mm bar will snap one of the lobes off the back of the cam so you must use an adjustable or big spanner (26ish mm) to hold the cam between lobes 2 & 3 while you tighten the cam wheel initially with the bar in place till its tight enough to hold the cam wheel steady. Then torque up, holding the cam with the big spanner/adjustable. I will look up the figures in a mo. Sorry. Taken an hour to unearth the engine and get suitable pics. No cam belt on and vernier instead of VVT but the cams are standard ST. Pic 4 is just the cams at N01 TDC but shows the crude lumps between lobes 2 & 3 that you can get a spanner on to torque against. Inlet cam bolt 120NM. Exhaust cam bolt 68NM Zetec Timing kit available from parts shops that stock laser tools. Quite commonly available. Nigel
-
No power to the cam solenoid allows it to fully retard under the influence of the internal spring in the inlet cam pulley and oil pressure. This is the position it would be in for starting when it was in a focus ST. Constant power to the solenoid fully advances it, a position it never reaches in the focus. Most advanced it gets is about 25deg. Nigel
-
Eureka! No! VVT with a 12v feed to the solenoid will run at full cam advance. That's 30deg of cam advance/60 deg on the crank. It will be an absulute b*stard to try to start it like that and will run like a dog. I ran for a while with fixed cam advance of 23deg which worked very well, (better that bang bang switching of the cam) and had been on the rolling road several times to refine fuel map, ignition and all the other variables was still very fiddly to start. Fine once hot. If you are as your post implies running with the solenoid activated then I'm not suprised you can't start it on new carbs which are only approximately jetted. Leave the cam solenoid disconnected, use a bit of easy start to blow the carp out of the engine and see how it goes. Leave the VVTPro disconnected for now. Nigel
-
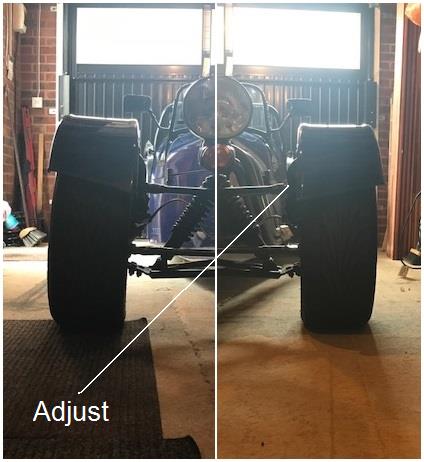
Camber of 1.5deg neg is a good ball park figure for the front wheels I would suggest. Ideal is to have a camber gauge and set both to as close to -1.5 as you can but if doing it by eyeI would do one turn in on the left front to start with. Bolt up and stand back and look. If you then have 1-2deg neg on the left but more on the right you can consider winding a turn out on the right if needed. (Sadly few of us would be able to tell the difference driving between 0 and 3 deg neg. Maybe I speak only for myself there?) Nigel
-
Good price. Automatic, so the buyer would need a new crank sender and crank sender housing. Can only be fitted when the flywheel is off. Nigel
-
Might be an idea to recheck the basics. You can check timing with a timing light. Have to bolt on a pointer close to crank pulley, find TDC with number 1 plug out, put a dot of tippex on the pulley next to the pointer and pick up off the HT leads in turn just to check they all fire and 1 & 4 do it in time with the TDC mark and 2 & 3 dont. Rev it and you can see if it advances. Also easy enough to check cam timing. TDC again and a bar fits in the cam slots. I'm thinking that even if one of the carbs is duff it should run on two pots. Maybe a little rough!!! Just wondering if somethings slipped or theres a crossed wire in the ignition. However sooty butterflys in only one carb do seem to point to that carb. May be untrue. Nigel
-
I see what you mean although they are not quite the same viewpoint. I agree with Richard. Unbolt the left top arm outer balljoint from the dummy strut, slaken the locknut that holds it the end of the wishbone and turn it one full revolution in to the wishbone to give more negative camber to the left front wheel. Bolt it all up again and take a look. I believe you get about 1.5 degrees change for each revolution. Might need two turns? Nigel
-
The idea is to allow whatever gas is making up the bubbles to bubble through the blue test liquid. You should not mix it with the coolant or let it be contaminated by the coolant. Ideal is to draw off some coolant from the top of the rad so no coolant blows/expands into the test vessel. Connect a tube from the rad cap neck and lead it into the vessel containing the test liquid. With a plain cap on the rad if you have one or the usual cap but the lower seal lifted to allow easy escape of the bubbles run the engine and let the escaping gas bubble through the test liquid for a few minutes. The liquid goes paler and then orangey/yellowy/pale brown if it detects exhaust gas in the bubbles. This confirms head gasket blown. If it stays blue then gasket not blown. Nigel There is a special 'test-tube' with a rubber bung that you simple add the liquid to and insert in the radcap neck, once again having removed some coolant.
-
Unless you have a very difficult plumbing prone to airlocks the simplest way to rid air from the system is to let the car run on the drive with the cap off till it gets very hot, all the while standing by with a can of water and keep on topping it up. Eventually the bubbles stop if they are trapped air. If it's a head gasket then they keep on coming. Nigel
-
Crude but you can use paint to resize pictures. Open in paint. Click on 'select' box and choose 'select all'. Click on 'resize' and insert percentage reduction you want, say 25 into the box. Paint automaticaly maintains aspect ratio. Save as and give the pic a new name. Nigel Or you can use a purpose made picture reducing programme like the one Matt Augier once made available to members which I have saved and jealously guarded since Win 98SE and still works fine on Win 7. Which is why all my pics are around 50meg and still visible. Never did like photobucket!
-
Can you confirm that under the lid/inside the expansion bottle the tube going through the lid extends to the bottom of the bottle? If it does then you should have a working spit/suck system. If not then the system will not bleed air and will be prone to airlocks. Nigel