Sparepart
 RHOCaR Member
-
Posts
351 -
Joined
-
Last visited
-
Days Won
14
Content Type
Profiles
Forums
Events
Store
Community Map
Everything posted by Sparepart
-
Just a thought while the pre lunch fizzzz is in the grey matters .... why not take the fan switch and put it in with your boiled egg tomorrow and check that it switches on before the egg is ready?
-
Random, I am really interested to know how you have/are connecting the ESC2 into your loom and how much of the Ford donor loom you are using. Especially whether or not you are following the diagram referenced earlier in this post at:- https://nw.rhocar.org/Ford ignition systems.htm I am still using the whole of engine bay loom from the donor as fitted on the Sierra, and there are several more components in the original loom that do not appear in the simpler circuit shown in the diagram. Looking at the circuit diagram in the Haynes manual, there is another relay, a couple of suppressors and a connection from the power hold relay to pin 8 of the ESC2 module. I am thinking that if your simpler loom works then I might be able to remove some wires and a relay from mine.
-
Welcome. These "kits" are not like your high end ones (Caterham etc.) they are better (arguably) than starting with drawings and a welder but not much more. Were many other parts included in what you purchased?. You will notice from the build manual kindly provided by dandan62 that it has the air of a "suggestion" rather than an itemised A fits into B using the supplied bolts type of instruction list. Sometimes there are not even holes, and their exact position is a matter of your judgment. This is the attraction of these kits, they make you think, and when you succeed in getting things done, there is a real sense of engineering achievement. The previous builder has done some of this already, using his/her skills, so I think now would be a good time to assess the quality of the existing construction. Simple but important things like are the wheels aligned and positioned satisfactorily ?. Also the rear part of the car which is a "sales feature" being held on by "only four bolts" (quotes from the manual) is this nice and squarely mounted? and will the height of the rear part be ok with regs if you attach seat belts to it. It will be much easier to correct anything now, rather than later.
-
Just wondering what happens with emission testing at the next MOT after a change of engine ?
-
As well as retarding the ignition for a cold engine, the temperature is used to apply choke, and turn on the manifold heater. So it's pretty important.
-
At the risk of seeming patronising, it is essential to have good connection for the thick power cables that are used to feed the starter motor. Disconnect the battery at the negative terminal and follow the path of the connections from the positive terminal to the starter motor. I would pull apart each connection that is not permanently joined and clean the mating surfaces until bright and shiny before rejoining. Then smear vaseline on the outside to ward off dampness. Then do the same for the path from the starter motor back to the negative of the battery. This may well include a good thick "Earth Strap" between the engine block and the battery -ve, and the chassis and the battery -ve. Apologies if this is obvious and I seem to be stating the obvious. The other thing that is interesting in your account, is that you have spark at all but one cylinder and yet the engine shows no sign of starting ? at all? so how have you ruled out no fuel?
-
I have the luxury of a copy of the Haynes Service and Repair manual .... I found a copy on line some time ago... I am rebuilding using the original Sierra Gia model loom that had ALL the bells and whistles. I don't need most of the wire, but I am too cheap to just throw it away and buy a new purpose built loom. So I have been pruning literally pounds of weight out of the mass of wires, and in doing so have had to take care not to remove something I need. So to get to your questions. The manual says the Power Hold relay allows the stepper motor (it's what operates the choke) to operate for a short time after the ignition has been turned off, to ventilate the manifold and deter the engine from "running on". Running on is what it says, you turn off the ignition but the engine keeps running for a while, very annoying. As for your temperature guage question. There are two temperature sensors shown in the manual, I did not look on my engine because it's all wrapped in cling film at the moment. In Chapter 3, page 3.8 picture 16.3a shows a sensor screwed into the block just opposite the dizzy cap. This is the one that runs to the guage, in the wiring diagram it is item 30 "Coolant Temp Sensor". The other sensor, the one for the ESC module is item 58 "Engine Coolant Temp. Sensor" its located in the underside of the inlet maniford (Page 5.20, picture 19.4) it's a bigish plug just above the oil filter.
-
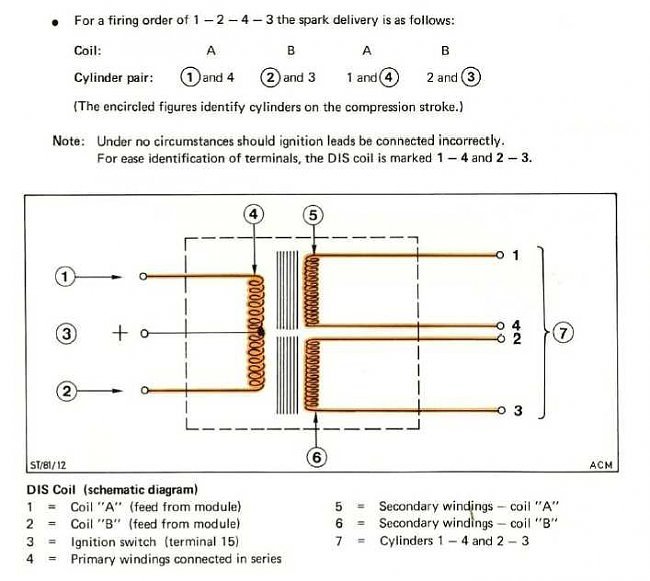
To answer your coil pack question. I think that I have found the circuit diagram, for the "Wasted Spark" pack used with Zetec ignition systems:- I assume you are measuring the voltage between 1,2,3 and a good earth (-ve). Pin 3 should be the same voltage as is coming from the ignition switch (terminal 15), I would have expected 12 volts. Pins 1 and 2 will be almost the same voltage as pin 3 because the primary windings are not big resistances. Also you say that only one cylinder seemed to have no spark ?. This would be unusual with this pack, as two HT leads should spark at the same time. One for a cylinder at top of compression and the other at top of exhaust.

-
Please, put me down for the modified wipers, and pm me with payment details when you can. Cheers Jan.
-
Thanks for the explanation.
-
I am left wondering how I missed your post. I have been trying to at least read posts by looking at the activity on the portal page. I have just searched for posts with "banger and cash" or "bangers and cash" (all words in content) and it did not list anything from you on Tuesday. If you have the time, can you indicate which forum you used, so that I can figure out why my search is failing. This will help me get better at finding other things, mostly historical, in which I am interested, and avoid bringing up subjects that have already been done and dusted.
-
No comment on your question. However in marketting circles, this valuable extra would be seen as a "Range Extender" enabling you to go where no one has gone before.
-
I know it's short notice if anyone wants to do anything, however I noticed a 2B for sale by auction at Mathewsons. Maybe it is from one of our members? ..... here is a link direct to the entry. There is a video to look at. https://mathewsons.co.uk/auctions/auction-dates/vehicles/16065-1989-robin-hood-2b Auction is tomorrow and Saturday!
-
Very slick. Seperate filler ? do you think that you will need to take precautions not to get air into the system if you do really run the main tank dry which I assume is what you are anxious about? When I were a lad, a family friend had a really basic Beetle, no fuel gauge, but a reserve tank switched by a knob near the base of the gear stick. I seem to remember a bit of really rough engine, rocking and backfire, only for a short time though.
-
The Haynes manual has some notes about these bolts. There are two different sorts. I attach a snippet from the manual. Yours look like Type Y bolts which are the higher tensile bolts 80 - 100 Nm on torque.
-
I'm no expert, however, a brand new fully charged car battery has thick electrodes and strong sulphuric acid. The energy is in the acid. As current is drawn the atoms on the surface of the electrodes migrate into the acid. The acid gets "weaker" and becomes more and more a salt. When the battery is charged the current returned causes the electrode atoms in the salt to return to the electrode surface. These two processes take their turns as the battery is discharged and charged. In a perfect world this would go on for ever. In reality, slowly, less and less of the electrode surface is returned because the atoms dont bind well with the surface and fall to the bottom of the cell and so loose electrical contact other atoms also tend to contaminate the surface. Also the structural integrity of the electrode is compromised and it becomes more fragile and brittle. The electrode is organised as a series of thinnish parallell plates to maximise surface area to be able to generate large currents on discharge. Unfortunately the currents also unleash magnetic forces between the plates, so they have a tendency to twist. Each cell creates a little over 2 volts of potential, there are 6 cells, each cell has two multiplate electrodes. The battery manufacturer wants to make as much profit as possible, so the construction of the cells and the thickness and purity of the plates and acid are all at a minimum to satisfy the spec and "lifetime" guarantee. Put this all together, and you can see that Voltage by itself is no guarantee of the state of the battery. Yes if one cell should fail, the voltage will drop immediately but its the voltage under load that is more important. A geriatric battery can fail suddenly because a trauma has caused a plate to fall to pieces or a plate to go short circuit to the opposite plate or if the high current magnetic effect causes the same things. An old battery starting a big engine on a cold morning is as deadly as CORVID19 to it. Charging does not help because the electrode surface area is too small to generate enough current. Still after all this babble, how can you tell if it's a good battery ?, the best way is by owning it from new and noticing how it performs, as it ages you will definitly see that it is more and more reluctant to get out of bed in the morning, treat it with respect, don't bump it or drop it, if you have to charge it, try and do it slowly and gently with care and respect. Then as it gets into old age be prepared to say goodbye and change it before the inevitable heart attack occurs.
-
I thought I could weld directly to the tank, however, with a trial piece of SS of the same thickness as the tank I soon found the limits of my MIG welding skills. The tank seams are welded by bringing the edges together as deep seams that are welded at the edge, this removes the problem of blow through and reduces potential warping.
-
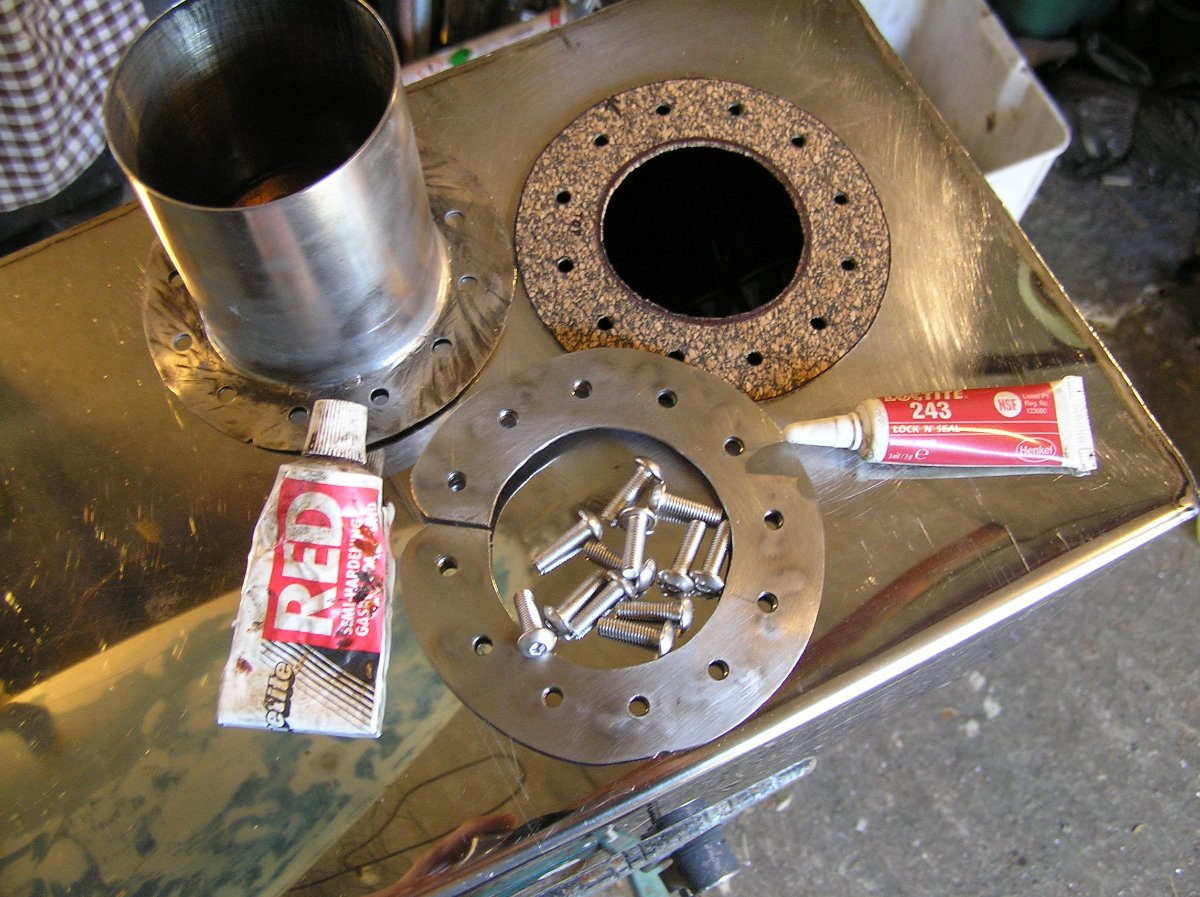
The Exmo that I am rebuilding had the same filler design using original Sierra grommet and filler pipe. It worked well for all the time I had it on the road. Dismantling for the rebuild I saw that the grommet had hardened and would need replacing, so I looked for a new one....... the cost as you have probably found is now north of £30 if you can find one. I resent having to pay lots for something so simple. So I have made and fitted my own filler pipe by making a flanged tube and bolting it to the tank. I copied an idea I saw for sale on the web for ones made in aluminium, but wanted stainless steel. I do have a welder, and probably spent more than £30 in the end if you consider time and trouble etc. Here is a photo. The ring that goes inside the tank has nuts welded beneath. I have not filled the tank yet ...........
-
Thanks for the snap of the tie bar, also searching for "Steamer" in the forums gives loads of useful references to EXMO mods of all sorts. I also notice that your Exmo does not have a windscreen, do you plan to fit one ?
-
Thank you for posting the shots of the strut top mods, even better, I see you made a tie bar conversion, something else that I am considering.. any piccies of these, at some stage would be nice, no rush, it's nothing I am going to do imminently... now its getting cold in my garage.
-
I'm rebuilding an Exmo also, will keep an eye on your build, good luck! I notice you have chopped off the ends of the suspension "arms" so you can have cycle wings. I have standard system and am looking at the problem with the strength of the arm around the top mount for the strut. When you get to it I'd like to know if you took any steps to strengthen this area and use a taper bearing perhaps.
-
Thank you for that mouse clicking exercise .... does it feel good to expose yourself to a wider audience? Soon we will be seeing all about your invovment in the PPE fiasco. Seriously though I hope you do get the chance to tell the real story and don't forget royalties!.
-
Before I fitted the pillars I made an outline drawing on a piece of A3 paper. That is I plonked one on the paper and drew around it. I used the drawing to calculate the angle via triangulation. I have made a PDF of the drawing. If you have access to an A3 printer then you too can have the outline. I attach the PDF here. Ignore all the dimensions, they are for the right angle trianges I made to derive the slope. The outline is obvious, and an A3 "actual size" print will be the actual outline. Both pillars are the same. I cant see why you could not get hold of some thick sheet steel, and cut them out yourself, the ones that came with the Exmo were just thick mild steel, very roughly cut out with plasma. On the other hand, if you decide to go this way you will face the task of forming the triangular part to the scuttle contour. This is not easy. AND as you already have a screen fitted, you have the added constraint of not wanting to move the base line of the screen. I notice that you have only two bolts between the pillar and the scuttle sides, some freedom for new holes. I guess in the end you have to weigh up the hours of work involved in fitting different pillars against your other alternatives. Windscreen-Pillar-A3-Actual-Outline.pdf
-
If it helps, like Brumster, my Exmo pillars are not the same as yours, I have mesured accurately and done the old SOH CAH TOA calculation I learned in school, they all come out at 65 degrees, between the "base" and the pillar.
-
While we are on mouse stories. My next door neighbour used poison, while I was using traps. A while after there were no more mice in traps or signs of droppings or gnawed bags of flour etc. I noticed a bad smell whenever I took a shower, at first I thought it was usual BO ... but one morning the smell made my eyes water. I investigated in the loft, as soon as I stuck my head through the trap door the smell was like a wall. Torch in one hand, cloth over my nose and mouth with the other I picked my way over the joists to the large header tank and peered over the edge to see a decomposing bloated mouse at the surface. Returning with a plastic bag I tried fishing it out by the tail, but the tail just came away, returning with latex gloves I scooped as many of the bits out as I could, all the time causing fresh waves of obnoxion. Obviously I had to disinfect the system and then flush many times before using it. Now, years later, I still have a good sniff of any shower water before I get under it, not just in my house, anywhere.